.NET MAUI Scheduler Appointments Styling
The Scheduler for .NET MAUI control makes it easy to customize the look & feel of the appointments.
Scheduler exposes an AppointmentStyleSelector (type Telerik.Maui.Controls.IStyleSelector) property which conditionally applies different appointment styles depending on some logic.
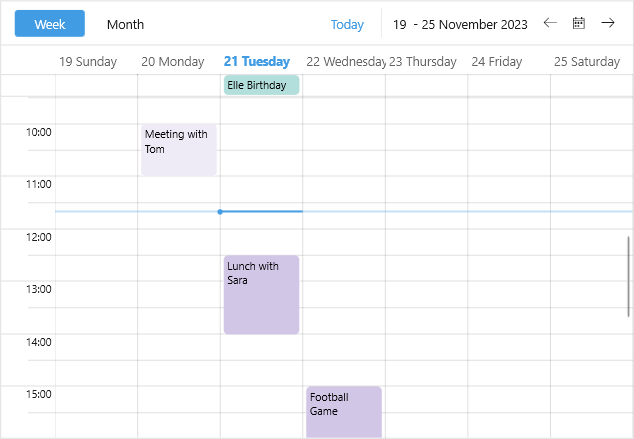
In the example below the custom AppointmentStyleSelector applies separate style to past and future appointments.
1. Create a custom Style Selector class:
public class CustomAppointmentStyleSelector : IStyleSelector
{
    public Style AllDayAppointmentStyle { get; set; }
    public Style ExpiredAppointmentStyle { get; set; }
    public Style OngoingAppointmentStyle { get; set; }

    public Style SelectStyle(object item, BindableObject bindable)
    {
        var appointment = (item as AppointmentNode).Occurrence.Appointment;

        if (appointment.IsAllDay)
        {
            return this.AllDayAppointmentStyle;
        }
        else if (appointment.Start < DateTime.Now)
        {
            return this.ExpiredAppointmentStyle;
        }
        else
        {
            return this.OngoingAppointmentStyle;
        }
    }
}
2. Add the style selector with the corresponding styles to the page resources:
<local:CustomAppointmentStyleSelector x:Key="CustomAppointmentStyleSelector">
    <local:CustomAppointmentStyleSelector.AllDayAppointmentStyle>
        <Style TargetType="telerik:AppointmentView">
            <Setter Property="BackgroundColor" Value="#B2DFDB" />
            <Setter Property="SubjectTextColor" Value="Black" />
        </Style>
    </local:CustomAppointmentStyleSelector.AllDayAppointmentStyle>
    <local:CustomAppointmentStyleSelector.ExpiredAppointmentStyle>
        <Style TargetType="telerik:AppointmentView">
            <Setter Property="BackgroundColor" Value="#EEEAF6" />
            <Setter Property="SubjectTextColor" Value="Black" />
        </Style>
    </local:CustomAppointmentStyleSelector.ExpiredAppointmentStyle>
    <local:CustomAppointmentStyleSelector.OngoingAppointmentStyle>
        <Style TargetType="telerik:AppointmentView">
            <Setter Property="BackgroundColor" Value="#D2C6E6" />
            <Setter Property="SubjectTextColor" Value="Black" />
        </Style>
    </local:CustomAppointmentStyleSelector.OngoingAppointmentStyle>
</local:CustomAppointmentStyleSelector>
3. Define the Scheduler with the AppointmentStyleSelector applied:
<telerik:RadScheduler x:Name="scheduler"
                      AppointmentStyleSelector="{StaticResource CustomAppointmentStyleSelector}">
    <telerik:RadScheduler.ViewDefinitions>
        <telerik:WeekViewDefinition />
        <telerik:MonthViewDefinition />
    </telerik:RadScheduler.ViewDefinitions>
</telerik:RadScheduler>
Check the result on Windows below: