New to Telerik UI for .NET MAUI? Start a free 30-day trial

Appointment Template

Scheduler for .NET MAUI provides the option to apply a DataTemplate to the Appointments for all the views. You can easily set a Template or TemplateSelector to the appointments through the AppointmentTemplate property:

  • AppointmentTemplate(DataTemplate)—Defines the template of the appointments.

Here is a quick example how to apply a custom slot template to the Scheduler:

1. Create a custom DataTemplateSelector class:

public class CustomAppointmentDataTemplate : DataTemplateSelector
{
    public DataTemplate AllDayAppointmentTemplate { get; set; }
    public DataTemplate AppointmentTemplate { get; set; }

    protected override DataTemplate OnSelectTemplate(object item, BindableObject container)
    {
        var appointment = (item as AppointmentNode).Occurrence.Appointment;
        if (appointment.IsAllDay || (appointment.End - appointment.Start).TotalDays > 1)
        {
            return this.AllDayAppointmentTemplate;
        }

        return this.AppointmentTemplate;
    }
}

2. Add the template to the page resources:

<local:CustomAppointmentDataTemplate x:Key="CustomAppointmentDataTemplate">
    <local:CustomAppointmentDataTemplate.AllDayAppointmentTemplate>
        <DataTemplate>
            <telerik:RadBorder CornerRadius="4"
                               IsClippedToBounds="True"
                               BackgroundColor="#B2DFDB">
                <Grid>
                    <BoxView WidthRequest="4"
                             BackgroundColor="#00897B"
                             HorizontalOptions="Start" />
                    <HorizontalStackLayout Spacing="4"
                                           Margin="6, 0, 4, 0">
                        <Label Text="&#xe83a;"
                               FontFamily="TelerikFontExamples"
                               TextColor="#00796B"
                               VerticalTextAlignment="Center" />
                        <Label Text="{Binding Occurrence.Appointment.Subject}"
                               TextColor="Black"
                               VerticalTextAlignment="Center" />
                    </HorizontalStackLayout>
                </Grid>
            </telerik:RadBorder>
        </DataTemplate>
    </local:CustomAppointmentDataTemplate.AllDayAppointmentTemplate>
    <local:CustomAppointmentDataTemplate.AppointmentTemplate>
        <DataTemplate>
            <telerik:RadBorder CornerRadius="4"
                               IsClippedToBounds="True"
                               BackgroundColor="#D2C6E6">
                <Grid>
                    <BoxView WidthRequest="4"
                             BackgroundColor="#8660C5"
                             HorizontalOptions="Start" />
                    <Label Text="{Binding Occurrence.Appointment.Subject}"
                           TextColor="Black"
                           Margin="6, 0, 4, 0" />
                </Grid>
            </telerik:RadBorder>
        </DataTemplate>
    </local:CustomAppointmentDataTemplate.AppointmentTemplate>
</local:CustomAppointmentDataTemplate>

3. Add the Scheduler definition with the AppointmentTemplate applied:

<telerik:RadScheduler x:Name="scheduler" 
                      AppointmentsSource="{Binding Appointments}"
                      AppointmentTemplate="{StaticResource CustomAppointmentDataTemplate}">
    <telerik:RadScheduler.ViewDefinitions>
        <telerik:DayViewDefinition />
        <telerik:WeekViewDefinition Title="Work Week" IsWeekendVisible="False" />
        <telerik:MonthViewDefinition />
    </telerik:RadScheduler.ViewDefinitions>
</telerik:RadScheduler>

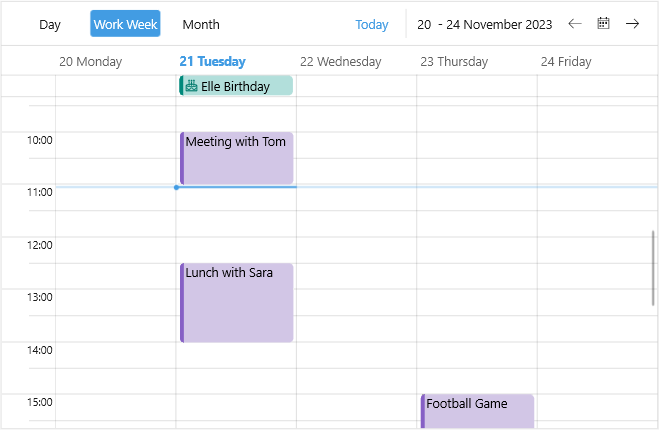
Check the result below:

Telerik .NET MAUI Scheduler Appointment Template

See Also

In this article