Swipe and Reorder Items
RadListView provides support for item drag gestures.
The drag gestures allow you to swipe the item left or right in order to show additional content. Also, if you drag an item top or bottom the items will be reordered.
Reordering
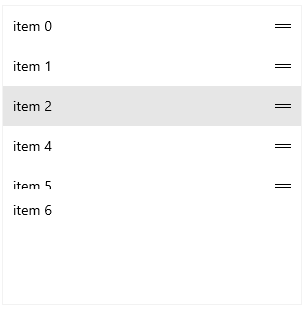
To enable the reordering feature, set the IsItemReorderEnabled property to True.
The reordering can be triggered with different gestures based on the used device and the reordering mode.
- In case you are using a touch device, the reordering is started with tap and hold. If the ReorderMode is set to Handle, the action starts on tap and move over the handle visual element of the item.
- In case you are using a mouse, you can start reordering by dragging an item with the mouse. If the ReorderMode is set to Handle, the action starts when the handle visual element of the item is dragged.
The ReorderMode allows you to define if you can interact with the whole item area when starting the reorder or a small handle element will be displayed in the item. The following modes are available:
- Default: The reordering starts with holding on the item.
- Handle: The reordering starts when the item is dragged using the reorder handle. The handle is visible only in this mode.
Example 1: Enabling items reordering and showing the reorder handle
<telerikData:RadListView IsItemReorderEnabled="True" ReorderMode="Handle" />
In case grouping or sorting is enabled, the reordering feature will provide only the drag visualization, but the drop action won't do anything. In order to make the items reorder also on drop, you will need to implement an ICommand and use it with a ListViewUserCommand that is called on the ReorderEnded action. This approach is demonstrated in the [#implement-custom-reorder-functionality] section of this article.
Swiping
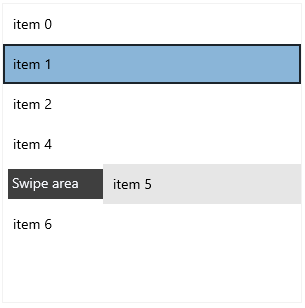
To enable the swiping feature, set the IsActionOnSwipeEnabled property to True.
The swiping feature allows you to move an item to the left or right. This offsets the item and displays an additional visual element where you can place additional content.
The swiping can be triggered with different gestures based on the used device.
- In case you are using a touch device, the swiping is started with a swipe gesture.
- In case you are using a mouse, you can start swiping by dragging the item with the mouse.
To define the content displayed in the swipe area, set the SwipeActionContent property of RadListView. The content covers the whole area of the listview item and it positions behind it. When you swipe to move the item, the SwipeActionContent is partially uncovered.
To determine the offset of the item after a successful swipe, set the ItemSwipeOffset property of RadListView.
To determine the minimum swipe distance (in pixels) that should be reached in order to create a successful swipe, set the ItemSwipeThreshold property of RadListView. In case the minimum threshold is not met after you finish the swipe (or mouse drag), the item will return to its normal position.
The item can be set to its default position with the EndItemSwipe method of RadListView.
Example 2: Setting up the swipe action
<telerikData:RadListView IsActionOnSwipeEnabled="True"
                         ItemSwipeOffset="100">
    <telerikData:RadListView.SwipeActionContent>
        <Border Background="#3F3F3F">
            <TextBlock Text="Swipe area" Foreground="#F7F9FE"
                        Margin="4"/>
        </Border>
    </telerikData:RadListView.SwipeActionContent>
</telerikData:RadListView>
Commands
The RadListView control provides number of commands that are executed when a certain gesture occurs:
-
ItemDragStartingCommand: Executed when the user starts dragging an item. The command parameter is of type ItemDragStartingContext and provides the following properties:
- Item (object): The interaction item.
- Action (DragAction): Specifies whether the action is related to reordering or swiping. The available values are { Reorder, ItemAction }.
-
ItemActionTapCommand: Executed when the SwipeActionButton is tapped. The command parameter is of type ItemActionTapContext and provides the following properties:
- Item (object): The interaction item.
- Offset (double): The current offset of the item.
-
ItemSwipingCommand: Executed while item is being swiped. The command parameter is of type ItemSwipingContext and provides the following properties:
- Item (object): The interaction item.
- DragDelta (double): The distance that the item has traveled.
-
ItemSwipeActionCompleteCommand: Executed when the swiping of the item has finished. The command parameter is of type ItemSwipeActionCompleteContext and provides the following properties:
- Item (object): The interaction item.
- FinalDragOffset (double): The final drag offset that the item will be positioned.
- DragDelta (double): The distance that the item has traveled.
-
ItemReorderCompleteCommand: Executed when reordering of an item has finished. The command parameter is of type ItemReorderCompleteContext and provides the following properties:
- Item (object): The interaction item.
- DestinationItem (object): The destination item, where the item being reordered has been dropped.
-
ItemTapCommand: Executed when an item has been tapped. The command parameter is of type ItemTapContext and provides the following property:
- Item (object): The item that has been tapped.
Read more about the commands available in RadListView in the Commands article.
Implement Custom Reorder Functionality
The built-in reorder functionality enables only the drag visualization of the items. There is no built-in action that reorder the ItemsSource items on drop. The following example shows how to implement and enable the drop action.
Here is the XAML definition of the RadListView. The view model class should be defined as a static resource.
Example 3: RadListView defined in XAML
<Grid>
    <Grid.Resources>
        <local:ViewModel x:Key="viewModel"/>
    </Grid.Resources>

    <telerikData:RadListView DataContext="{StaticResource viewModel}"
                                     ItemsSource="{Binding Items}"
                                     IsItemReorderEnabled="True">
         <telerikData:RadListView.ItemTemplate>
            <DataTemplate>
                <TextBlock Text="{Binding Text}"/>
            </DataTemplate>
        </telerikData:RadListView.ItemTemplate>
        <telerikData:RadListView.Commands>
            <telerikListViewCommands:ListViewUserCommand  EnableDefaultCommand="False" Id="ReorderEnded" Command="{Binding ReorderItemsCommand, Source={StaticResource viewModel}}"/>
        </telerikData:RadListView.Commands>
    </telerikData:RadListView>
</Grid>

<!-- where the telerik namespaces point to:
     xmlns:telerikDataControls="using:Telerik.UI.Xaml.Controls.Data"
     xmlns:telerikListViewCommands="using:Telerik.UI.Xaml.Controls.Data.ListView.Commands"
-->
Example 4: Model definitions
public class ViewModel
{
    public ViewModel()
    {
        this.Items = GetItems();
        this.ReorderItemsCommand = new DelegateCommand(ReorderItems);
    }

    public ICommand ReorderItemsCommand { get; set; }

    public ObservableCollection<Item> Items { get; set; }

    private ObservableCollection<Item> GetItems()
    {
        var items = new ObservableCollection<Item>();
        for (var i = 0; i < 3; i++)
        {
            items.Add(new Item { Text = "item " + i });
        }

        return items;
    }

    private void ReorderItems(object parameter)
    {
        var context = parameter as ReorderEndedCommandContext;

        var item = context.Item as Item;
        var destItem = context.DestinationItem as Item;

        int sourceIndex = this.Items.IndexOf(item);
        int targetIndex = this.Items.IndexOf(destItem);

        this.Items.Move(sourceIndex, targetIndex);
    }
}

public class Item
{
    public string Text { get; set; }
}