Ticks Styling
The RangeSlider for .NET MAUI control provides styling properties for its ticks as well as a style selector, which you can use to apply different styles to the ticks according to custom logic.
-
InRangeTickColor(Color)—Defines the color of the ticks that are within the start-end range. -
OutOfRangeTickColor(Color)—Specifies the color of the ticks that are outside of the start-end range. -
TickThickness(double)—Defines the width of the ticks. -
InRangeTickStyle(Style)—Specifies custom style to the ticks that are within the start-end range. OutOfRangeTickStyle(Style)—Specifies custom style to the ticks that are outside of the start-end range.TicksStyleSelector(type Telerik.Maui.Controls.IStyleSelector)—Defines a selector that can apply different styles for different ticks.
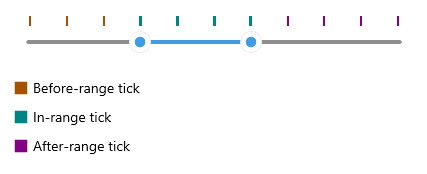
Here is a quick example on how the TicksStyleSelector can be applied to set separate styles to the ticks before the selected range, inside the selected range and after the selected range.
1. Create a custom style selector class which inherits from Telerik.Maui.Controls.IStyleSelector:
public class RangeTickStyleSelector : IStyleSelector
{
    public Style BeforeRangeStyle { get; set; }
    public Style InsideRangeStyle { get; set; }
    public Style AfterRangeStyle { get; set; }

    public Style SelectStyle(object item, BindableObject bindable)
    {
        double value = (double)item;
        RadRangeSlider rangeSlider = (RadRangeSlider)bindable;
        if (value < rangeSlider.RangeStart) return this.BeforeRangeStyle;
        else if (value > rangeSlider.RangeEnd) return this.AfterRangeStyle;
        else return this.InsideRangeStyle;
    }
}
Telerik.Maui.Controls.IStyleSelectorprovides a mechanism to select aMicrosoft.Maui.Controls.Stylebased on a custom logic.
2. Add The style selector to the page's resources:
<local:RangeTickStyleSelector x:Key="RangeTickStyleSelector">
    <local:RangeTickStyleSelector.BeforeRangeStyle>
        <Style TargetType="telerik:RadBorder">
            <Setter Property="BackgroundColor" Value="#A55200" />
            <Setter Property="WidthRequest" Value="2" />
            <Setter Property="HeightRequest" Value="10" />
        </Style>
    </local:RangeTickStyleSelector.BeforeRangeStyle>
    <local:RangeTickStyleSelector.InsideRangeStyle>
        <Style TargetType="telerik:RadBorder">
            <Setter Property="BackgroundColor" Value="#018383" />
            <Setter Property="WidthRequest" Value="3" />
            <Setter Property="HeightRequest" Value="10" />
        </Style>
    </local:RangeTickStyleSelector.InsideRangeStyle>
    <local:RangeTickStyleSelector.AfterRangeStyle>
        <Style TargetType="telerik:RadBorder">
            <Setter Property="BackgroundColor" Value="#830183" />
            <Setter Property="WidthRequest" Value="2" />
            <Setter Property="HeightRequest" Value="10" />
        </Style>
    </local:RangeTickStyleSelector.AfterRangeStyle>
</local:RangeTickStyleSelector>
3. Define the RangeSlider with the style selector applied:
<telerik:RadRangeSlider Minimum="0"
                        Maximum="100"
                        RangeStart="30"
                        RangeEnd="60"
                        TicksPlacement="Start"
                        TickStep="10"
                        TickStyleSelector="{StaticResource RangeTickStyleSelector}" />
Check the result below: