First Steps with Telerik UI for .NET MAUI in Visual Studio
In this tutorial, you will create a simple .NET MAUI application and enhance it by adding a Telerik UI for .NET MAUI control. You will achieve this by using Visual Studio for Windows and utilizing the Telerik NuGet source that lets you download and install Telerik controls.
Prerequisites
- To download the Telerik UI for .NET MAUI packages, you need a Telerik account. If you don't have one, you can create one for free.
- To create the app, you need Visual Studio 2022 17.12 or later with installed .NET MAUI workload.
Step 0: Start Your Free Trial
- If you already have an active license for Telerik UI for .NET MAUI, skip this step and continue with Step 1.
-
If you don't have an active license, follow the steps below to activate your free trial:
Download the MAUI Installer and start the installation.
Make sure that Telerik UI for .NET MAUI is selected and continue with the setup.
Log in with your Telerik account and complete the installation.
After the successful installation of .NET MAUI, the MAUI Installer activates your 30 day free trial. The installer also downloads your license key file, so you can skip the next step and continue with Step 2: Create a New MAUI Project.
Step 1: Download Your License Key File
To download and install your Telerik license key file:
- Go to the License Keys page in your Telerik account.
- Click the Download License Key button.
- Save the
telerik-license.txtfile to%AppData%\Telerik\telerik-license.txt.
This will make the license key available to all Telerik .NET apps that you develop on your local machine.
Step 2: Create a New MAUI Project
In this step, you will create a basic .NET MAUI project as a starting point for your application development:
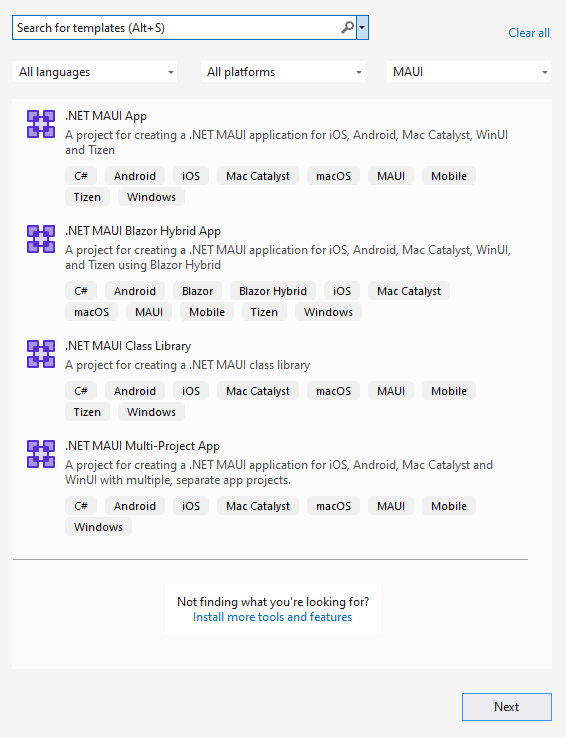
Open Visual Studio and select Create a new project in the start window.
-
Select the .NET MAUI App template, and click the Next button.
Name your project and select a location.
Choose the .NET framework for your project.
Wait until Visual Studio restores all dependencies (when done, all exclamation marks in the Dependencies tree view item disappear).
-
Click the Windows Machine button to build and run the app.

If you encounter any issues creating the basic project, see the complete guide in Microsoft's .NET MAUI documentation.
Step 3: Add the Telerik NuGet Server
Telerik maintains a NuGet feed with official UI for .NET MAUI releases and service packs. These packages are available for registered users with an active trial or commercial license. Adding the Telerik NuGet server as a source in Visual Studio lets you download and install Telerik packages containing controls and utilities.
To add the Telerik NuGet source to Visual Studio:
In Visual Studio go to Tools > NuGet Package Manager > Package Manager Settings.
Select Package Sources and then click the + button to add a new package source.
Enter a Name for the new package source, for example,
telerik.com.Add the
https://nuget.telerik.com/v3/index.jsonURL as a Source. Click OK.-
Whenever Visual Studio displays a dialog to enter credentials for
nuget.telerik.com, use your Telerik account email and password.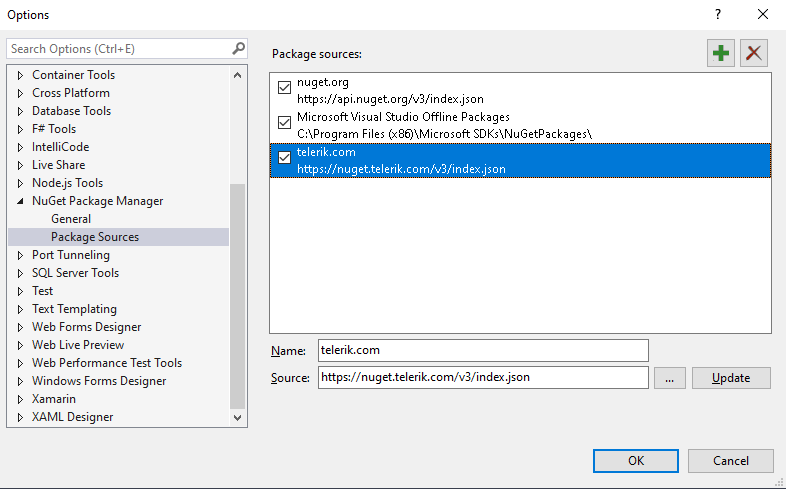
Step 4: Install the Telerik UI for .NET MAUI Controls
In Visual Studio and go to Tools > NuGet Package Manager > Manage NuGet Packages for Solution....
-
Install the Telerik UI for .NET MAUI package:
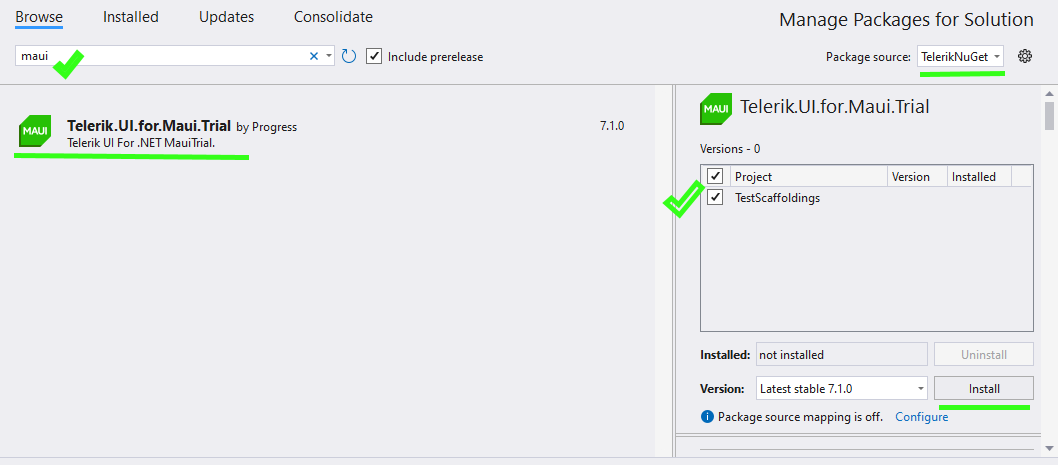
Select the
telerik.comPackage source that you added earlier. As this is a private NuGet feed, you must authenticate with your Telerik account user name and password.Select the Browse tab, enter
MAUIin the search box, and then select theTelerik.UI.for.Mauipackage.-
Select the checkbox for the target Project, and then click Install.
If your project uses the
Telerik.UI.for.Maui.8.0.0NuGet package and .NET 9, you must also install theMicrosoft.Maui.Controls.Compatibilitypackage. This is needed because Telerik UI for .NET MAUI version 8.0.0 depends on Microsoft's compatibility package, which is no longer included in the default .NET MAUI App project template. This dependency has been removed in Telerik UI for .NET MAUI version 9.0.0.
Step 5: Add the Telerik Namespace and Register the Controls
To use the controls in the Telerik UI for .NET MAUI library, add the Telerik namespace:
- In the
MainPage.xamlfile, locate the root element at the top. -
Paste the Telerik namespace below the last already available namespace:
    xmlns:telerik="http://schemas.telerik.com/2022/xaml/maui"
```
To visualize the Telerik controls, register them in the
MauiProgram.csfile of your project:- In the
MauiProgram.csfile, add the following using statement:
using Telerik.Maui.Controls.Compatibility; ``` - In the
-
In the
CreateMauiAppmethod, call theUseTelerikextension method:<!-- Code omitted for brevity --> .UseMauiApp<App>() .UseTelerik() <!-- Code omitted for brevity --> ```Step 6: Add a Telerik UI Component
In this step, you will replace the Button control in Microsoft's project template with a Telerik control. The Telerik UI for .NET MAUI TemplatedButton that you will use gives you full control over the Button's content.
To add the TemplatedButton control to the application:
Delete the existing Button and its event handler:
In the
MainPage.xamlfile, locate the Button withx:Name="CounterBtn"and delete it.In the
MainPage.xaml.cscode-behind, locate theOnCounterClickedevent handler and delete it.In the
MainPage.xamlfile, add the Telerik UI for .NET MAUI TemplatedButton and set its content to a string:
    <telerik:RadTemplatedButton x:Name="templatedButton"
                            Content="My TemplatedButton Content" />
```
After adding the basic TemplatedButton and setting the initial content, you can hit
F5to confirm that the app is running. In the next steps, you will configure the control by adding some interactivity.
Step 7: Add Custom Content to the TemplatedButton
In this step, you will edit the code-behind file by adding logic that makes the TemplatedButton interactive: clicking the button will change its content and show a loading indicator for two seconds.
-
In the
MainPage.xamlfile, set the new content of the TemplatedButton:- Change the content inside the button by removing the string and defining a
Grid, which lets you organize the content in a structured layout. - In the
Grid, add a BusyIndicator control and adjust its styling options. -
In the
Grid, add a label control for the loading indicator.<telerik:RadTemplatedButton x:Name="templatedButton"> <telerik:RadTemplatedButton.Content> <Grid ColumnDefinitions="Auto, *" HorizontalOptions="Center"> <telerik:RadBusyIndicator x:Name="busy" AnimationContentHeightRequest="16" AnimationContentColor="#80CBC4" AnimationContentWidthRequest="16" AnimationType="Animation4" IsVisible="{Binding IsBusy,Source={x:Reference busy}}" Margin="0, 0, 10, 0" /> <Label x:Name="loadingLabel" Grid.Column="1" TextColor="{Binding Source={RelativeSource AncestorType={x:Type telerik:RadTemplatedButton}}, Path=TextColor}" Text="Load Content" /> </Grid> </telerik:RadTemplatedButton.Content> </telerik:RadTemplatedButton> ```
- Change the content inside the button by removing the string and defining a
-
In the
MainPage.xaml.csfile, add a new member method within theMainPageclass. This new method adds the logic that controls the content of the button:private async void OnTemplatedButtonClicked(object sender, EventArgs e) { this.busy.IsBusy = true; this.loadingLabel.Text = "Loading Data"; await Task.Delay(TimeSpan.FromSeconds(2)); this.busy.IsBusy = false; this.loadingLabel.Text = "Data is Loaded"; } ```- Finally, set the
Clickedevent and add some styles to the TemplatedButton. Use the various appearance options provided by the component, for example,TextColor,Background,BorderBrush, and so on:
    <telerik:RadTemplatedButton x:Name="templatedButton"
                            TextColor="Black"
                            Background="#FAFAFA"
                            BorderBrush="LightGray"
                            BorderThickness="1"
                            Clicked="OnTemplatedButtonClicked"
                            HorizontalOptions="Center">
    <telerik:RadTemplatedButton.Content>
        <Grid ColumnDefinitions="Auto, *" HorizontalOptions="Center">
            <telerik:RadBusyIndicator x:Name="busy"
                                        AnimationContentHeightRequest="16"
                                        AnimationContentColor="#80CBC4"
                                        AnimationContentWidthRequest="16"
                                        AnimationType="Animation4"
                                        IsVisible="{Binding IsBusy,Source={x:Reference busy}}"
                                        Margin="0, 0, 10, 0" />
            <Label x:Name="loadingLabel"
                    Grid.Column="1"
                    TextColor="{Binding Source={RelativeSource AncestorType={x:Type telerik:RadTemplatedButton}}, Path=TextColor}"
                    Text="Load Content" />
        </Grid>
    </telerik:RadTemplatedButton.Content>
</telerik:RadTemplatedButton>
```
To run the application, press
F5. Congratulations, you created your first app with Telerik UI for .NET MAUI controls! - Finally, set the