Validation Support
RadPropertyGrid supports validation through IDataErrorInfo, INotifyDataErrorInfo and through DataAnnotations as well as validating PropertySets.
Complete examples of the implementation of the validation mechanisms in the RadPropertyGrid control can be found in our GitHub repository:
You can run these examples through the SDK Samples Browser.
Validating through IDataErrorInfo
In order to have the validation rules defined through the IDataErrorInfo interface, you will have to implement additional code which sets the ValidatesOnDataErrors and NotifyOnValidationError properties of the Binding to "true". Please note, that the default binding generated for auto-generated PropertyDefinition have those properties set to "false".
Example 1: Setting ValidatesOnDataErrors and NotifyOnValidationError of the Binding
private void rpg_AutoGeneratingPropertyDefinition(object sender, Telerik.Windows.Controls.Data.PropertyGrid.AutoGeneratingPropertyDefinitionEventArgs e)
{
    (e.PropertyDefinition.Binding as Binding).ValidatesOnDataErrors = true;
    (e.PropertyDefinition.Binding as Binding).NotifyOnValidationError = true;
}
Private Sub rpg_AutoGeneratingPropertyDefinition(ByVal sender As Object, ByVal e As Telerik.Windows.Controls.Data.PropertyGrid.AutoGeneratingPropertyDefinitionEventArgs)
    TryCast(e.PropertyDefinition.Binding, Binding).ValidatesOnDataErrors = True
    TryCast(e.PropertyDefinition.Binding, Binding).NotifyOnValidationError = True
End Sub
You can define the validation rules like so:
Example 2: Defining validation rules
public string this[string columnName]
{
    get
    {
        if (columnName == "IntProp")
        {
            return this.IntProp < 100 && this.IntProp > 0 ? string.Empty : "Value should be in the range of (0, 100)";
        }
        if (columnName == "StringProp")
        {
            return this.StringProp != null && Regex.IsMatch(this.StringProp, @"^[0-9]+[\p{L}]") ? string.Empty : @"Value should math the regex: ^[0-9]+[\p{L}]";
        }
        if (columnName == "DateTimeProp")
        {
            return this.DateTimeProp.Year > 1900 ? string.Empty : "Date should be after 1/1/1900";
        }
        return string.Empty;
    }
}
Default Public ReadOnly Property Item(ByVal columnName As String) As String
    Get
        If columnName = "IntProp" Then
            Return If(Me.IntProp < 100 AndAlso Me.IntProp > 0, String.Empty, "Value should be in the range of (0, 100)")
        End If
        If columnName = "StringProp" Then
            Return If(Me.StringProp IsNot Nothing AndAlso Regex.IsMatch(Me.StringProp, "^[0-9]+[\p{L}]"), String.Empty, "Value should math the regex: ^[0-9]+[\p{L}]")
        End If
        If columnName = "DateTimeProp" Then
            Return If(Me.DateTimeProp.Year > 1900, String.Empty, "Date should be after 1/1/1900")
        End If
        Return String.Empty
    End Get
End Property
Validating through INotifyDataErrorInfo
Provided your business objects correctly implement the INotifyDataErrorInfo interface, such validation is supported out of the box. Example 3 and Example 4 demonstrate a sample implementation.
Example 3: Defining the validation method
    private void ValidateName()
    {
        var error = "Name must be at least 5 characters!";

        if (this.Name == null || this.Name.Length < 5)
        {
            this.AddError("Name", error);
        }
        else
        {
            this.RemoveError("Name", error);
        }
    }
    Private Sub ValidateName()
        Dim [error] = "Name must be at least 5 characters!"

        If Me.Name Is Nothing OrElse Me.Name.Length < 5 Then
            Me.AddError("Name", [error])
        Else
            Me.RemoveError("Name", [error])
        End If
    End Sub
Example 4: Calling the ValidateName method
    public string Name
    {
        get { return this.name; }
        set
        {
            if (value != this.name || value == null)
            {
                this.name = value;
                this.OnPropertyChanged("Name");
                this.ValidateName();
            }
        }
    }
    Public Property Name() As String
        Get
            Return Me._name
        End Get
        Set(ByVal value As String)
            If value <> Me._name OrElse value Is Nothing Then
                Me._name = value
                Me.OnPropertyChanged("Name")
                Me.ValidateName()
            End If
        End Set
    End Property
Validating through DataAnnotations
In order to have the validation rules defined through DataAnnotations respected, you will have to set the ValidatesOnExceptions property of the Binding to true. Please note, that the default binding generated for auto-generated PropertyDefinition does not have this property set to true.
Example 5: Setting ValidatesOnExceptions of Binding
private void rpg1_AutoGeneratingPropertyDefinition(object sender, Telerik.Windows.Controls.Data.PropertyGrid.AutoGeneratingPropertyDefinitionEventArgs e)
{
    (e.PropertyDefinition.Binding as Binding).ValidatesOnExceptions = true;
}
Private Sub rpg1_AutoGeneratingPropertyDefinition(ByVal sender As Object, ByVal e As Telerik.Windows.Controls.Data.PropertyGrid.AutoGeneratingPropertyDefinitionEventArgs)
    TryCast(e.PropertyDefinition.Binding, Binding).ValidatesOnExceptions = True
End Sub
For example you can define the Required DataAnnotations attribute like so:
Example 6: Defining DataAnnotations Attribute
private string requiredField;
[Required(ErrorMessage = "This field is Required.")]
public string RequiredField
{
    get { return requiredField; }
    set
    {
        requiredField = value;
        ValidateProperty("RequiredField", value);
        this.OnPropertyChanged("RequiredField");
    }
}
Private _requiredField As String
<Required(ErrorMessage:="This field is Required.")>
Public Property RequiredField() As String
    Get
        Return _requiredField
    End Get
    Set(ByVal value As String)
        _requiredField = value
        ValidateProperty("RequiredField", value)
        Me.OnPropertyChanged("RequiredField")
    End Set
End Property
You may notice that there is a call to a ValidateProperty method. You will have to define such method like this:
Example 7: Defining ValidateProperty method
public void ValidateProperty(string propName, object value)
{
    var result = new List<System.ComponentModel.DataAnnotations.ValidationResult>();
    Validator.TryValidateProperty(value, new ValidationContext(this, null, null) { MemberName = propName }, result);
    if (result.Count > 0)
    {
        throw new ValidationException(result[0].ErrorMessage);
    }
}
Public Sub ValidateProperty(ByVal propName As String, ByVal value As Object)
    Dim result = New List(Of ValidationResult)()
    Validator.TryValidateProperty(value, New ValidationContext(Me, Nothing, Nothing) With {.MemberName = propName}, result)
    If result.Count > 0 Then
        Throw New ValidationException(result(0).ErrorMessage)
    End If
End Sub
Validating Property Sets
Before proceeding with this section you might find it useful to get familiar with RadPropertyGrid`s Property Sets functionality.
In order to enable validation for the fields that represent property sets, you need to set the PropertySetsValidationFunction of RadPropertyGrid. The function takes two arguments: string - the property that is being changed and object - the value that is about to be applied. The function returns a string that represents the error message.
Example 8: Setting the PropertySetsValidationFunction
this.rpg.PropertySetsValidationFunction = new Func<string, object, string>((s, t) =>
{
    if (s == "Name" && t != null && t.ToString().Length < 5)
    {
        return "Name should contain more than 5 characters!";
    }
    else
    {
        return null;
    }
});
Me.rpg.PropertySetsValidationFunction = New Func(Of String, Object, String)(Function(s, t)
                                                                                If s = "Name" AndAlso t IsNot Nothing AndAlso t.ToString().Length < 5 Then
                                                                                    Return "Name should contain more than 5 characters!"
                                                                                Else
                                                                                    Return Nothing
                                                                                End If
                                                                            End Function)
Figure 1 shows the appearance of RadPropertyGrid after validation is applied.
Figure 1: Appearance of RadPropertyGrid after PropertySetsValidationFunction is set:
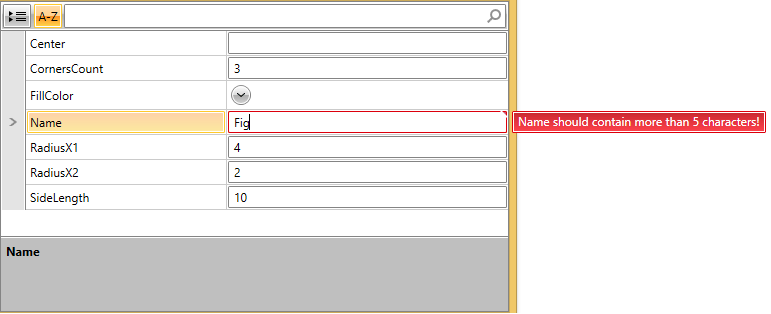
Both the ValidatesOnDataErrors and NotifyOnValidationError properties of the PropertyDefinition`s Binding should be set to True for the error message to appear.