Add New Row Button
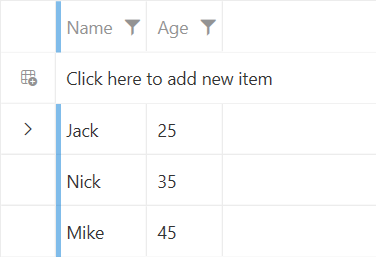
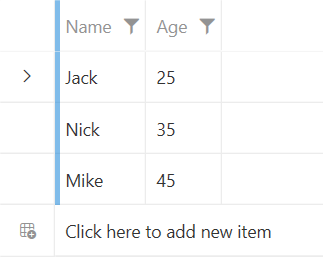
RadGridView allows you to display an additional row that will allow you to insert new entries in the bound collection. To display it, set the NewRowPosition property to either Top or Bottom and expose an empty constructor in the underlying object.
The Bottom option works only when the
GroupRenderModeproperty ofRadGridViewis set toFlat.
The following example shows how to display the new row:
Defining the underlying object and view model
public class Person
{
    //Expose an empty constructor to create a new row
    public Person()
    {
    }

    public string Name { get; set; }
    public int Age { get; set; }
}

public class MainViewModel
{
    public MainViewModel()
    {
        this.People = new ObservableCollection<Person>()
        {
            new Person() { Name = "Jack", Age = 25 },
            new Person() { Name = "Nick", Age = 35 },
            new Person() { Name = "Mike", Age = 45 },
        };
    }

    public ObservableCollection<Person> People { get; set; }
}
Public Class Person
    'Expose an empty constructor to create a new row
    Public Sub New()
    End Sub

    Public Property Name As String
    Public Property Age As Integer
End Class

Public Class MainViewModel
    Public Sub New()
        Me.People = New ObservableCollection(Of Person)() From {
            New Person() With {
                .Name = "Jack",
                .Age = 25
            },
            New Person() With {
                .Name = "Nick",
                .Age = 35
            },
            New Person() With {
                .Name = "Mike",
                .Age = 45
            }
        }
    End Sub

    Public Property People As ObservableCollection(Of Person)
End Class
Defining the RadGridView to show the new row
<Grid>
    <Grid.DataContext>
        <local:MainViewModel/>
    </Grid.DataContext>
    <telerik:RadGridView x:Name="radGridView"
                         ItemsSource="{Binding People}"
                         NewRowPosition="Top"/>
</Grid>

New Row Position
The NewRowPosition property allows you to specify whether the new row will be visible on the top or on the bottom of the items, or not be displayed at all. The property is of the type of GridViewNewRowPosition and it exposes the following options:
-
None—With this option, the new row will not be displayed. This is the default value of the NewRowPosition property. -
Top—Displays the new row on top of the displayed items. -
Bottom—Displays the new row on the bottom of the items in the current view port. For this option, theGroupRenderModeproperty of RadGridView has to be set toFlat.
Setting the new row position to be on the bottom
<Grid>
    <Grid.DataContext>
        <local:MainViewModel/>
    </Grid.DataContext>
    <telerik:RadGridView x:Name="radGridView"
                         ItemsSource="{Binding People}"
                         GroupRenderMode="Flat"
                         NewRowPosition="Bottom"/>
</Grid>

Customizing the New Row's Content
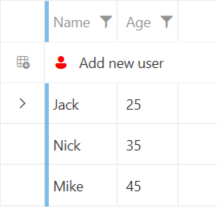
RadGridView provides the ability to customize the content of the new row. To do so, you can utilize the GridViewNewRowContent and GridViewNewRowContentTemplate properties.
Using the GridViewNewRowContent and GridViewNewRowContentTemplate
<Grid>
    <Grid.DataContext>
        <local:MainViewModel/>
    </Grid.DataContext>
    <telerik:RadGridView x:Name="radGridView"
                         ItemsSource="{Binding People}"
                         GroupRenderMode="Flat"
                         GridViewNewRowContent="Add new user"
                         NewRowPosition="Top">
        <telerik:RadGridView.GridViewNewRowContentTemplate>
            <DataTemplate>
                <StackPanel Orientation="Horizontal">
                    <telerik:RadGlyph Glyph="{StaticResource GlyphUser}" Margin="0 0 10 0" Foreground="Red"/>
                    <TextBlock Text="{Binding}" VerticalAlignment="Center"/>
                </StackPanel>
            </DataTemplate>
        </telerik:RadGridView.GridViewNewRowContentTemplate>
    </telerik:RadGridView>
</Grid>

Styling the New Row Element
The new row of RadGridView is represented by the GridViewNewRow element. You can style it either implicitly (via a global Style) or utilize the NewRowStyle property of RadGridView. To learn how to style the GridViewNewRow element, check the Styling the GridViewNewRow article.