Data Validation
One of the most important features provided by RadGridView is the data validation. Data validation features enable you to take complete control of the data entered in your grid's cells.
The purpose of this tutorial is to show you how to validate data using RadGridView.
The data validation is controllable through events. Be sure you are familiar with all validation events exposed by the RadGridView.
For the purpose of this tutorial, we will use the RadGridView declaration in Example 1. The RadGridView is populated with some sample data.
Example 1: Declare RadGridView
<telerik:RadGridView x:Name="radGridView"/>
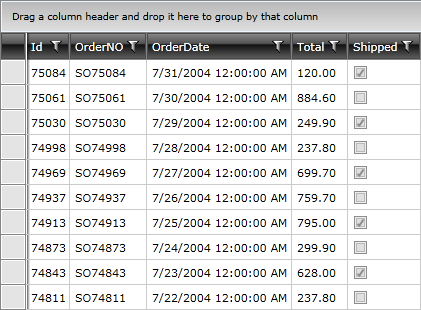
Figure 1: Standard appearance of RadGridView
Setting the Mode for the Validation
RadGridView exposes a property - ValidatesOnDataErrors - that controls the way the data validation, provided by IDataErrorInfo and INotifyDataErrorInfo Interfaces, is performed. It may be set to one of the following values:
None: Denotes that RadGridView will not perform any validation.
InViewMode: Denotes that RadGridView will perform validation only in view mode.
InEditMode: Denotes that RadGridView will perform validation only in edit mode. If the RadGridView is initially loaded with an incorrect value, no error messages will be displayed.
Default: This is the default value. It combines the two previous ones - InViewMode | InEditMode.
Setting the Validation Type
In R2 2016, Telerik introduced the ValidationType property of RadGridView. It provides you with the possibility to choose what type of validation to apply for each instance of RadGridView. It is a Flags Enumeration and can take the following values:
- None: None of the validation mechanisms is respected.
- DataAnnotations: Only validation through data annotations is respected.
- IDataErrorInfo: Only validation through the IDataErrorInfo interface is respected.
- INotifyDataErrorInfo: Only validation through the INotifyDataErrorInfo interface is respected.
- Default: Validation through all three mechanisms is respected.
Example 2: Set the ValidationType property of RadGridView
<telerik:RadGridView x:Name="radGridView" ValidationType="Default"/>
Validating Data on a Cell Level
The cell validation occurs when a GridViewCell is edited and its new data is about to be committed. At this moment, a CellValidating event is fired and since the new value is not committed yet to the underlying data object, here is the perfect place for applying a custom UI validation.
Example 3 shows how to validate the OrderNo property of the Order object to be longer than 5 characters.
Attach to the CellValidating event, which is exposed by the RadGridView.
Example 3: Attach to the CellValidating event
<telerik:RadGridView CellValidating="radGridView_CellValidating"/>
Example 3: Add custom logic in the code behind
private void radGridView_CellValidating(object sender, Telerik.Windows.Controls.GridViewCellValidatingEventArgs e)
{
    if (e.Cell.Column.UniqueName == "OrderNO")
    {
        if (e.NewValue.ToString().Length < 5)
        {
            e.IsValid = false;
            e.ErrorMessage = "OrderNO must be longer than five characters.";
        }
    }
}
Private Sub radGridView_CellValidating(ByVal sender As Object, ByVal e As Telerik.Windows.Controls.GridViewCellValidatingEventArgs)
    If e.Cell.Column.UniqueName = "OrderNO" Then
        If e.NewValue.ToString().Length < 5 Then
            e.IsValid = False
            e.ErrorMessage = "OrderNO must be longer than five characters."
        End If
    End If
End Sub
When you try to enter an order number that has fewer than five characters, you should see a validation message that is similar to the one in Figure 2.
Figure 2: RadGridView's appearance after validation
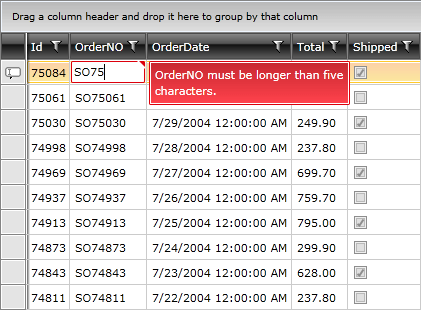
When you set the e.IsValid property to False, this will cancel the editing process and will return focus to the invalid GridViewCell. After this UI layer validation is successful (e.IsValid is True, which is the default value). Then the Data layer validation occurs. This is the validation that is built into the business object implementation.
If the edited cell's column has a CellEditTemplate set, the e.NewValue argument will always be null. You can get the new value through the e.EditingElement parameter instead.
Validating Data on a Property Level
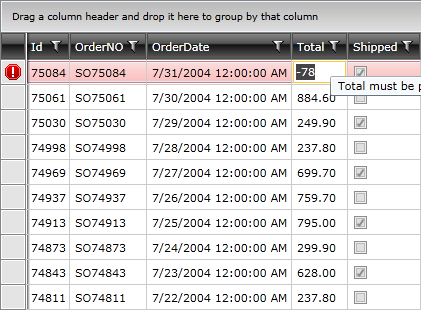
An alternative approach is to use validation on a property level as shown in Example 4. In this case, you need to throw an exception when an incorrect value is about to be set. This results in a binding validation error (Figure 3) and the GridViewBoundColumnBase editor will enter into an invalid state.
Example 4: Set validation on a property level
public class Order
{
    private string orderNo;
    public string OrderNO
    {
        get
        {
            return this.orderNo;
        }
        set
        {
            if (value.Length < 5)
            {
                throw new Exception("OrderNo should be longer than 5 characters.");
            }
            this.orderNo = value;
        }
    }

    public int Total { get; internal set; }
}
Public Class Order
    Private m_orderNo As String

    Public Property OrderNO() As String
        Get
            Return Me.m_orderNo
        End Get
        Set(ByVal value As String)
            If value.Length < 5 Then
                Throw New Exception("OrderNo should be longer than 5 characters.")
            End If
            Me.m_orderNo = value
        End Set
    End Property

    Public Property Total As Integer
End Class
Figure 3: RadGridView's appearance after validation

An exception of any kind will result in a validation error, and an exception message will appear as an error tooltip.
Validating Data on a Row Level
In the previous examples, the data was validated per cell, using the CellValidating event or property validation. You can do the same thing per row, using the RowValidating event. The RowValidating event is very similar to the CellValidating event. However, instead of getting an individual cell, you are getting an entire row.
Example 5 shows how to validate the OrderNO and Total properties of the Order object.
Attach to the RowValidating event, which is exposed by the RadGridView.
Example 5: Attach to the RowValidating event
<telerik:RadGridView RowValidating="radGridView_RowValidating"/>
Example 6: Apply custom logic in the RowValidating event
private void radGridView_RowValidating(object sender, Telerik.Windows.Controls.GridViewRowValidatingEventArgs e)
{

    Order order = e.Row.DataContext as Order;
    if (String.IsNullOrEmpty(order.OrderNO) || order.OrderNO.Length < 5)
    {
        GridViewCellValidationResult validationResult = new GridViewCellValidationResult();
        validationResult.PropertyName = "OrderNO";
        validationResult.ErrorMessage = "OrderNO is required and must be at least five characters";
        e.ValidationResults.Add(validationResult);
        e.IsValid = false;
    }

    if (order.Total < 0)
    {
        GridViewCellValidationResult validationResult = new GridViewCellValidationResult();
        validationResult.PropertyName = "Total";
        validationResult.ErrorMessage = "Total must be positive";
        e.ValidationResults.Add(validationResult);
        e.IsValid = false;
    }
}
Private Sub radGridView_RowValidating(ByVal sender As Object, ByVal e As Telerik.Windows.Controls.GridViewRowValidatingEventArgs)
    Dim order As Order = TryCast(e.Row.DataContext, Order)
    If [String].IsNullOrEmpty(order.OrderNO) OrElse order.OrderNO.Length < 5 Then
        Dim validationResult As New GridViewCellValidationResult()
        validationResult.PropertyName = "OrderNO"
        validationResult.ErrorMessage = "OrderNO is required and must be at least five characters"
        e.ValidationResults.Add(validationResult)
        e.IsValid = False
    End If
    If order.Total < 0 Then
        Dim validationResult As New GridViewCellValidationResult()
        validationResult.PropertyName = "Total"
        validationResult.ErrorMessage = "Total must be positive"
        e.ValidationResults.Add(validationResult)
        e.IsValid = False
    End If
End Sub
A few things worth mentioning here:
In order to access the new values, you should grab the row's DataContext (in this case, it is an Order). For the old values, use the OldValues property.
The GridViewCellValidationResult object is used for displaying error messages when the user enters wrong data.
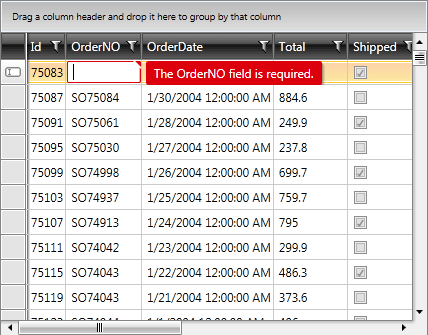
The RowValidating event fires each time a GridViewRow gets loaded into the viewport, whether in edit mode or not. You can avoid executing any custom logic defined in your event handler by checking the EditOperationType property of the GridViewRowValidatingEventArgs.
Figure 4: RadGridView's appearance after validation on row level was applied
Once you have added such errors, you will have to explicitly clear them when needed. Read this help article for information about how to clear user defined errors.
Validating Data Through Data Annotations
RadGridView also allows you to take advantage of the System.ComponentModel.DataAnnotations assembly.
Example 7 shows you how to use DataAnnotations in order to validate the OrderNO property of the Order object.
Example 7: Set validation through data DataAnnotations
[Required]
public string OrderNO
{
    get
    {
        return this.orderNo;
    }
    set
    {
        ValidationContext validationContext = new ValidationContext(this, null, null);
        validationContext.MemberName = "OrderNO";
        Validator.ValidateProperty(value, validationContext);
        this.orderNo = value;
    }
}
<Required()>
Public Property OrderNO() As String
    Get
        Return Me.m_orderNo
    End Get
    Set(ByVal value As String)
        Dim validationContext As New ValidationContext(Me, Nothing, Nothing)
        validationContext.MemberName = "OrderNO"
        Validator.ValidateProperty(value, validationContext)
        Me.m_orderNo = value
    End Set
End Property
In order to use DataAnnotations you should add a reference to the System.ComponentModel.DataAnnotations assembly.
The following Validation Attributes are available:
RequiredAttribute: Specifies that a value must be provided for a property.
RegularExpressionAttribute: Designates a regular expression to be used for validation of the associated member.
StringLengthAttribute: Specifies the maximum and minimum number of characters that are allowed for an entity member.
RangeAttribute: Designates the minimum and maximum constraints for the associated member.
DateTypeAttribute: Specifies the name of an additional type to associate with an entity member.
CustomValidationAttribute: Designates a customized method to execute to validate the entity member.
A full list of all available validation attributes can be found in MSDN.
You can see the result in Figure 5.
Figure 5: Appearance of RadGridView after DataAnnotations valididation is applied
Once the UI and Data validation is passed (i.e., the Binding tried to update the value for the bound property), the CellValidated event is raised. The ValidationResult can be valid or not. Here you can also add a custom logic like changing the visual state of the editor (through the e.EditorElement).
Validating Data When Using Custom CellEditTemplate
The RadGridView control validation engine includes some specific required properties, internally set on the editor's binding, generated by default. When defining a custom CellEditTemplate, these properties won't be set internally. Example 8 demonstrates which binding properties need to be set to make the validation work as expected.
Example 8: Set required validation properties to the editing element
<telerik:GridViewDataColumn.CellEditTemplate>
    <DataTemplate>
        <TextBox Text="{Binding Path=MyPropertyName,
                            ValidatesOnNotifyDataErrors=True,
                            ValidatesOnDataErrors=True,
                            NotifyOnValidationError=True,
                            ValidatesOnExceptions=True,
                            UpdateSourceTrigger=PropertyChanged,
                            Mode=TwoWay}" />
    </DataTemplate>
</telerik:GridViewDataColumn.CellEditTemplate>
Examples
For a general example on how to validate the data, you can check our Validation WPF Demos.
You can also download runnable projects from our online SDK repository here; the examples are listed under GridView.
GridView/ValidationIDataErrorInfo.
GridView/ValidationINotifyDataErrorInfo.
Although GitHub is a very well-known platform, we saw a better and easier approach for reviewing our examples in our SDK Samples Browser. The SDK Samples Browser is an application that automatically connects to GitHub and downloads the XAML SDK repository locally to a location that could be set by the user. After download is complete, the application gives a very convenient navigation between all the available examples and a search functionality that doesn’t simply search by control’s names but also through the example’s names and descriptions.