Control Panel
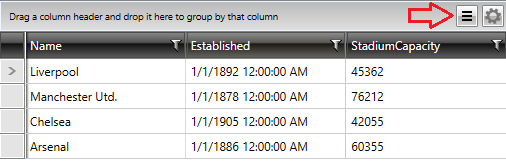
The Control Panel is a feature of the RadGridView that provides the end user with the option to change different configurations related to RadGridView's settings through additional elements positioned on the top right of the control.
Figure 1: Control Panel within RadGridView
In order to add items in the Control Panel, you need to set the ControlPanelItems property of the RadGridView. You can define different content for as many ControlPanelItems as you need. Each ControlPanelItem can allow the end user to configure different options. Each item should have a ControlPanelItem.Content.
Example 1: Adding items in the Control Panel
  <telerik:RadGridView.ControlPanelItems>
    <telerik:ControlPanelItem ButtonTooltip="Column chooser">
      <telerik:ControlPanelItem.Content>
        <ListBox ItemsSource="{Binding Columns}" BorderThickness="0">
          <ListBox.ItemTemplate>
            <DataTemplate>
              <CheckBox Content="{Binding Header, Mode=OneWay}" IsChecked="{Binding IsVisible, Mode=TwoWay}" />
            </DataTemplate>
          </ListBox.ItemTemplate>
        </ListBox>
      </telerik:ControlPanelItem.Content>
    </telerik:ControlPanelItem>
  </telerik:RadGridView.ControlPanelItems>
Example 2: Setting a custom display for the items
  <telerik:RadGridView.ControlPanelItems>
    <telerik:ControlPanelItem ButtonTooltip="Filtering Options">
      <telerik:ControlPanelItem.ButtonContent>
        <Path Width="16" Height="16" HorizontalAlignment="Center" VerticalAlignment="Center" Data="F1M511.6665,467.2715C509.6575,468.2995,507.1905,467.5095,506.1635,465.5005C505.1325,463.4915,505.9265,461.0325,507.9355,460.0005C509.9445,458.9745,512.4095,459.7695,513.4375,461.7745C514.4695,463.7825,513.6775,466.2405,511.6665,467.2715 M518.5605,462.8565L517.8825,460.0155L515.3935,460.2825C515.1415,459.8585,514.8505,459.4725,514.5225,459.1275L515.4435,456.8975L512.9515,455.3645L511.3965,457.2925C510.8575,457.1515,510.3025,457.0815,509.7415,457.0775L508.7675,454.9135L505.9375,455.6715L506.2705,458.0665C505.8795,458.3075,505.5215,458.5835,505.2025,458.8835L503.0535,458.0005L501.5175,460.4875L503.3665,461.9795C503.2315,462.4865,503.1515,463.0135,503.1415,463.5435L501.0335,464.4175L501.7125,467.2605L504.0635,467.0085C504.3355,467.4795,504.6545,467.9065,505.0235,468.2815L504.1575,470.3765L506.6475,471.9095L508.1425,470.0605C508.6495,470.1855,509.1655,470.2555,509.6925,470.2615L510.5785,472.3905L513.4255,471.7135L513.1675,469.2965C513.6075,469.0285,514.0145,468.7215,514.3635,468.3765L516.5455,469.2745L518.0815,466.7855L516.1495,465.2305C516.2665,464.7565,516.3315,464.2705,516.3385,463.7805z" Stretch="Fill" Fill="{telerik:Windows8Resource ResourceKey=StrongBrush}"/>
      </telerik:ControlPanelItem.ButtonContent>
      <telerik:ControlPanelItem.Content>
        <CheckBox IsChecked="{Binding IsFilteringAllowed, Mode=TwoWay}"
                  Content="Allow Filtering"
                  Margin="10"/>
      </telerik:ControlPanelItem.Content>
    </telerik:ControlPanelItem>
  </telerik:RadGridView.ControlPanelItems>
You can review a runnable solution showing how to define ControlPanelItems from our SDK Samples Browser, which you can download from here. The example is listed under GridView/ControlPanel
Reusing Control Panel Items
You can add a common Style targeting the ControlPanel that all the RadGridView controls in the application will inherit.
The ControlPanelItemsCollection property of the RadGridView, added in Q1 2016, represents a collection of the different Control Panel items.
You can set the ControlPanelItemsCollection either implicitly or explicitly. We advise on using the first approach.
Implicitly Set the Control Panel Items
It is possible to declare a style that targets the RadGridView control. In this case, the style will be applied to all RadGridView controls in the application, as shown in Example 3.
Example 3: Declare a common style for the Control Panel
  <Style TargetType="telerik:RadGridView">
    <Setter Property="ControlPanelItems">
      <Setter.Value>
        <telerik:ControlPanelItemCollection>
          <telerik:ControlPanelItem ButtonTooltip="Filtering Options" >
            <telerik:ControlPanelItem.ContentTemplate>
              <DataTemplate>
                <CheckBox IsChecked="{Binding IsFilteringAllowed, Mode=TwoWay}"
   Content="Allow Filtering"
   Margin="10"/>
              </DataTemplate>
            </telerik:ControlPanelItem.ContentTemplate>
          </telerik:ControlPanelItem>
          <telerik:ControlPanelItem ButtonTooltip="Column chooser" >
            <telerik:ControlPanelItem.ContentTemplate>
              <DataTemplate>
                <ListBox ItemsSource="{Binding Columns}"  BorderThickness="0">
                  <ListBox.ItemTemplate>
                    <DataTemplate>
                      <CheckBox Content="{Binding Header, Mode=OneWay}"
         IsChecked="{Binding IsVisible, Mode=TwoWay}" />
                    </DataTemplate>
                  </ListBox.ItemTemplate>
                </ListBox>
              </DataTemplate>
            </telerik:ControlPanelItem.ContentTemplate>
          </telerik:ControlPanelItem>
        </telerik:ControlPanelItemCollection>
      </Setter.Value>
    </Setter>
  </Style>
If you're using implicit styles, you should base your style on the RadGridViewStyle.
Explicitly Set the Control Panel Items
You can change the control panel items explicitly for a specific RadGridView. First, the ControlPanelItemCollection should be created as a static resource:
Example 4: Explicitly change the item collection of the RadGridView's Control Panel
  <telerik:ControlPanelItemCollection x:Key="itemsControl" x:Shared="False" >
    <telerik:ControlPanelItem ButtonTooltip="Column chooser" >
      <telerik:ControlPanelItem.Content>
        <ListBox ItemsSource="{Binding Columns}"  BorderThickness="0">
          <ListBox.ItemTemplate>
            <DataTemplate>
              <CheckBox Content="{Binding Header, Mode=OneWay}" IsChecked="{Binding IsVisible, Mode=TwoWay}" />
            </DataTemplate>
          </ListBox.ItemTemplate>
        </ListBox>
      </telerik:ControlPanelItem.Content>
    </telerik:ControlPanelItem>
    <telerik:ControlPanelItem ButtonTooltip="Filtering Options">

      <telerik:ControlPanelItem.Content>
        <CheckBox IsChecked="{Binding IsFilteringAllowed,
                Mode=TwoWay}"
              Content="Allow Filtering"
              Margin="10"/>
      </telerik:ControlPanelItem.Content>

    </telerik:ControlPanelItem>
  </telerik:ControlPanelItemCollection>
Example 5: Set RadGridView's ControlPanelItems property
<telerik:RadGridView Grid.Row="0"
                     ColumnWidth="*"
                     Name="clubsGrid2"
                     ControlPanelItems="{StaticResource itemsControl}"
                     ItemsSource="{Binding Clubs}">
</telerik:RadGridView>