Data Validation
The data fields of the RadCardView control support data validation of the user input.
The feature provides visual feedback when an invalid value is entered. This article shows how to implement custom validation logic.
Using Validation Events
The RadCardView control provides few events that are raised whenever the data is changed using the UI - CardValidating, CardDataFieldValidating and CardDataFieldValidated.
The CardDataFieldValidating and CardDataFieldValidated events are raised when a data field exits its edit mode. If the card loses the focus when a data field exits edit mode, then the CardValidating event is raised.
CardDataFieldValidating can be used to validate the associated value and determine the validation state of the data field.
Example 1: Validating a data field
private void RadCardView_CardDataFieldValidating(object sender, CardDataFieldValidatingEventArgs e)
{
    if (e.DataField.DataMemberBinding.Path.Path == "Number")
    {
        var dataItem = (CardInfo)e.DataField.Item;
        if (dataItem.Number < 0)
        {
            e.IsValid = false;
        }
    }
}
Using ValidationException
The validation can be implemented in the view model. If the updated value is invalid, a ValidationException can be thrown in the corresponding property setter. To enable the visual feedback in the UI, set the ValidatesOnExceptions and NotifyOnValidationError properties of the DataMemberBinding to True.
Example 2: Implementing validation logic in the view model
private int number;
public int Number
{
    get { return number; }
    set
    {
        if (value < 0)
        {
            throw new ValidationException("Positive number required.");
        }
        else
        {
            number = value;
        }
    }
}
Example 3: Enabling visual feedback using the data binding properties
<telerik:RadCardView.DataFieldDescriptors>
    <telerik:CardDataFieldDescriptor DataMemberBinding="{Binding Number, Mode=TwoWay, ValidatesOnExceptions=True, NotifyOnValidationError=True}" />
</telerik:RadCardView.DataFieldDescriptors>
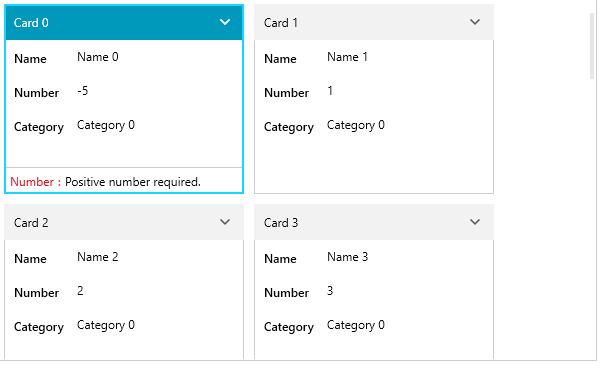
Figure 1: Data validation visual feedback
Using Data Annotations
The data binding validation can be enabled also by using the data annotation attributes.
Example 4: Using data annotations in the view model
private int number;

[Range(0, int.MaxValue, ErrorMessage = "Positive number required.")]
public int Number
{
    get { return number; }
    set { number = value; } }
}
Example 5: Data binding the view model property
<telerik:RadCardView.DataFieldDescriptors>
    <telerik:CardDataFieldDescriptor DataMemberBinding="{Binding Number, Mode=TwoWay}" />
</telerik:RadCardView.DataFieldDescriptors>
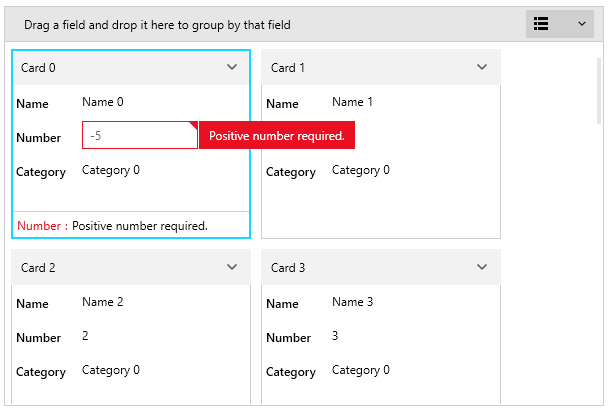
Figure 2: Data validation visual feedback when using data annotations