ZOrder
RadDiagram gives you the ability to control the Z-Order of shapes and connections by using their ZIndex property. You can also use RadDiagramCommands in order to increase/decrease ZIndex of the selected RadDiagramItems simultaneously.
Using the ZIndex property
Consider the following code:
RadDiagramShape shape1 = new RadDiagramShape()
{
    Text = "shape1",
    ZIndex = 3,
    ElementShape = new EllipseShape(),
    BackColor = System.Drawing.Color.LightBlue
};
shape1.Position = new Telerik.Windows.Diagrams.Core.Point(100, 10);
radDiagram1.AddShape(shape1);

RadDiagramShape shape2 = new RadDiagramShape()
{
    Text = "shape2",
    ZIndex = 2,
    ElementShape = new EllipseShape(),
    BackColor = System.Drawing.Color.LightGreen
};
shape2.Position = new Telerik.Windows.Diagrams.Core.Point(150, 60);
radDiagram1.AddShape(shape2);

RadDiagramShape shape3 = new RadDiagramShape()
{
    Text = "shape3",
    ZIndex = 1,
    ElementShape = new EllipseShape(),
    BackColor = System.Drawing.Color.LightCoral
};
shape3.Position = new Telerik.Windows.Diagrams.Core.Point(60, 60);
radDiagram1.AddShape(shape3);
Dim shape1 As New RadDiagramShape() With { _
    .Text = "shape1", _
    .ZIndex = 3, _
    .ElementShape = New EllipseShape(), _
    .BackColor = System.Drawing.Color.LightBlue _
}
shape1.Position = New Telerik.Windows.Diagrams.Core.Point(100, 10)
RadDiagram1.AddShape(shape1)
Dim shape2 As New RadDiagramShape() With { _
    .Text = "shape2", _
    .ZIndex = 2, _
    .ElementShape = New EllipseShape(), _
    .BackColor = System.Drawing.Color.LightGreen _
}
shape2.Position = New Telerik.Windows.Diagrams.Core.Point(150, 60)
RadDiagram1.AddShape(shape2)
Dim shape3 As New RadDiagramShape() With { _
    .Text = "shape3", _
    .ZIndex = 1, _
    .ElementShape = New EllipseShape(), _
    .BackColor = System.Drawing.Color.LightCoral _
}
shape3.Position = New Telerik.Windows.Diagrams.Core.Point(60, 60)
radDiagram1.AddShape(shape3)
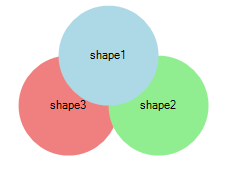
We have reversed the natural ZOrder of the 3 Shapes.

Using the RadDiagram Commands
RadDiagram provides a set of predefined commands for manipulating the selected items' ZIndices. "BringForward" and "SendBackward" allow you to increase/decrease the Z-Indices of the selected RadDiagramItems. If you need to bring the selected item(s) on top of all other items or below them, you can use "BringToFront" and "SentToback":
RadDiagramShape shape1 = new RadDiagramShape()
{
    Text = "shape1",
    ZIndex = 1,
    ElementShape = new EllipseShape(),
    BackColor = System.Drawing.Color.LightBlue
};
shape1.Position = new Telerik.Windows.Diagrams.Core.Point(100, 10);
radDiagram1.AddShape(shape1);

RadDiagramShape shape2 = new RadDiagramShape()
{
    Text = "shape2",
    ZIndex = 2,
    ElementShape = new EllipseShape(),
    BackColor = System.Drawing.Color.LightGreen
};
shape2.Position = new Telerik.Windows.Diagrams.Core.Point(150, 80);
radDiagram1.AddShape(shape2);

RadDiagramShape shape3 = new RadDiagramShape()
{
    Text = "shape3",
    ZIndex = 3,
    ElementShape = new EllipseShape(),
    BackColor = System.Drawing.Color.LightCoral
};
shape3.Position = new Telerik.Windows.Diagrams.Core.Point(60, 80);
radDiagram1.AddShape(shape3);

RadDiagramConnection connection1 = new RadDiagramConnection() { Name = "connection1" };
connection1.Source = shape1;
connection1.Target = shape2;
connection1.ZIndex = 2;
connection1.SourceConnectorPosition = "Right";
connection1.TargetConnectorPosition = "Right";

radDiagram1.Items.Add(connection1);

RadDiagramConnection connection2 = new RadDiagramConnection()
{
    Name = "connection2"
};
connection2.Source = shape1;
connection2.Target = shape3;
connection2.ZIndex = 1;
connection2.SourceConnectorPosition = "Left";
connection2.TargetConnectorPosition = "Left";
radDiagram1.Items.Add(connection2);
Dim shape1 As New RadDiagramShape() With { _
    .Text = "shape1", _
    .ZIndex = 1, _
    .ElementShape = New EllipseShape(), _
    .BackColor = System.Drawing.Color.LightBlue _
}
shape1.Position = New Telerik.Windows.Diagrams.Core.Point(100, 10)
radDiagram1.AddShape(shape1)
Dim shape2 As New RadDiagramShape() With { _
    .Text = "shape2", _
    .ZIndex = 2, _
    .ElementShape = New EllipseShape(), _
    .BackColor = System.Drawing.Color.LightGreen _
}
shape2.Position = New Telerik.Windows.Diagrams.Core.Point(150, 80)
RadDiagram1.AddShape(shape2)
Dim shape3 As New RadDiagramShape() With { _
    .Text = "shape3", _
    .ZIndex = 3, _
    .ElementShape = New EllipseShape(), _
    .BackColor = System.Drawing.Color.LightCoral _
}
shape3.Position = New Telerik.Windows.Diagrams.Core.Point(60, 80)
RadDiagram1.AddShape(shape3)
Dim connection1 As New RadDiagramConnection() With { _
    .Name = "aaaa" _
}
connection1.Source = shape1
connection1.Target = shape2
connection1.ZIndex = 2
connection1.SourceConnectorPosition = "Right"
connection1.TargetConnectorPosition = "Right"
RadDiagram1.Items.Add(connection1)
Dim connection2 As New RadDiagramConnection() With { _
    .Name = "bbbb" _
}
connection2.Source = shape1
connection2.Target = shape3
connection2.ZIndex = 1
connection2.SourceConnectorPosition = "Left"
connection2.TargetConnectorPosition = "Left"
radDiagram1.Items.Add(connection2)
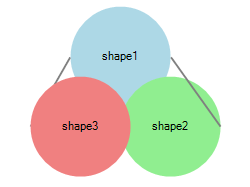
This way configured, the items in RadDiagram are ordered as illustrated below:

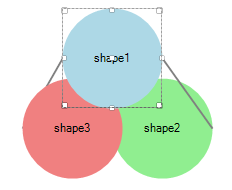
Here is the result of selecting the first shape and executing the DiagramCommands.BringToFront:

this.radDiagram1.SelectedItem = shape1;
this.radDiagram1.DiagramElement.TryExecuteCommand(DiagramCommands.BringToFront, "");
Me.RadDiagram1.SelectedItem = shape1
Me.RadDiagram1.DiagramElement.TryExecuteCommand(DiagramCommands.BringToFront, "")
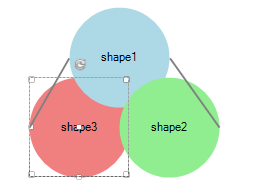
Here is the result of selecting the third shape and executing the DiagramCommands.SendToBack:

this.radDiagram1.SelectedItem = shape3;
this.radDiagram1.DiagramElement.TryExecuteCommand(DiagramCommands.SendToBack, "");
Me.RadDiagram1.SelectedItem = shape3
Me.RadDiagram1.DiagramElement.TryExecuteCommand(DiagramCommands.SendToBack, "")