The
RadListViewcontrol is now obsolete and will be removed in the future. Use the RadCollectionView control instead. TheRadCollectionViewis a complete, ground-up rewrite of the ListView. TheRadCollectionViewoffers improved performance, enhanced features, and a modernized approach to managing lists of data. TheRadCollectionViewincorporates all of the ListView's key features. More about the differences between both components and how to migrate to the newRadCollectionViewis available in the Migrating the Telerik .NET MAUI RadListView to RadCollectionView article.
.NET MAUI ListView Item Style Selector
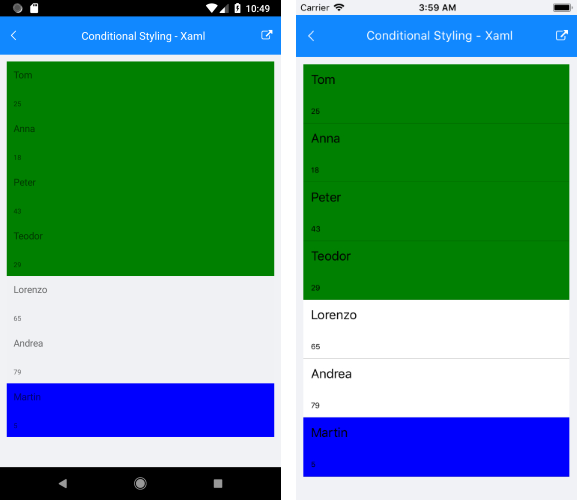
The ListView component exposes conditional styling feature. It allows users to apply a different Style to each item depending on a specific condition.
Example
The following example will demonstrate how to apply the Conditional Styling in the ListView control.
1. Set up the ListView control:
<telerik:RadListView x:Name="listView"
                     ItemsSource="{Binding Source}">
    <telerik:RadListView.BindingContext>
        <local:ViewModel />
    </telerik:RadListView.BindingContext>
    <telerik:RadListView.ItemTemplate>
        <DataTemplate>
            <telerik:ListViewTemplateCell>
                <telerik:ListViewTemplateCell.View>
                    <StackLayout>
                        <Label Margin="10" Text="{Binding Name}" />
                        <Label Margin="10"
                               FontSize="10"
                               Text="{Binding Age}" />
                    </StackLayout>
                </telerik:ListViewTemplateCell.View>
            </telerik:ListViewTemplateCell>
        </DataTemplate>
    </telerik:RadListView.ItemTemplate>

    <telerik:RadListView.ItemStyleSelector>
        <local:ExampleListViewStyleSelector />
    </telerik:RadListView.ItemStyleSelector>
</telerik:RadListView>
2. Create a simple data for the ListView component:
public class Person
{
    public Person(string name, int age)
    {
        this.Name = name;
        this.Age = age;
    }

    public string Name { get; set; }
    public int Age { get; set; }
}

public class ViewModel
{
    public ViewModel()
    {
        this.Source = new List<Person> {
            new Person("Tom", 25),
            new Person("Anna",18),
            new Person("Peter",43),
            new Person("Teodor",29),
            new Person("Lorenzo",65),
            new Person("Andrea",79),
            new Person("Martin",5) };
    }

    public List<Person> Source { get; set; }
}
3. You can set a different style for a specific item by using the ListViewStyleSelector class. We can use the OnSelectStyle method to change the styles of the items in the ListView control. A sample implementation of a custom class that derives from ListViewStyleSelector and overrides its OnSelectStyle method is presented below:
public class ExampleListViewStyleSelector : ListViewStyleSelector
{
    protected override void OnSelectStyle(object item, ListViewStyleContext styleContext)
    {
        var style = new ListViewItemStyle
        {
            BackgroundColor = Colors.Transparent
        };

    styleContext.ItemStyle = style;
    styleContext.SelectedItemStyle = new ListViewItemStyle
    {
        BackgroundColor = Colors.Gray,
        BorderColor = Colors.Red,
        BorderWidth = 2
    };

    var sourceItem = item as Person;
    if (sourceItem.Age < 18)
    {
        styleContext.ItemStyle.BackgroundColor = Colors.Blue;
    }
    else if (sourceItem.Age < 65)
    {
        styleContext.ItemStyle.BackgroundColor = Colors.Green;
    }
}


}

For Item Style Selector example, go to the SDKBrowser Demo Application and navigate to ListView -> Styling category.