Getting Started
This article will guide you through the steps needed to add a basic RadBadgeView control in your application.
- Setting up the app
- Adding the required Telerik references
- Adding RadBadgeView control
- Adding RadBadgeView Content
1. Setting up the app
Take a look at these articles and follow the instructions to setup your app:
2. Adding the required Telerik references
You have two options:
Add the Telerik UI for Xamarin Nuget package following the instructions in Telerik NuGet package server topic. Note that RadBadgeView does not have a separate nuget package.
Add the references to Telerik assemblies manually, check the list below with the required assemblies for RadBadgeView component:
| Platform | Assemblies |
|---|---|
| Portable | Telerik.XamarinForms.Primitives.dll Telerik.XamarinForms.Common.dll Telerik.XamarinForms.SkiaSharp.dll |
| Android | Telerik.XamarinForms.Primitives.dll Telerik.XamarinForms.Common.dll Telerik.XamarinForms.SkiaSharp.dll |
| iOS | Telerik.Xamarin.iOS.dll Telerik.XamarinForms.Primitives.dll Telerik.XamarinForms.Common.dll Telerik.XamarinForms.SkiaSharp.dll |
| UWP | Telerik.Core.dll Telerik.XamarinForms.Primitives.dll Telerik.XamarinForms.Common.dll Telerik.XamarinForms.SkiaSharp.dll |
3. Adding RadBadgeView control
If your app is setup, you are ready to add a RadBadgeView control to your page.
<telerikPrimitives:RadBadgeView/>
var badge = new RadBadgeView();
In addition to this you need to add the following namespace:
xmlns:telerikPrimitives="clr-namespace:Telerik.XamarinForms.Primitives;assembly=Telerik.XamarinForms.Primitives"
using Telerik.XamarinForms.Primitives;
4. Adding RadBadgeView Content and BadgeText
The Badge marker(indicator) which is part of the RadBadgeView will be visualized only if RadBadgeView
Contentproperty is set.
Example
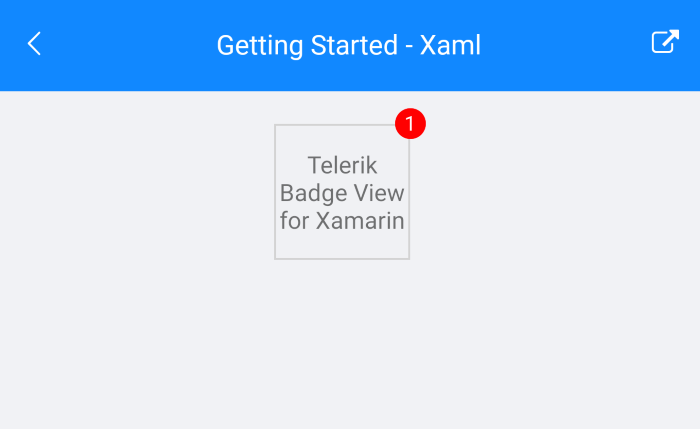
Add the RadBadgeView and set Content property and BadgeText property.
<telerikPrimitives:RadBadgeView BadgeText="1">
    <telerikPrimitives:RadBadgeView.Content>
        <telerikPrimitives:RadBorder WidthRequest="80"
                                     HeightRequest="80"
                                     BorderThickness="1"
                                     BorderColor="LightGray">
            <Label Text="Telerik Badge View for Xamarin"
                   FontSize="14"
                   VerticalTextAlignment="Center"
                   HorizontalTextAlignment="Center"/>
        </telerikPrimitives:RadBorder>
    </telerikPrimitives:RadBadgeView.Content>
</telerikPrimitives:RadBadgeView>
var badgeView = new RadBadgeView();
badgeView.BadgeText = "1";
badgeView.Content = new RadBorder
{
    WidthRequest = 80,
    HeightRequest = 80,
    BorderThickness = 1,
    BorderColor = Color.LightGray,
    Content = new Label
    {
        Text = "Telerik Badge View for Xamarin",
        FontSize = 14,
        VerticalTextAlignment = TextAlignment.Center,
        HorizontalTextAlignment = TextAlignment.Center,
    },
};
Here is the result:
Figure 1: BadgeView Getting Started
BadgeView Getting Started Example can be found in SDK Browser/Examples/BadgeViewControl/GettingStartedCategory folder.