Managing Docking Controls Dynamically
The purpose of this tutorial is to show you how to manage the RadDocking control dynamically (using procedural code or XAML).
The following operation will be examined:
Before reading this tutorial you should get familiar with the Visual Structure of the standard RadDocking control and its elements.
For the purpose of this tutorial, you will need to create an empty WPF Application project.
In order to use the RadDocking control in your projects you have to add a reference to Telerik.Windows.Controls.Docking.dll and Telerik.Windows.Controls.Navigation.
For the purpose of this tutorial the following RadDocking declaration will be used:
<telerik:RadDocking x:Name="radDocking">
    <telerik:RadSplitContainer x:Name="radSplitContainer">
        <telerik:RadPaneGroup x:Name="radGroup">
            <telerik:RadPane x:Name="radPane1" Header="Server Explorer"/>
            <telerik:RadPane x:Name="radPane2" Header="Toolbox"/>
            <telerik:RadPane x:Name="radPane3" Header="Properties"/>
        </telerik:RadPaneGroup>
    </telerik:RadSplitContainer>
</telerik:RadDocking>
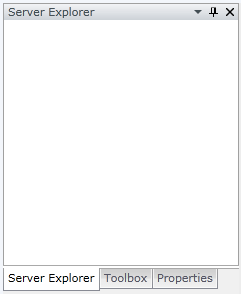
Making a Pane Floatable in the Code-Behind
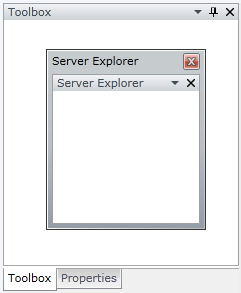
You can programmatically make a pane floatable by either calling MakeFloatingDockable() or MakeFloatingOnly() of the RadPane class. Both of these methods are doing one and the same thing - they will undock your pane and host it in a separate ToolWindow.
- Using the MakeFloatingDockable() method
private void MakeFloatingDockable()
{
    radPane1.MakeFloatingDockable();
}
Private Sub MakeFloatingDockable()
    radPane1.MakeFloatingDockable()
End Sub
- Using the MakeFloatingOnly() method
private void MakeFloatingOnly()
{
    radPane1.MakeFloatingOnly();
}
Private Sub MakeFloatingOnly()
    radPane1.MakeFloatingOnly()
End Sub
Note that if you make your pane floating using the MakeFloatingOnly() you will not be able to dock it back again using drag and drop, to make it dockable again you have to call the method MakeDockable().
Executing any of the described methods will lead to the following result:
MakeFloatingOnly(), MakeFloatingDockable() and MakeDockable() methods work only when all of the objects are constructed and added to the object tree. Which means that you should invoke them after the Loaded event of the RadDocking control has been fired.
Making a Pane Floatable in XAML
In order to make a pane floatable during design-time, you need to set the InitialPosition property of the respective RadSplitContainer either to FloatingDockable or FloatingOnly.
- Using the FloatingDockable initial position
<telerik:RadDocking x:Name="radDocking1">
    <telerik:RadSplitContainer x:Name="radSplitContainer1" InitialPosition="FloatingDockable">
        <telerik:RadPaneGroup x:Name="radGroup1">
            <telerik:RadPane x:Name="radPane11" Header="Server Explorer"/>
            <telerik:RadPane x:Name="radPane21" Header="Toolbox"/>
            <telerik:RadPane x:Name="radPane31" Header="Properties"/>
        </telerik:RadPaneGroup>
    </telerik:RadSplitContainer>
</telerik:RadDocking>
- Using the FloatingOnly initial position
<telerik:RadDocking x:Name="radDocking2">
    <telerik:RadSplitContainer x:Name="radSplitContainer2" InitialPosition="FloatingOnly">
        <telerik:RadPaneGroup x:Name="radGroup2">
            <telerik:RadPane x:Name="radPane12" Header="Server Explorer"/>
            <telerik:RadPane x:Name="radPane22" Header="Toolbox"/>
            <telerik:RadPane x:Name="radPane32" Header="Properties"/>
        </telerik:RadPaneGroup>
    </telerik:RadSplitContainer>
</telerik:RadDocking>
Note, that when setting the InitialPosition to FloatingOnly, you won't be able to dock the pane during run-time. In order to make the pane dockable again, you need to invoke the MakeDockable() method of the RadPane class.
Making a Pane Dockable in the Code-Behind
In order to make a pane dockable, you need to invoke the MakeDockable() method of an instance of the RadPane class.
private void MakeDockable()
{
    radPane1.MakeDockable();
}
Private Sub MakeDockable()
    radPane1.MakeDockable()
End Sub
MakeDockable method works only when all of the objects are constructed and added to the object tree. Which means that you should invoke it after the Loaded event of the RadDocking control has been fired.
Making a pane dockable will not dock the pane to any of the sides in the docking area. But it will allow the user to dock the pane during run-time via drag and drop.
Making a Pane Dockable in XAML
In order to make a pane dockable during design-time, you need to set the InitialPosition property of the respective RadSplitContainer to FloatingDockable, like it is shown in the code below.
<telerik:RadDocking x:Name="radDocking3">
    <telerik:RadSplitContainer x:Name="radSplitContainer3" InitialPosition="FloatingDockable">
        <telerik:RadPaneGroup x:Name="radGroup3">
            <telerik:RadPane x:Name="radPane13" Header="Server Explorer"/>
            <telerik:RadPane x:Name="radPane23" Header="Toolbox"/>
            <telerik:RadPane x:Name="radPane33" Header="Properties"/>
        </telerik:RadPaneGroup>
    </telerik:RadSplitContainer>
</telerik:RadDocking>
Setting the InitialPosition to FloatingDockable or FloatingOnly will make your pane(s) floating. However, using the FloatingOnly value will not allow the user to dock the pane during run-time.
Docking a Pane in the Code-Behind
In order to dock a pane in the code-behind, you need to use the AddItem method of the RadGroupPane class.
public void AddItem(RadPane item, DockPosition dockPosition) { }
Public Sub AddItem(ByVal item As RadPane, ByVal dockPosition As DockPosition)
End Sub
Docking a Pane Design-Time
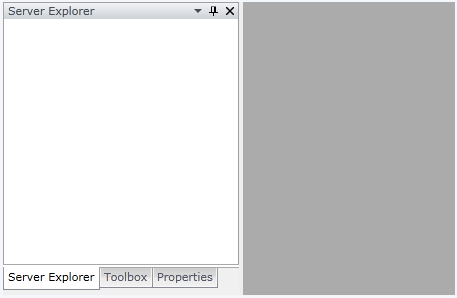
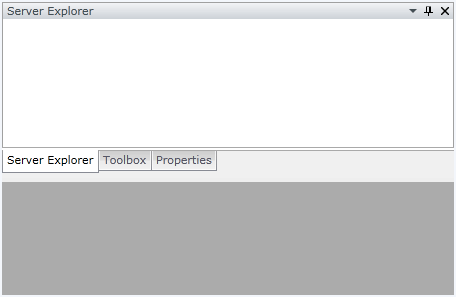
In order to dock a pane during design-time, you need to set the InitialPosition property of the respective RadSplitContainer to any of the following values:
- DockedLeft
<telerik:RadDocking x:Name="radDocking4">
    <telerik:RadSplitContainer x:Name="radSplitContainer4" InitialPosition="DockedLeft">
        <telerik:RadPaneGroup x:Name="radGroup4">
            <telerik:RadPane x:Name="radPane14" Header="Server Explorer"/>
            <telerik:RadPane x:Name="radPane24" Header="Toolbox"/>
            <telerik:RadPane x:Name="radPane34" Header="Properties"/>
        </telerik:RadPaneGroup>
    </telerik:RadSplitContainer>
</telerik:RadDocking>
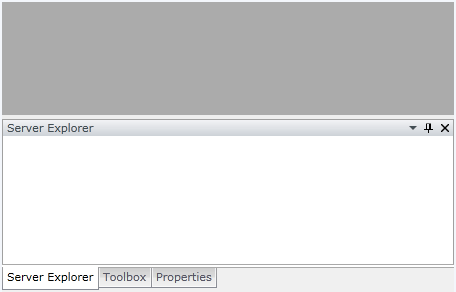
- DockedTop
<telerik:RadDocking x:Name="radDocking5">
    <telerik:RadSplitContainer x:Name="radSplitContainer5" InitialPosition="DockedTop">
        <telerik:RadPaneGroup x:Name="radGroup5">
            <telerik:RadPane x:Name="radPane15" Header="Server Explorer"/>
            <telerik:RadPane x:Name="radPane25" Header="Toolbox"/>
            <telerik:RadPane x:Name="radPane35" Header="Properties"/>
        </telerik:RadPaneGroup>
    </telerik:RadSplitContainer>
</telerik:RadDocking>
- DockedRight
<telerik:RadDocking x:Name="radDocking6">
    <telerik:RadSplitContainer x:Name="radSplitContainer6" InitialPosition="DockedRight">
        <telerik:RadPaneGroup x:Name="radGroup6">
            <telerik:RadPane x:Name="radPane16" Header="Server Explorer"/>
            <telerik:RadPane x:Name="radPane26" Header="Toolbox"/>
            <telerik:RadPane x:Name="radPane36" Header="Properties"/>
        </telerik:RadPaneGroup>
    </telerik:RadSplitContainer>
</telerik:RadDocking>
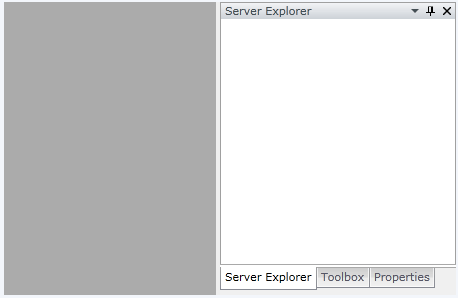
- DockedBottom
<telerik:RadDocking x:Name="radDocking7">
    <telerik:RadSplitContainer x:Name="radSplitContainer7" InitialPosition="DockedBottom">
        <telerik:RadPaneGroup x:Name="radGroup7">
            <telerik:RadPane x:Name="radPane17" Header="Server Explorer"/>
            <telerik:RadPane x:Name="radPane27" Header="Toolbox"/>
            <telerik:RadPane x:Name="radPane37" Header="Properties"/>
        </telerik:RadPaneGroup>
    </telerik:RadSplitContainer>
</telerik:RadDocking>
Pin/Unpin a Pane in the Code-Behind
In order to pin a pane in the code-behind, you need to set the IsPinned property of the RadPane class to True.
private void PinPane()
{
    radPane1.IsPinned = true;
}
Private Sub PinPane()
    radPane1.IsPinned = True
End Sub
Respectively, in order to unpin a pane in the code-behind, you need to set the IsPinned property of the RadPane class to False.
private void UnpinPane()
{
    radPane1.IsPinned = false;
}
Private Sub UnpinPane()
    radPane1.IsPinned = False
End Sub
If you intend to use the IsPinned property in the code-behind, make sure you are setting its value after the Loaded event has been fired. Otherwise it won't work.
Pin/Unpin a Pane in XAML
In order to pin a pane in XAML, you need to set the IsPinned attribute of the RadPane to True.
Respectively, in order to unpin a pane in XAML, you need to set the IsPinned attribute of the RadPane to False.
<telerik:RadDocking x:Name="radDocking8">
    <telerik:RadSplitContainer x:Name="radSplitContainer8">
        <telerik:RadPaneGroup x:Name="radGroup8">
            <telerik:RadPane x:Name="radPane18" Header="Server Explorer" IsPinned="False"/>
            <telerik:RadPane x:Name="radPane28" Header="Toolbox"/>
            <telerik:RadPane x:Name="radPane38" Header="Properties"/>
        </telerik:RadPaneGroup>
    </telerik:RadSplitContainer>
</telerik:RadDocking>
Closing a Pane in the Code-Behind
If you want to close a pane in the code-behind, then you need to set the IsHidden property of the RadPane class to True.
private void ClosePane()
{
    radPane1.IsHidden = true;
}
Private Sub ClosePane()
    radPane1.IsHidden = true
End Sub
To re-open the closed pane set IsHidden back to false.
Re-opening a closed pane
radPane1.IsHidden = true;
If you need further management of the RadDocking you can take a look at some of the following topics:
Hiding all panes.
Showing all panes.
Pin all panes.
Unpin all panes.
Disabling the Close ("X") Button.
Adding menu items to the RadPane's Menu.
Freezing the layout.
If you need further customizations of the RadDocking you can take a look at some of the following topics: