How to Customize or Remove RadPane's Menu
The purpose of this tutorial is to show you how to customize RadPane's menu.
For more information about the RadPane structure, read here. If you want to learn more about RadPane's menu, read this one.
Customizing RadPane's Menu
To add custom commands to RadPane's menu, you should perform the following steps:
-
You can create a custom class CustomRadDockingCommands. Inside, you can create a singleton property of type Telerik.Windows.Controls.RoutedUICommand. Example 1 demonstrates how you can do that.
Example 1: Create Singleton command property
public class CustomRadDockingCommands { private static RoutedUICommand closeAllPanesButThisCommand; public static RoutedUICommand CloseAllPanesButThisCommand { get { if (closeAllPanesButThisCommand == null) { closeAllPanesButThisCommand = new RoutedUICommand("Close all panes but this!", "CloseAllPanesButThisCommand", typeof(RadDockingCommands)); } return closeAllPanesButThisCommand; } } } -
Create a custom DataTemplate by using the Telerik's RadContextMenu and RadMenuItem controls. You can use either the built-in RadDockingCommands or create a custom one - both approaches are demonstrated in this topic. Set the created DataTemplate to RadPane's ContextMenuTemplate property. Example 2 show how to set RadPane's ContextMenuTemplate property.
Example 2: Custom DataTemplate for the ContextMenuTemplate property
<Window.Resources> <DataTemplate x:Key="ContextMenuTemplate"> <telerik:RadContextMenu InheritDataContext="False"> <telerik:RadMenuItem IsChecked="{Binding IsFloatingOnly}" Command="telerik:RadDockingCommands.Floating" CommandParameter="{Binding}" CommandTarget="{Binding}" Header="{Binding Command.Text, RelativeSource={RelativeSource Self}}" /> <telerik:RadMenuItem IsChecked="{Binding IsDockableOptionChecked}" Command="telerik:RadDockingCommands.Dockable" CommandParameter="{Binding}" CommandTarget="{Binding}" Header="{Binding Command.Text, RelativeSource={RelativeSource Self}}" /> <telerik:RadMenuItem Command="local:CustomRadDockingCommands.CloseAllPanesButThisCommand" CommandParameter="{Binding}" CommandTarget="{Binding}" Header="{Binding Command.Text, RelativeSource={RelativeSource Self}}" /> </telerik:RadContextMenu> </DataTemplate> <Style TargetType="telerik:RadPane"> <Setter Property="ContextMenuTemplate" Value="{StaticResource ContextMenuTemplate}" /> </Style> </Window.Resources> <Grid> <telerik:RadDocking x:Name="radDocking"> <telerik:RadSplitContainer> <telerik:RadPaneGroup> <telerik:RadPane Title="Pane 1" Content="Pane 1 Content" /> <telerik:RadPane Title="Pane 2" Content="Pane 2 Content" /> <telerik:RadPane Title="Pane 3" Content="Pane 3 Content" /> <telerik:RadPane Title="Pane 4" Content="Pane 4 Content" /> </telerik:RadPaneGroup> </telerik:RadSplitContainer> </telerik:RadDocking> </Grid> -
You should implement your custom logic in the OnCloseAllPanesButThis and OnCloseAllPanesButThisCanExecute methods. They specify whether the command can be executed and what action is performed, when it is executed. Example 3 demonstrates sample logic for the command methods.
Example 3: Implement Execute and CanExecute methods
public class CustomRadDockingCommands { private static RoutedUICommand closeAllPanesButThisCommand; public static RoutedUICommand CloseAllPanesButThisCommand { get { if (closeAllPanesButThisCommand == null) { closeAllPanesButThisCommand = new RoutedUICommand("Close all panes but this!", "CloseAllPanesButThisCommand", typeof(RadDockingCommands)); } return closeAllPanesButThisCommand; } } public static void OnCloseAllPanesButThis(object sender, ExecutedRoutedEventArgs e) { RadPane pane = e.Parameter as RadPane; if (pane != null) { RadPaneGroup paneGroup = pane.PaneGroup; if (paneGroup != null) { System.Collections.Generic.IEnumerable<RadPane> panesToClose = paneGroup.EnumeratePanes().Where(x => !x.IsHidden && x.IsPinned); foreach (RadPane paneToClose in panesToClose) { if (paneToClose != pane) { paneToClose.IsHidden = true; } } } } } public static void OnCloseAllPanesButThisCanExecute(object sender, CanExecuteRoutedEventArgs e) { e.CanExecute = false; RadPaneGroup paneGroup = sender as RadPaneGroup; if (paneGroup != null) { int childrenCount = paneGroup.EnumeratePanes().Count(x => !x.IsHidden && x.IsPinned); if (childrenCount > 1) { e.CanExecute = true; } else { e.CanExecute = false; } } } } -
Your menu command is ready and you have a custom DataTemplate, which is set to the ContextMenuTemplate property. The next step is to register your custom command by using the Telerik.Windows.Controls.CommandManager class in the CustomRadDockingCommands constructor. Example 4 shows the final structure of the CustomRadDockingCommands class.
Example 4: Register CloseAllPanesButThisCommand custom command
    public class CustomRadDockingCommands
    {
        private static RoutedUICommand closeAllPanesButThisCommand;

        public static RoutedUICommand CloseAllPanesButThisCommand
        {
            get
            {
                if (closeAllPanesButThisCommand == null)
                {
                    closeAllPanesButThisCommand = new RoutedUICommand("Close all panes but this!", "CloseAllPanesButThisCommand", typeof(RadDockingCommands));
                }
                return closeAllPanesButThisCommand;
            }
        }
        static CustomRadDockingCommands()
        {
            CommandManager.RegisterClassCommandBinding(typeof(RadPaneGroup), new CommandBinding(CustomRadDockingCommands.CloseAllPanesButThisCommand, OnCloseAllPanesButThis, OnCloseAllPanesButThisCanExecute));
        }

        public static void OnCloseAllPanesButThis(object sender, ExecutedRoutedEventArgs e)
        {
            RadPane pane = e.Parameter as RadPane;
            if (pane != null)
            {
                RadPaneGroup paneGroup = pane.PaneGroup;
                if (paneGroup != null)
                {
                    System.Collections.Generic.IEnumerable<RadPane> panesToClose = paneGroup.EnumeratePanes().Where(x => !x.IsHidden && x.IsPinned);
                    foreach (RadPane paneToClose in panesToClose)
                    {
                        if (paneToClose != pane)
                        {
                            paneToClose.IsHidden = true;
                        }
                    }
                }
            }
        }

        public static void OnCloseAllPanesButThisCanExecute(object sender, CanExecuteRoutedEventArgs e)
        {
            e.CanExecute = false;
            RadPaneGroup paneGroup = sender as RadPaneGroup;
            if (paneGroup != null)
            {
                int childrenCount = paneGroup.EnumeratePanes().Count(x => !x.IsHidden && x.IsPinned);

                if (childrenCount > 1)
                {
                    e.CanExecute = true;
                }
                else
                {
                    e.CanExecute = false;
                }
            }
        }
    }
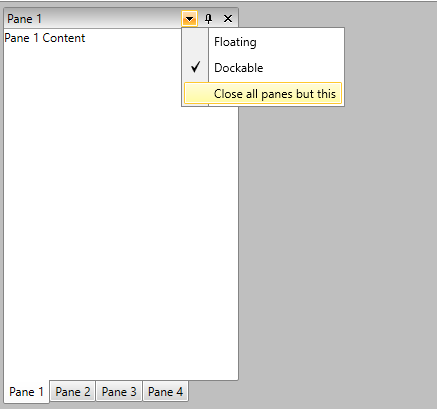
Run your demo. RadPane's menu should look like the snapshot below.
Removing RadPane's Menu
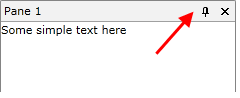
In order to remove RadPane's Menu, you should set RadPane's ContextMenuTemplate property to null (respectively {x:Null} in XAML).
Example 5: Set ContextMenuTemplate property to null
<telerik:RadDocking x:Name="radDocking">
    <telerik:RadDocking.DocumentHost>
        <telerik:RadSplitContainer>
            <telerik:RadPaneGroup>
                <telerik:RadPane x:Name="radPane"
                            Title="Pane 1"
                            ContextMenuTemplate="{x:Null}">
                    <TextBlock Text="Some simple text here" />
                </telerik:RadPane>
            </telerik:RadPaneGroup>
        </telerik:RadSplitContainer>
    </telerik:RadDocking.DocumentHost>
</telerik:RadDocking>
Example 6: Set ContextMenuTemplate property to null in code behind
radPane.ContextMenuTemplate = null;
radPane.ContextMenuTemplate = Nothing