Getting Started with WinForms DropDownList
This article shows how you can start using RadDropDownList.
| RELATED VIDEOS | |
|---|---|
| Getting Started with RadDropDownList | |
| In this video, you will learn how to bind data to the new RadDropDownList control. |  |
Adding Telerik Assemblies Using NuGet
To use RadDropDownList when working with NuGet packages, install the Telerik.UI.for.WinForms.AllControls package. The package target framework version may vary.
Read more about NuGet installation in the Install using NuGet Packages article.
With the 2025 Q1 release, the Telerik UI for WinForms has a new licensing mechanism. You can learn more about it here.
Adding Assembly References Manually
When dragging and dropping a control from the Visual Studio (VS) Toolbox onto the Form Designer, VS automatically adds the necessary assemblies. However, if you're adding the control programmatically, you'll need to manually reference the following assemblies:
- Telerik.Licensing.Runtime
- Telerik.WinControls
- Telerik.WinControls.UI
- TelerikCommon
The Telerik UI for WinForms assemblies can be install by using one of the available installation approaches.
Defining the RadDropDownList
The following tutorial demonstrates how to add items and images to a RadDropDownList and how to retrieve selected text and images.
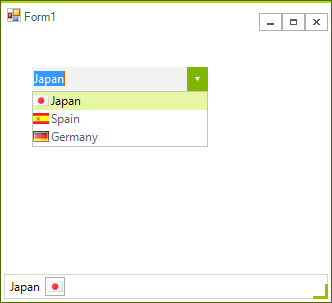
Figure 1: Select a country from RadDropDownList

Add a RadDropDownList and a RadStatusStrip to a form.
Add a few images to the project as resources.
-
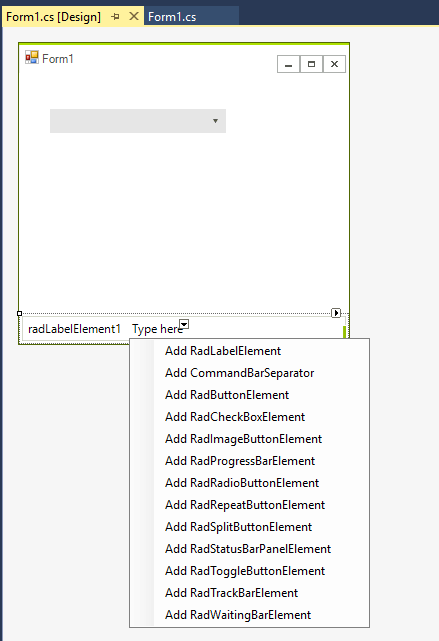
Using the downward arrow of the RadStatusStrip, add a RadLabelElement and a RadButtonElement. Set the DisplayStyle of the RadButtonElement to Image.
Figure 2: RadStatusStrip item elements

Select RadDropDownList and find the Items property in the Property Window of Visual Studio. Click the ellipsis button to open the RadItem Collection Editor. Click the
Addbutton three times to create three list items. Set the text of the first, second and third item to Japan, Spain and Germany respectively. Set the resource images to the Image property of the items. In addition, set the TextImageRelation property to ImageBeforeText.Click OK to close the RadItem Collection Editor.
In the Properties Window select the Events button.
Locate and double-click the RadDropDownList SelectedIndexChanged event to create an event handler.
Paste the following code to the SelectedIndexChanged event handler. The code retrieves the selected item and assigns the text and image for the selected item to the status bar label and image elements.
Handling the SelectedIndexChanged event
void radDropDownList1_SelectedIndexChanged(object sender, Telerik.WinControls.UI.Data.PositionChangedEventArgs e)
{
    if (this.radDropDownList1.SelectedIndex > -1)
    {
        this.radLabelElement1.Text = this.radDropDownList1.SelectedItem.Text;
        this.radImageButtonElement1.Image = this.radDropDownList1.SelectedItem.Image;
    }
}
Private Sub radDropDownList1_SelectedIndexChanged(ByVal sender As Object, ByVal e As Telerik.WinControls.UI.Data.PositionChangedEventArgs)
    If Me.radDropDownList1.SelectedIndex > -1 Then
        radLabelElement1.Text = Me.radDropDownList1.SelectedItem.Text
        Me.radImageButtonElement1.Image = Me.radDropDownList1.SelectedItem.Image
    End If
End Sub
This is it! Now the change in the selection of the RadDropDownList instance will be reflected on RadStatusStrip.
Telerik UI for WinForms Learning Resources
- Telerik UI for WinForms DropDownList Component
- Getting Started with Telerik UI for WinForms Components
- Telerik UI for WinForms Setup
- Telerik UI for WinForms Application Modernization
- Telerik UI for WinForms Visual Studio Templates
- Deploy Telerik UI for WinForms Applications
- Telerik UI for WinForms Virtual Classroom(Training Courses for Registered Users)
- Telerik UI for WinForms License Agreement)