.NET MAUI Autocomplete Display Text Formatting
The AutoComplete control provides the option to format the visualized text in the input, so you can modify the displayed details when item is get from the suggestion view. The format of the text can be defined when AutoComplete
DisplayMode
is Plain
or Tokens
:
-
DisplayTextFormatter
(IDisplayTextFormatter): Defines the formatter of the selected item.
To define the formatter of the selected item, you can use the following options:
- Set the
DisplayTextFortammer
property and define the name of the property from the business object which will be displayed after formatting. - Create a custom class that inherits from
IDisplayTextFormatter
and implement a custom logic how the selected item can be formatted.
Example
DisplayText Formatter with DisplayMode Plain
Here is an example how the RadAutoComplete
DisplayTextFormatter
works on Plain DisplayMode
:
1. Create the needed business objects, for example type Client with the following properties:
public class Client
{
public Client() { }
public Client(string name, string imageSource)
{
this.Name = name;
this.ImageSource = imageSource;
}
public Client(string name, string email, string imageSource)
{
this.Name = name;
this.Email = email;
this.ImageSource = imageSource;
}
public string Name { get; set; }
public string Email { get; set; }
public string ImageSource { get; set; }
}
2. Create a ViewModel with a collection of Client objects:
public class ClientsViewModel
{
public ClientsViewModel()
{
this.Source = new ObservableCollection<Client>()
{
new Client("Freda Curtis", "fcurtis@mail.com", "available.png"),
new Client("Jeffery Francis", "jfrancis@mail.com", "away.png"),
new Client("Eva Lawson", "elawson@mail.com", "available.png"),
new Client("Emmett Santos", "esantos@mail.com", "busy.png"),
new Client("Theresa Bryan", "tbryan@mail.com", "available.png"),
new Client("Jenny Fuller", "jfuller@mail.com", "busy.png"),
new Client("Terrell Norris", "tnorris@mail.com", "away.png"),
new Client("Eric Wheeler", "ewheeler@mail.com", "away.png"),
new Client("Nida Carty", "ncarty@mail.com", "away.png"),
new Client("Niki Samaniego", "nsamaniego@mail.com", "busy.png")
};
}
public ObservableCollection<Client> Source { get; set; }
}
3. Create a class, for example, MyTextFormatter
that inherits from Telerik.Maui.Controls.AutoComplete.IDisplayTextFormatter
:
public class MyTextFormatter : IDisplayTextFormatter
{
public string FormatItem(object item)
{
var businessItem = item as Client;
return string.Format("Name: {0}, Email: {1}", businessItem.Name, businessItem.Email);
}
}
4.Use the following snippet to declare a RadAutoComplete
in XAML:
<telerik:RadAutoComplete x:Name="autoCompleteView"
ItemsSource="{Binding Source}"
TextSearchPath="Name"
BackgroundColor="White"
DisplayMode="Plain"
SuggestionViewMaxHeight="150">
<telerik:RadAutoComplete.DisplayTextFormatter>
<local:MyTextFormatter />
</telerik:RadAutoComplete.DisplayTextFormatter>
</telerik:RadAutoComplete>
DisplayText Formatter with DisplayMode Token
Here is an example how the RadAutoComplete
DisplayTextFormatter
works on Tokens
:
First, create the needed business objects, for example type Client with the following properties:
1. Create the needed business objects, for example type Client with the following properties:
public class Client
{
public Client() { }
public Client(string name, string imageSource)
{
this.Name = name;
this.ImageSource = imageSource;
}
public Client(string name, string email, string imageSource)
{
this.Name = name;
this.Email = email;
this.ImageSource = imageSource;
}
public string Name { get; set; }
public string Email { get; set; }
public string ImageSource { get; set; }
}
2. Create a ViewModel with a collection of Client objects:
public class ClientsViewModel
{
public ClientsViewModel()
{
this.Source = new ObservableCollection<Client>()
{
new Client("Freda Curtis", "fcurtis@mail.com", "available.png"),
new Client("Jeffery Francis", "jfrancis@mail.com", "away.png"),
new Client("Eva Lawson", "elawson@mail.com", "available.png"),
new Client("Emmett Santos", "esantos@mail.com", "busy.png"),
new Client("Theresa Bryan", "tbryan@mail.com", "available.png"),
new Client("Jenny Fuller", "jfuller@mail.com", "busy.png"),
new Client("Terrell Norris", "tnorris@mail.com", "away.png"),
new Client("Eric Wheeler", "ewheeler@mail.com", "away.png"),
new Client("Nida Carty", "ncarty@mail.com", "away.png"),
new Client("Niki Samaniego", "nsamaniego@mail.com", "busy.png")
};
}
public ObservableCollection<Client> Source { get; set; }
}
3. Use the following snippet to declare a RadAutoComplete
in XAML:
<telerik:RadAutoComplete x:Name="radAutoCompleteView"
ItemsSource="{Binding Source}"
TextSearchPath="Name"
DisplayTextFormatter="Email"
BackgroundColor="White"
DisplayMode="Tokens"
SuggestionViewMaxHeight="150">
</telerik:RadAutoComplete>
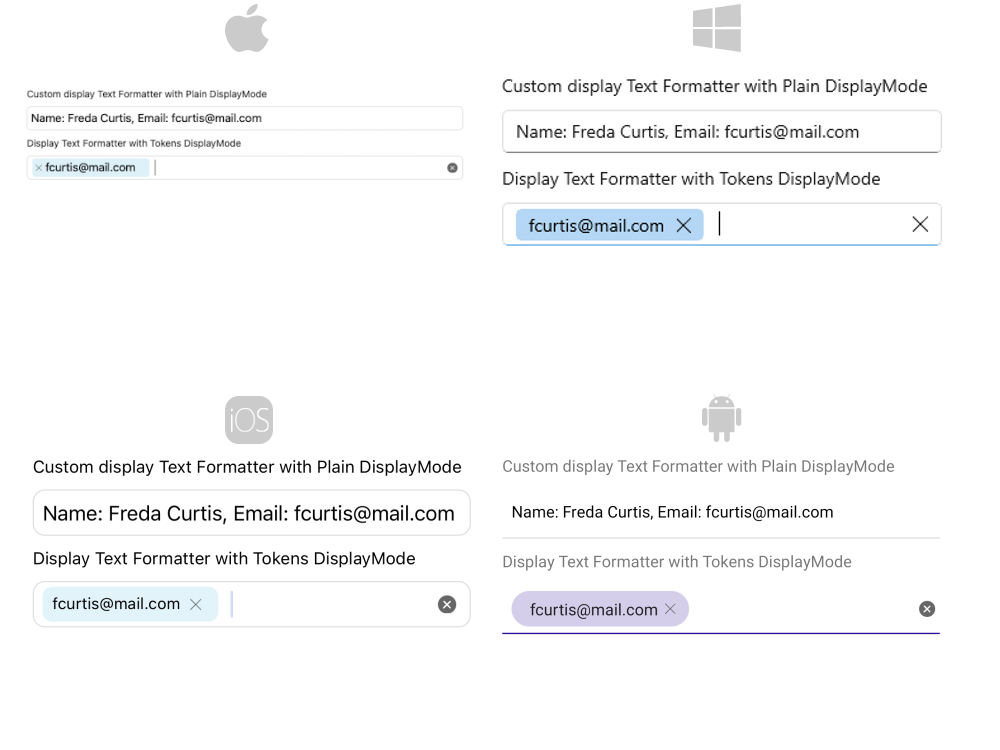
Here is how the DisplayText Formatter looks in both cases:
For Autocomplete DisplayText Formatter example refer to the SDKBrowser Demo application.