Part 1 - Hello jQuery
This tutorial will walk you through building an HTML5 application in ASP.NET. In this first out of five parts you are going to learn:
- How to install jQuery
- How to use jQuery with Web Forms
- How to use the Internet Explorer
F12Developer Tools
This module covers the very basic information that you need to know about jQuery and how to use it inside Visual Studio/Internet Explorer. There are some good tips on things you can do with the Internet Explorer Developer Tools here as well. Check out the screencast, or skip to the written summary below.
Screencast
Written Summary
In this tutorial, you are going to build a sample application, which takes in a user's first and last name, and returns a greeting. First, you will build the application in a typical Web Forms fashion, then you will refactor the application to use jQuery.
Create Sample Application
Open Visual Studio. All of these examples use Visual Studio 2010 and .NET Version 4.0. Remember that the only limiting factor to your HTML5 development is the browser. As long the browser is capable, .NET is capable.
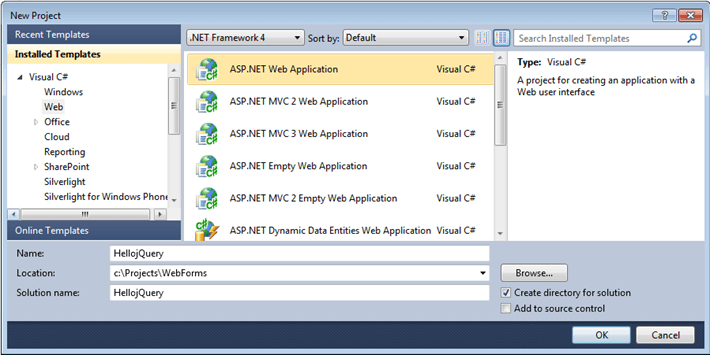
Select File/New Project and select the ASP.NET Web Application project template. Name the application HellojQuery.
Figure 1: The creation of a new project
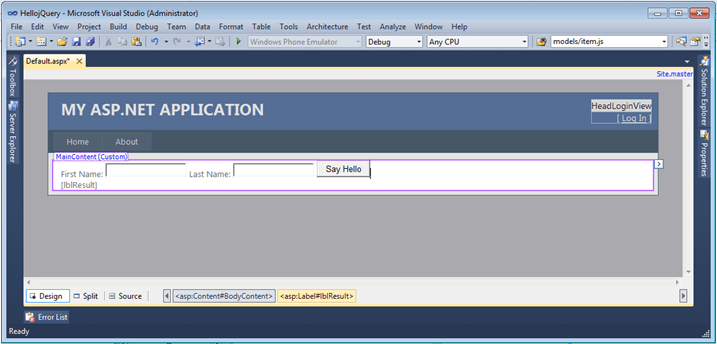
Open the Default.aspx page. Switch to a Design view and delete all the content. Drag out two TextBoxes, a Button, and a Label control from the toolbox. Against First Name: type a name. After the first text box, put a space and type in the field against Last Name:. Put a space between the second text box and the Button. Put the label on the following line by pressing Enter.
Name the first text box txtFirstName, the second one txtLastName. Name the Button btnSayHello and change its Text property to Say Hello. Set the Label ID to lblResult and clear out the Text property.
Figure 2: The default design view
Double-click the Say Hello button to create a new button click event in the Default.aspx.cs file. Set the label text equal to the string Hello concatenated with the Text property of txtFirstName and the Text property of txtLastName.
The example below demonstrates the btnSayHello click event.
protected void btnSayHello_Click(object sender, EventArgs e) {

    lblResult.Text = "Hello " + txtFirstName.Text + " " + txtLastName.Text;

}
Use Internet Explorer Developer Tools
Press F5 or the Run icon and run the application. Do not enter your name in yet, nor click the button. Instead, press F12 to open the Internet Explorer Developer Tools. Switch to the Network tab and click Start Capturing.
Figure 3: The F12 developer tools
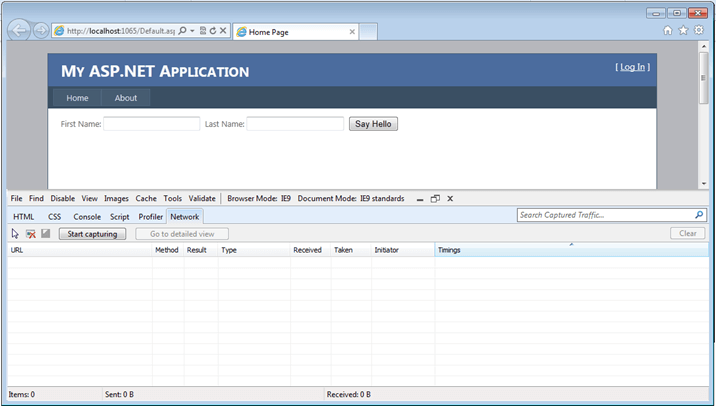
Refresh the page. Notice that the Network tab now shows three items. The first one is the Default.aspx page that you are looking at. The second is the CSS file that is referenced in the head of the Default.aspx page. The last one is the WebResource.axd file which contains JavaScript and other resources for the page as determined by Web Forms related to the ASP.NET controls that you choose to use.
Note that the method for all three requests is a GET. This means that the browser requested three files from the server and did that with an HTTP GET. A GET is commonly used when requesting information from a server. By default when you visit a URL, your browser will do a GET to retrieve the requested site.
Figure 4: The network traffic for a GET

Now fill out the form in the application with your first name and click the Say Hello button. The server responds as expected by setting the label text equal to the first name field plus the last name field. Have another look at the network traffic pane. It looks nearly identical, but the Default.aspx page was retrieved this time with a POST. This is because this time the browser sent some data to the server specifically the values of the first name and last name text boxes. When browsers send information to the server and expect a response, this is typically done with a POST method.
Figure 5: The network traffic for a POST

In ASP.NET Web Forms, the page posts back to itself, or to the same URL. To inspect the information that was sent to the server, double-click on the POST method and click on the Request Body tab.
Figure 6: The network request body

Here you can see that the _VIEWSTATE object was sent back to the server. If you scroll down far enough, you are going to find the values of the first and last name text boxes in the viewstate object. What happened is that the browser did a POST to the server requesting the page, but also passing in the values of the text boxes. The server event was fired, the HTML in the Default.aspx page was altered and then sent to the browser.
This requires a complete round trip to the server. This means that the browser has to load up the page all over again. This is completely unnecessary (especially in this simple application).
jQuery is a simple JavaScript library that allows the developer to interact with the HTML of the page (amongst many other things) in a very straightforward way.
Add jQuery to Project
Visual Studio projects actually come with jQuery in the Scripts folder by default. However, these jQuery and VSDoc files may be out of date and not connected with a Nuget installation. Delete the jQuery files in the Scripts folder, including the VSDoc file.
To install jQuery from Nuget, right-click the project and select Add Library Package Reference > Online from the left-hand side and enter jquery in the search box. Click the Install button on the jQuery package. This will install the VSDoc files as well. There is no need to install them separately.
Figure 7: The NuGet jQuery search

This is going to put the latest version of jQuery in the Scripts folder. There are three files there:
-
jquery-1.9.1.js- This is the full jQuery source file. -
jquery-1.9.1.min.js- The minified version of jQuery, which removes all whitespace and comments, as well as [minifies](https://en.wikipedia.org/wiki/Minification_(programming) the script to make it as small as possible. This version is identical to the first one in every way except that it is unreadable for debugging. This is generally the file that is used when an application is in production. For development, use the full jQuery version. -
jquery-1.9.1-vsdoc.js- Provides IntelliSense inside Visual Studio for jQuery. As long as this file is named in the same way as the jQuery file, IntelliSense will work.
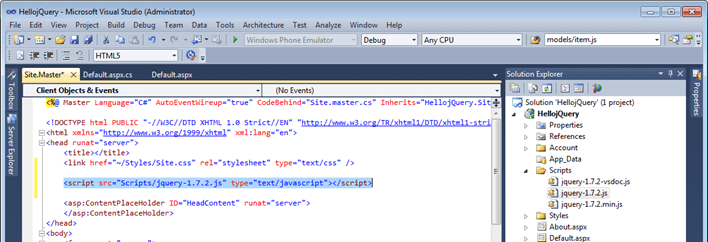
Open up the Site.Master page. Drag the full jQuery source into the head of the page, directly below the link tag to Site.css. This creates a new link tag pointing to the jQuery-1.9.1.js file. JQuery is now added to the project.
Figure 8: jQuery that is added to the master page
Use jQuery Directly in Browser
Run the application again. When it comes up, open the developer tools by selecting F12. Switch to the Console tab in the developer tools. The console allows a developer to execute arbitrary JavaScript commands at runtime. As a test, type alert("Hello!"); in the console and press Enter.
Figure 9: The Hello alert popup

jQuery code can be executed either by calling methods off of the jQuery object, or simply using the $. The $ is commonly known and recognized as representing jQuery.
For this project, you are expected to know that jQuery selects items out of the DOM. The DOM is the Document Object Model, but you can think of this as just your page. jQuery allows you to select elements out of your page and get or set different properties on the elements. jQuery has many types of selectors, but it is important to be very comfortable with the following two basic types of selectors:
Type 1. ID Selectors - This is when you select an element based upon its unique ID. Every HTML element on your page must have a unique ID. This is done by using the # (number) sign.
The example below demonstrates how to select an element by ID with jQuery.
// gets the First Name text box
var txtFirstName = $("#txtFirstName");
Type 2. Class Selectors - When an element, or a group of elements, is selected by the CSS class. If you have several elements on a page with the same class, all of them will be returned. This is done by using the . (dot) sign.
The example below demonstrates how to select elements by class with jQuery.
// gets the text boxes with a textbox class
var textboxes = $(".textbox");
Enter a first and last name in the text boxes in the application before proceeding.
To select the First Name text box value in this project, remember that you set the ID earlier in this tutorial to txtFirstName. You then need to call the jQuery val() method to retrieve the text inside the text box.
The example below demonstrates how to get the text of txtFirstName by entering the command in the console and pressing Enter.
// gets the text of the element with a txtFirstName ID
$("#txtFirstName").val();
Notice that the command is echoed out into the console, but there is no value. This mistake was made on purpose to demonstrate an important feature of ASP.NET Web Forms.
Figure 10: The no-value txtFirstName
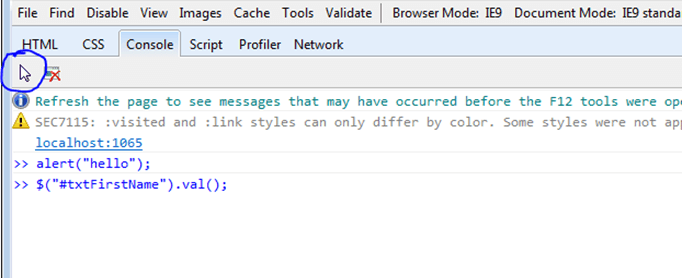
To figure out why this did not work, click on the white arrow which is the element selector. Then go up into the page and click on the text box that you named txtFirstName. The HTML tab opens and the element in the page is highlighted. Notice that its ID is not txtFirstName, but rather MainContent_txtFirstName. This is because the controls were added to a content container in Default.aspx. In ASP.NET Web Forms, controls added to a parent server control are prefixed with the parent name. If parents are nested within parents, they may have multiple values appended onto the front. This is to make sure that IDs do in fact remain unique.
Figure 11: The prefixed txtFirstName
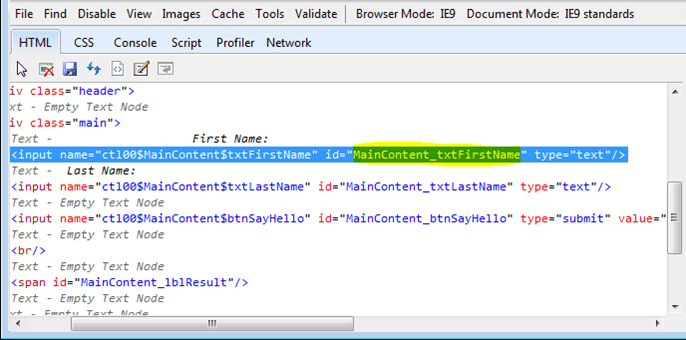
Switch back to the Console tab and, keeping in mind the actual ID of txtFirstName at runtime, get the text of txtFirstName by entering the following command in the console.
// gets the text of the element with a txtFirstName id
$("#MainContent_txtFirstName").val();
Notice that the text value of the first name text box is returned.
Figure 12: The txtFirstName having a value

Refactor Application to Use jQuery
Given that you can select any element in the page, and get or set its value, switch back to Visual Studio and open up the Default.aspx file. Right above the closing </asp:Content> tag, open a new script block. You do not have to specify the type of the script block. All script blocks are assumed to be JavaScript unless otherwise specified.
The example below demonstrates how to open a new script block.
<script>
    // ... JavaScript will go here
</script>
Execute Document Ready
Another important concept in jQuery is the Document Ready function. This is a function that jQuery executes when the page finishes loading. This is important as you do not want to execute any code until all libraries, CSS, and HTML elements have been loaded on the page.
The shorthand for this function is to declare a function, wrap that function in parenthesis (()) and put the jQuery $ at the front. This should be committed to memory as it is used quite frequently in jQuery-powered applications.
The example below demonstrates how to create a document ready function.
<script>

    $(function() {
        // no code here is executed until the page has
        // finished loading
    });

</script>
Before writing any code in the Document Ready, a slight modification is needed in the HTML. All the contents inside Default.aspx is ultimately rendered inside a Form tag that is in the Master page. This means that any button click will cause the page to post back or rather, submits the page to the server. This is the round trip that we are attempting to eliminate. Remove the Button markup and replace it with plain HTML that renders an input with a type of button. This is going to display a button whose click does not cause the form to post.
The example below demonstrates how to replace an ASP button control with standard input.
<!-- Replace This -->
<asp:Button ID="btnSayHello" runat="server" onclick="btnSayHello_Click" Text="Say Hello" />

<!-- With This -->
<input type="button" id="btnSayHello" value="Say Hello" />
To create a new click event for the input button, select the button with jQuery and then specify its click event. When the click event is specified, a function is passed in and it is going to be executed when the button click actually occurs. Notice that it is unnecessary to prefix the new button with MainContent, because while it is in an ASP.NET Content Area, it is not a server control and consequently its ID is not modified at runtime.
The example below demonstrates how to create a click event for the new button.
<script>

    $(function() {

        $("#btnSayHello").click(function() {

            // all code here will be executed when
            // btnSayHello is clicked

        });

    });

</script>
Select both the First name and Last name text boxes and store their values in variables. Lastly, the lblResult control renders as a <span> tag at runtime. To set the text that is rendered inside the span tag, select the lblResult control with jQuery and set its html property.
The example below demonstrates the full click event code.
<script>

    $(function() {

        $("#btnSayHello").click(function() {

            // get the values of the first and last name text boxes
            var firstName = $("#MainContent_txtFirstName").val();
            var lastName = $("#MainContent_txtLastName").val();

            // set the text of the label
            $("#MainContent_lblResult").html("Hello " + firstName + " " + lastName);

        });

    });

</script>
Run the application. Fill in a First name and Last name value. Click the button and note that the value of the label is updated, but the page never posts back to the server. All manipulation happens on the client side.
Further Reading
To get a further and exhaustive understanding of jQuery, it is highly recommended that you go through the 30 Days To Learn jQuery course on TutsPlus. After finishing this set of learning screencasts for jQuery, you are not only going to feel extremely comfortable with the library, but also have vastly accelerated your overall skills in HTML5 development.
The code from this module can be downloaded from the GitHub repository course.
Tutorials on how to build an HTML application in ASP.NET: