Part 2 - Hello Services
This tutorial will walk you through the creation of RESTful services with ASP.NET Web API. In this second out of five parts you are going to learn:
- How to install ASP.NET Web API
- How to create a service that supports CRUD (Create, Read, Update, Destroy) operations
- How to wire up a web page to a Web API Service
- How to debug Web API Services
This module will cover how to create a RESTful service with ASP.NET Web API, and how to consume that service in JSON format with jQuery. There is also a very quick primer on the concept of REST and JSON, as well as a good look at using the IE F12 Developer Tools to debug your application.
All code used in this module can be downloaded from the GitHub project course. Feel free to download the finished product, or follow the screencast or the written content.
Screencast
Written Summary
In this tutorial, you are going to build a sample application which displays data from an SQL Server table using AJAX to fetch the data from a Web API service. You will also add CRUD abilities to both the UI and the service while learning how to stay RESTful with your service implementation.
Quick Primer on REST and JSON
REST stands for Representational State Transfer. It is a pattern for developing services which lets the HTTP requests describe what sort of action should be done, and what format the data should be in and it allows the server to indicate success or failure by using HTTP codes. Through applying this strategy, it is easy to construct very predictable URLs from web services so that consuming them becomes much easier. There is much more to REST than that short explanation, but this tutorial tries to stay as RESTful as possible.
JSON is an acronym that stands for JavaScript Object Notation. This is a way of serializing data and objects into a very simple and easy to understand string representation. The JSON format is not only easily consumable by JavaScript, but is also much easier for humans to read and debug.
Create Sample Application
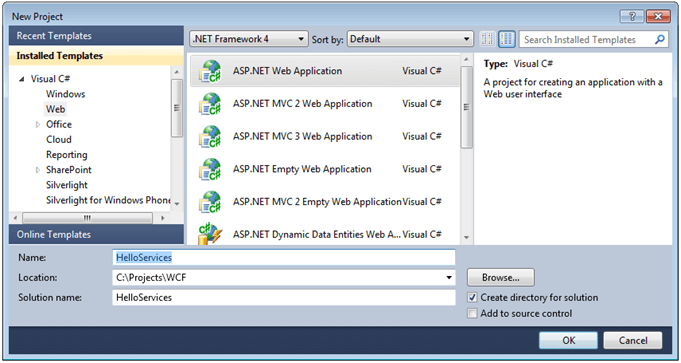
Open Visual Studio. Select File/New Project and select the ASP.NET Web Application template. Name the application HelloServices.
Figure 1: Filing a new project
Open the Default.aspx page and delete all the content.
Project Structure
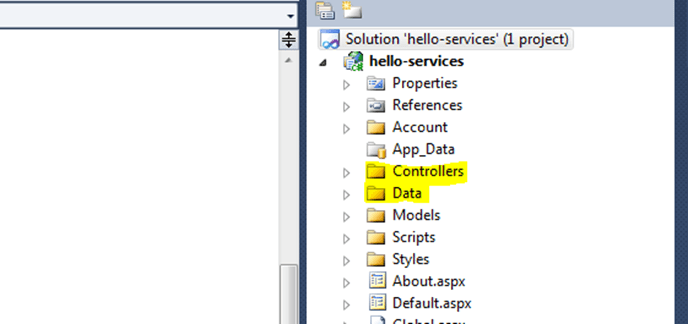
Before proceeding with this project, create some structure for the application to keep it organized. Create a folder called Data directly under the main project which will hold the data access layer. Create a second folder called Controllers which will hold the Web API service that will be created in this tutorial.
Figure 2: Data controllers
Create Data Access Layer
The Northwind Database project is going to be used for the purpose of this tutorial and LINQ To SQL is going to be applied as the Data Access layer because of its simplicity and ease of use. Make sure you install the Northwind Database before proceeding.
Right-click the Data folder. Select Add New Item > LINQ To SQL Classes. Give the dbml file the name NorthwindContext.dbml Click Add. This will bring up the LINQ To SQL designer surface. Open the Servers Explorer window either from the left-hand side, or from the View menu. Expand the Northwind database and expand Tables. Drag the Employees table onto the design surface. Save the file.
Figure 3: Adding LINQ to SQL
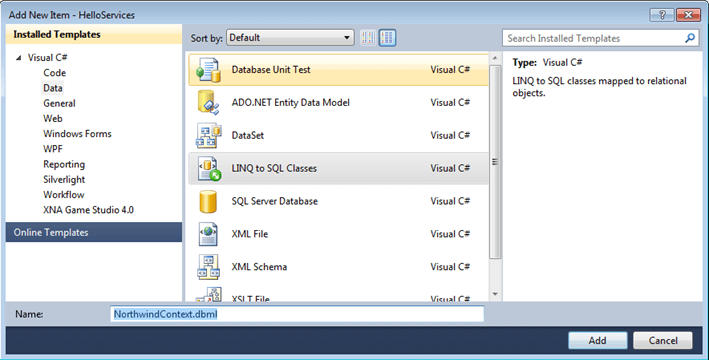
Figure 4: Added LINQ to the SQL Table

Install NuGet Packages
Install Web API
Before the service that returns the data from the database can be created, make sure you install Web API from NuGet.
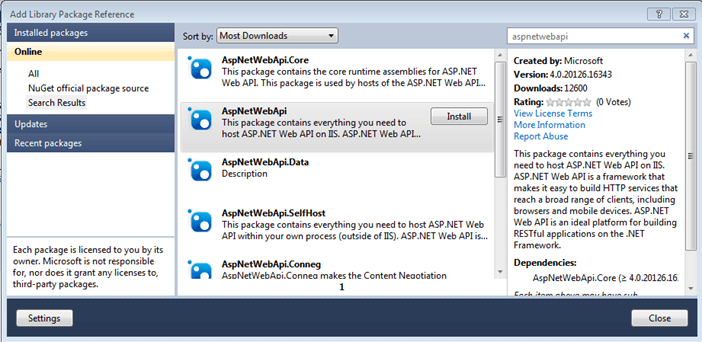
Right-click the project and select Add Library Package Reference. When the dialogue comes up, click the online tab on the left-hand side and enter aspnetwebapi in the search box. Select AspNetWebApi from the search result and click the Install button. Accept the package dependencies and install those as well.
Figure 5: Nuget ASP.NET Web API
Install jQuery
Enter jquery in the Search box. Select jQuery and then Install.
Figure 6: Installing jQuery
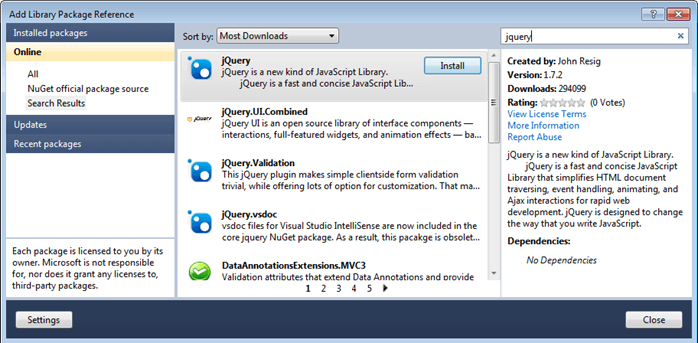
Close the Add Library Package Reference dialogue.
Create Web API Service
To create the Web API Service, an empty class is needed. Right-click the Controllers folder. Select Add > Class. Name the class EmployeesController.cs
Figure 7: Employees Controller

To designate the EmployeesController.cs class that was just added as a Web API controller that will respond to requests, inherit from the ApiController class. If ApiController is not recognized for you, hover over the word until you get the context menu. This will give you the option to include System.Web.Http. Optionally, you can achieve the same result by pressing Alt+Shift+F10, which brings up the same context menu.
Figure 8: Employee controller inheriting the API controller class

This class will contain methods that can be invoked from the web service that is being created. This service represents the Employees table in the Northwind Database. This is the table that is going to be used in this tutorial for data.
A typical RESTful endpoint will respond to the following HTTP verbs:
-
GET- Used when a browser is requesting data from the server. -
PUT- Typically used when updating an item. -
POST- Typically used when creating a new item. -
DELETE- Used when deleting an item.
To start with, create a get method. This method returns all of the data in the Employees table in the Northwind Database. Name the method Get(). The method should return a list of Data.Employee objects. The Data.Employee object is created automatically for you by LINQ To SQL when the Employees table was added to the LINQ To SQL designer surface.
Create an instance of the Data.NorthwindDataContext at the top of the file and name it _context This is the object that is used to query the database.
Inside the Get() method, write a simple LINQ query to retrieve all employees from the Employees table.
The example below demonstrates the LINQ query to select all employees.
public List<Data.Employee> Get() {

    var employees = from e in _context.Employees
                    select e;

    return employees.ToList();

}
Since Web API operates on convention over configuration, simply naming this method Get is enough to designate as the method that will respond to the HTTP GET.
Figure 9: Returning a LINLINQ to the SQL object
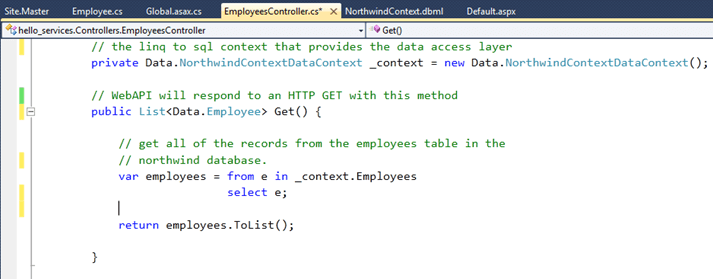
You can override this convention by specifying to the verb you want a method to respond to by decorating the method with the correct attribute (i.e. HttpPut).
Set Up Routing
Before Web API can return results via a URL, a route needs to be set up, so that the application knows to map a specific route back to the EmployeesController.cs file in the Controllers folder.
Open the Global.asax file. Under the Application_Start method, add the following code demonstrated in the example below.
void Application_Start(object sender, EventArgs e) {

    // intialize the default routing configuration

    RouteTable.Routes.MapHttpRoute(
        name: "DefaultApi",
        routeTemplate: "api/{controller}/{id}",
        defaults: new { id = System.Web.Http.RouteParameter.Optional });
}
This block initializes routing for Web API. This is how it knows to route URLs to certain controllers. In this case, the default route says that anything coming after /api on the root should be routed to a controller. It is also passing an optional id parameter to the end of the URL. If the id is passed, it is handed off to the proper method. If nothing is passed, it is ignored. This means that the route for the EmployeesController will be something like http://your-server/api/employees.
Test the Application
Press F5 to build and run the application. You will notice that the application throws an error that is somewhat obscure. If you inspect the details of that error, it will tell you that it cannot serialize the LINQ To SQL object.
Figure 10: Serialization error
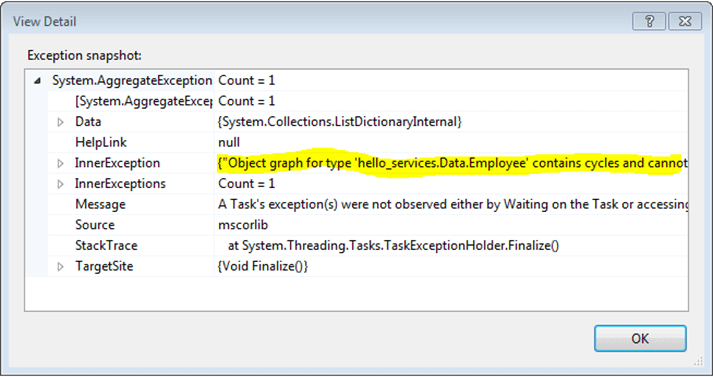
This is because .NET cannot serialize the LINQ To SQL object that is being returned by the Get() method in the EmployeesController.cs file. LINQ To SQL Objects are rather complex and contain far more information than what is actually needed by the UI, which is the raw data.
Add Model
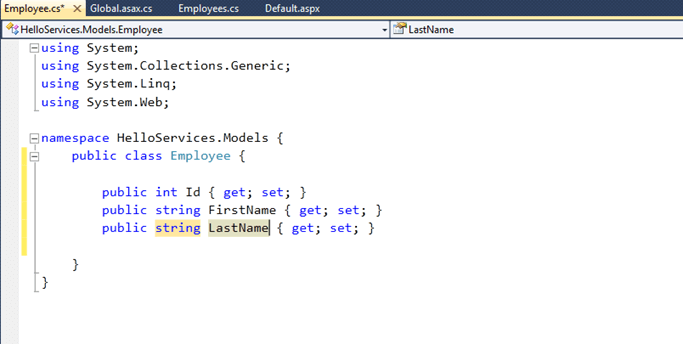
To get the raw data out of the LINQ To SQL objects and into a format that .NET can easily serialize, you will create a model object which will represent one row in the Employees table. This model will have properties that mirror the columns in the Employees table. For the sake of brevity, add only three properties to the model.
Right-click the project in Visual Studio and select Add Folder. Name this folder Models. Right-click the Models folder. Select Add > Class. Optionally, you can achieve the same effect by pressing Shift+Alt+C. Name this class Employee. In the Employee class, which is now in the Models folder, add three properties. One for the employee ID, first name, and last name.
The example below demonstrates the Employee model object.
public class Employee {

    public int Id { get; set; }

    public string FirstName { get; set; }

    public string LastName { get; set; }

}
Figure 11: Employee model
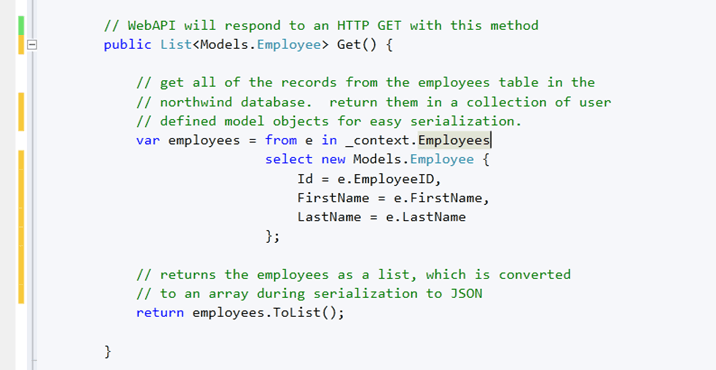
Open up the EmployeesController.cs file in the Controllers folder. Alter the Get() method to return a list of Model.Employee objects instead of a list of Data.Employee objects. Also alter the LINQ To SQL Query so that it selects a new Employee model object for each row returned from the database.
The example below demonstrates how to return a list of Employee model objects.
public List<Model.Employees> Get() {

    // select a new model object for each row in the
    // linq query result

    var employees = from e in _context.Employees
                    select new Models.Employee {
                        Id = e.EmployeeID,
                        FirstName = e.FirstName,
                        LastName = e.LastName
                    };

    return employees.ToList();

}
Figure 12: Web get
Test the Application
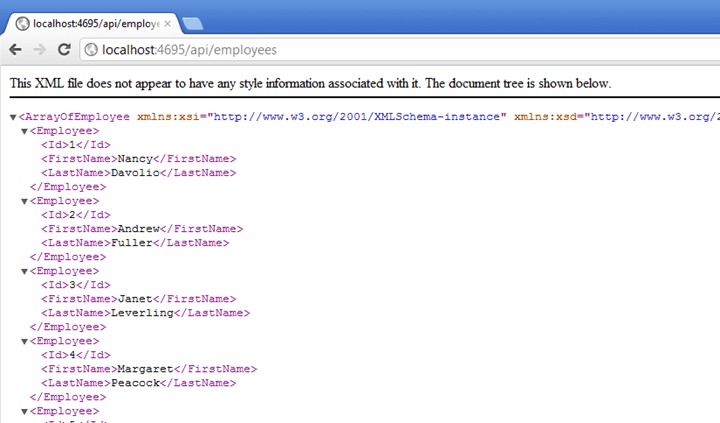
Press F5 to run the application again. Navigate to the api/employees URL. Notice that Web API returns the records from the Northwind Employees table in XML format. Internet Explorer will try to download the file, but other browsers, such as Chrome, will display the results.
Figure 13: Employees XML
Get JSON Data With AJAX
Now that data is being returned by the service, it is possible to use jQuery to call that service with AJAX and get the results in JSON format instead of XML. Once the data has been retrieved as JSON, it is much easier to work with it and create a user interface. For this demonstration, you are going to retrieve the list of employees and display each employee in an HTML table row.
Add jQuery to Project
Open the Site.Master file and drag the jquery.min file over to the page just below the Site.css link tag in the head of the page. At the time of this writing, the current version of jQuery is jquery-1.9.1.min.js
Figure 14: Adding jQuery to the master page

Open up the Default.aspx file. Create an HTML table element with an employees id, as demonstrated in the example below.
<table id="employees"></table>Below the table element that you just created, but before the closing content tag, open a new script block as demonstrated in the example below.
<table id="employees"></table>

<script>

    // jquery ajax code will go here

</script>
Inside the script block create a jQuery Document Ready function. This is the function that executes when the entire page has loaded, including all HTML, CSS, and included JavaScript files.
Inside the Document Ready function, select the HTML table with the employees id from the DOM and assign it to a variable $employees call for later use. It is considered a good practice by some to prefix variables containing jQuery objects with a $ so that you know that the variable represents a jQuery wrapped object when you see it later down in the code. The table is selected by its ID by using the jQuery ID Selector](https://api.jquery.com/id-selector/) (the number (#) sign).
The example below demonstrates how to select a table when the document is ready.
<table id="employees"></table>

<script>

    // document ready function

    $(function() {

        // select the employees table from the page and
        // store it in a variable for later use.
        var $employees = $("#employees");

    });

</script>
Make AJAX Calls
[AJAX](https://en.wikipedia.org/wiki/Ajax_(programming) is an acronym that stands for Asynchronous JavaScript And XML. However, it has come to take on a much broader and less specific meaning. AJAX generally refers to the action of making a request to the server in the background and receiving a result. This is different from the typical browser request/response communication in that it happens without any visual indication that anything has taken place. It is absolutely silent unless the UI is built to show background requests. Additionally, XML is rarely used anymore for AJAX operations. It is most common now to use JSON, which is an incredibly simple form of serialization that is very easy to manipulate with JavaScript. Web API supports rendering in JSON with the new System.Json library.
One of the things that makes jQuery so desirable, is that it makes AJAX very trivial for a developer to implement. To make an AJAX call to the Web API Employee service, use the jQuery .ajax() function. This function takes an object that contains the parameters for configuring the AJAX request. For the request to the api/employees endpoint, the configuration object needs you to specify the url, contentType, and success options.
-
url- This option will be specified as the stringapi/employees. This URL is a relative path, so there is no need to specify the full URL. -
contentType- Since it is much easier to work with JSON, the AJAX request needs to specify that the data should be in JSON format. This is done by setting the HTTP Header content type toapplication/json. When using jQuery, this is done simply by settingcontentTypetojson. -
success- This is the function that is called when the server returns a response to the AJAX call. The function takes in a data parameter, which holds the JSON response returned from the employees web service.
The example below demonstrates how to make an AJAX call for employees data in JSON format.
<table id="employees"></table>

<script>

    // document ready function
    $(function() {

        // select the employees table from the page and
        // store it in a variable for later use
        var $employees = $("#employees");

        // make an AJAX call to the employees Web API service
        // to retrieve a JSON response of all the employees
        $.ajax({

            // the URL to the service
            url: "api/employees",

            // the format that the data should be in when
            // it is returned
            contentType: "json",

            // the function that executes when the server
            // responds to this AJAX request successfully
            success: function(data) {

                // put the JSON response in the Employees table

            }

        });

    });

</script>
To put the data returned into the page, iterate over the results returned by the server. This is done using the jQuery .each() function. As each item is iterated over, a new row is added to the Employees HTML table by using the jQuery append() method. The table variable is used instead of selecting the table each time in the loop. Selecting an item once from the DOM and referencing it in a variable is better for performance and cuts down on code clutter.
The example below demonstrates how to make an AJAX call fir the employees data in JSON format.
<table id="employees"></table>

<script>

    // document ready function

    $(function() {

        // select the Employees table from the page and
        // store it in a variable for later use.
        var $employees = $("#employees");


        // make an AJAX call to the employees Web API service
        // to retrieve a JSON response of all the employees
        $.ajax({

            // the URL to the service
            url: "api/employees",

            // the format that the data should be in when
            // it is returned
            contentType: "json",

            // the function that executes when the server
            // responds to this AJAX request successfully
            success: function(data) {

                // iterate over the data items returned from the server
                // the index variable is the position in the collection.
                // the item variable is the item itself
                $.each(data, function(index, item){

                    // append the first and last name to the table
                    $employees.append("<tr><td>" + item.FirstName + "</td>" +
                                          "<td>" + item.LastName + "</td>");

                });

              }

        });

    });

</script>
Test the Application
Press F5 to run the application, or if your application is still running, save the file and refresh the page or point the page at the Default.aspx URL. Since all the changes were made in JavaScript, it is not necessary to stop and start the application.
Notice that the application shows the employees in a list. Press F12 to open the developer tools. Click the network tab and then Start Capturing. Refresh the page. The request that is made to api/employees. Double-click the request. The Content-Type is set to JSON.
Figure 15: F12 content type inspection

Select the Response body tab. Inspect the JSON response returned from the server.
Figure 16: F12 response body

Enable Deletion Of Employees
Switch back to Visual Studio and the Default.aspx page. In order to add the ability to delete employees from the UI, its necessary to add a button out to the right-hand side of each row. This could be done by adding more HTML inside the each() loop. However, this is already a bit messy. There is HTML in the JavaScript and adding to this would make it worse. Generally, it is a best practice not to include HTML inside the JavaScript this way.
Use Templates
To clean this up and make it better, it is a good idea to use the templating concept. This is the idea of having a single table row which is created once and then copied for each element in the dataset and appended to the table. There are many forms of templating and some libraries that make this much simpler. This is explored in more detail in later modules.
For this example, a very basic form of manual templating is demonstrated. The idea here is to add a block of HTML that is not visible on the page, but can be used to dynamically create HTML elements. Specifically, a table row is needed. This implementation involves adding a div with a templates id right after the closing script block. The style on this div will be set to display: none. This means that this div and all its content is not going to be displayed on the page. Inside this div create a table, then a single table row definition with a column for the first name, a column for the last name, and a column for the Delete button that contains a button. These elements will have classes and not ids since they are going to be used over and over again.
The example below demonstrates how to create a block of template HTML.
<table id="employees"></table>

<script>

    // document ready function
    $(function() {

        // select the Employees table from the page and
        // store it in a variable for later use.
        var $employees = $("#employees");

        // make an AJAX call to the employees Web API service
        // to retrieve a JSON response of all the employees
        $.ajax({

            // the URL to the service
            url: "api/employees",

            // the format that the data should be in when
            // it is returned
            contentType: "json",

            // the function that executes when the server
            // responds to this AJAX request successfully
            success: function(data) {

                // iterate over the data items returned from the server
                // the index variable is the position in the collection
                // the item variable is the item itself
                $.each(data, function(index, item){

                        // append the first and last name to the table
                        $employees.append("<tr><td>" + item.FirstName + "</td>" +
                                              "<td>" + item.LastName + "</td>");

                });

            }

        });
    });

 </script>

<div id="templates" style="display: none">

    <table>

        <tr class="row-template">
            <td class="firstName" style="width: 100px;"></td>
            <td class="lastName" style="width: 100px;"></td>
            <td>
                <input type="button" value="X" class="delete" />
            </td>
        </tr>

    </table>

</div>
Inside of the each() loop, select the templates div by its id. Then use the jQuery .find() method to select the row by its class. This will find the items in the children of the templates div with the specified selector. Once the table row is selected, call the jQuery clone() method. This will create a new object of the same type that was just selected (a table row), and store it in the variable.
In jQuery this is called Chaining. This is when methods are called on methods because each method returns an object, allowing you to continue to call methods on the same line. Once the row template has been created, find the first and last name columns and set their .html() with the first and last name from the returned JSON data. Then select the button by its class and add a click event.
Inside the click event, create another ajax() method. The URL will be the same as the first ajax() method with the exception that the current item id is appended onto the end. This creates a RESTful URL. The type should be set to delete. In the success function, simply remove the item from the page by calling the jQuery .remove() function. This will reflect the database change in the user interface. Lastly, right before the closing bracket for the each() loop, append the row to the table.
The example below demonstrates how to create a block of template HTML.
<table id="employees"></table>

<script>

    // document ready function
    $(function() {

        // select the Employees table from the page and
        // store it in a variable for later use
        var $employees = $("#employees");

        // make an AJAX call to the employees Web API service
        // to retrieve a JSON response of all the employees
        $.ajax({

            // the URL to the service
            url: "api/employees",

            // the format that the data should be in when
            // it is returned
            contentType: "json",

            // the function that executes when the server
            // responds to this AJAX request successfully
            success: function(data) {

                // iterate over the data items returned from the server
                // the index variable is the position in the collection
                // the item variable is the item itself
                $.each(data, function(index, item){

                    // create a row template
                    var $row = $("#templates").find(".row-template").clone();

                    // set the first and last name column text for the row
                    $row.find(".firstName").html(item.FirstName);
                    $row.find(".lastName").html(item.LastName);

                    // find the button and set its click event
                    $row.find(".delete").click(function() {

                    // call the delete method on the employees service

                    $.ajax({
                        // append the current employee id onto the URL
                        url: "api/employees/" + item.Id,

                        // set the request type to be a DELETE
                        type: "DELETE",

                        // remove the row on a success response from the server
                        success: function() {
                            $row.remove();
                        }
                    });

                    // append the row to the table
                    $employees.append($row);
                });

            }
        });

    });

</script>

<div id="templates" style="display: none">

    <table>

        <tr class="row-template">
            <td class="firstName" style="width: 100px;"></td>
            <td class="lastName" style="width: 100px;"></td>
            <td>
                <input type="button" value="X" class="delete" />
            </td>
        </tr>

    </table>

</div>
Test the Application
Press F5 to run the application. Open the Developer Tools in Internet Explorer by pressing F12. Switch to the network tab and click Start Capturing. Notice that when the Delete button is clicked, an AJAX request is fired to the server with a delete method. The server is currently returning a 404, because the delete method has not yet been created in the service.
Figure 17: Deleting not implemented

Add Delete Method
Switch back to Visual Studio and stop the application. Open up the EmployeesController.cs file in the Controllers folder. Create a void method underneath the Get() method called Delete() which takes in an id parameter of int type, as demonstrated in the example below.
public void Delete(int id) {

    // code to delete employee by id goes here

}
Inside the Delete() method, select the employee to delete by its id from the LINQ to SQL context. Delete the employee and submit the changes by using LINQ To SQL. The id parameter is passed along by the default routing that was set up in the Global.asax. Since the method is named Delete() it responds to an HTTP DELETE verb.
The example below demonstrates how to delete an employee by using LINQ To SQL.
public void Delete(int id) {

    // select the employee from the database by its id
    var employeeToDelete = (from e in _context.Employees
                            where e.EmployeeID == id
                            select e).FirstOrDefault();

    // delete the employee from the context
    _context.Employees.DeleteOnSubmit(employeeToDelete);

    // submit the changes
    _context.SubmitChanges();

}
Add yourself as an employee in the Northwind Employees table by providing just your last and first name. The other employees cannot be deleted due to existing relationships in other tables.
Run the Application
Press F5 to run the application. Press F12 to open the Developer Tools. Switch to the Network tab and click Start Capturing. Click Delete next to the name you added to the database. Notice that the delete AJAX request happens and a 200 is returned from the server. This means that the item has been successfully deleted from the database. Also notice that your name was removed from the page by jQuery.
Figure 18: Final result

Further Reading
Web API is a maturing library and is baked into the official release of MVC 4 onwards. For now, the following screencasts should help you become quite familiar with using Web API in MVC 4. For detailed information on how to do this, see Web API With MVC 4 Screencast Series.
The complete application used in this project is available on the GitHub site course.
Tutorials on how to build an HTML application in ASP.NET: