Data Binding
Data binding is a mechanism for automatic population of the RadListView with items, based on the provided data structure. RadListView support data binding either at design time or at run time. Three properties control the data binding:
DataSource - Specifies the source of the data to be bound.
DisplayMember - Specifies the particular data to be displayed in a RadListView.
ValueMember - Specifies the particular data to be returned as the value of a RadListView.
Data Binding at Design Time
You can bind RadListView at design time by specifying the DataSource, ValueMember and DisplayMember properties either from the Smart Tag or the Properties section in Visual Studio.
Figure 1: Data Binding at Design Time
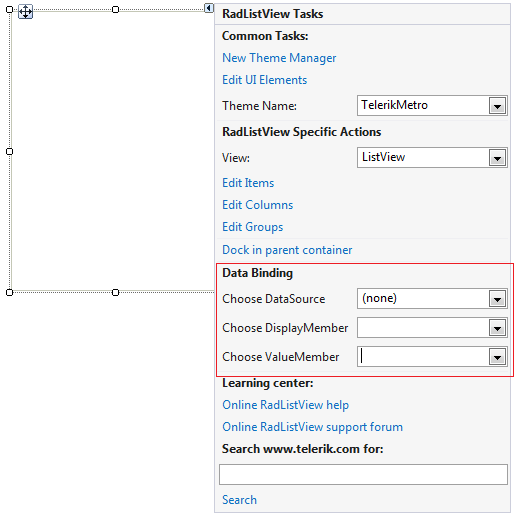
To set the DataSource:
1. Select the DataSource property and click the drop-down arrow to display all existing data sources on the form.
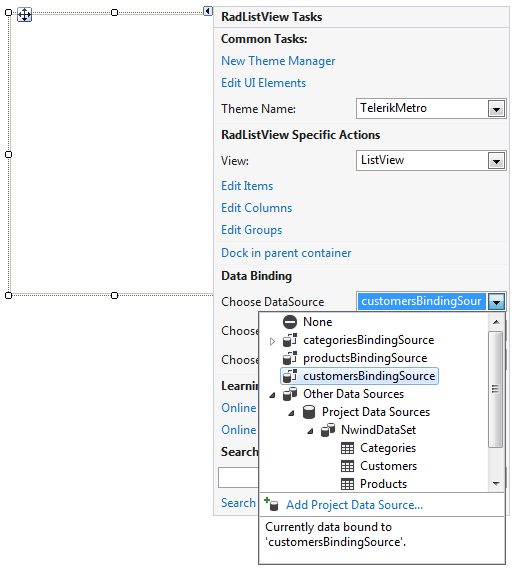
2. Click the Add Project Data Source link and follow the instructions in the Data Source Configuration Wizard to add a data source to your project. You can use databases, web services, or objects as data sources.
3. When you set the DataSource property, you can choose a DisplayMember and ValueMember. The DisplayMember specifies the particular data to be displayed in RadListView’s items. The ValueMember specifies the particular data to be returned by the Value property in RadListView’s items.
Figure 2: Setting DisplayMember and ValueMember properties
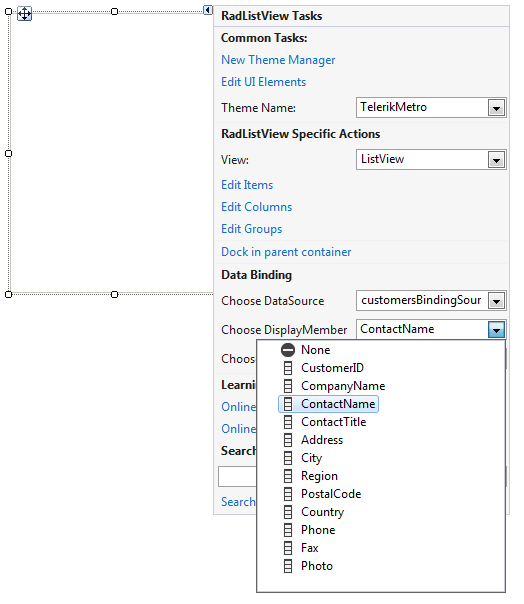
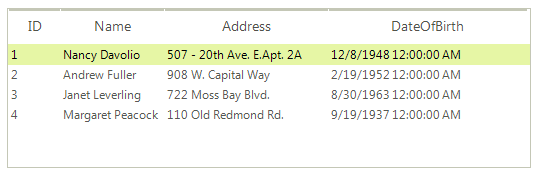
Figure 3: Data-bound RadListView
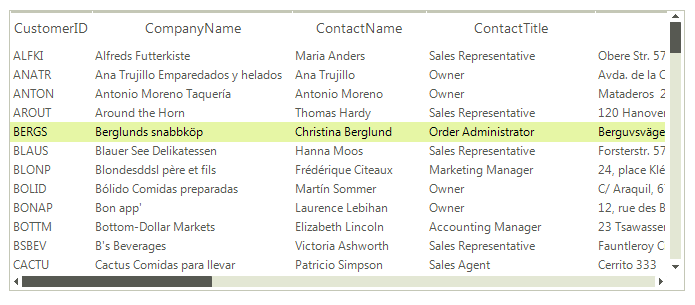
Manipulating Columns
When you bind RadListView to a collection of business objects and select its ViewType to be DetailsView, the values of all the properties of the business objects will be displayed in columns.
By handling the ColumnCreating event you can manipulate the size, the visibility and other properties of the columns:
Columns creating
void radListView1_ColumnCreating(object sender, Telerik.WinControls.UI.ListViewColumnCreatingEventArgs e)
{
    if (e.Column.FieldName == "CustomerID" || e.Column.FieldName == "ParentID")
    {
        e.Column.Visible = false;
    }
    if (e.Column.FieldName == "CompanyName")
    {
        e.Column.HeaderText = "Company";
    }
    if (e.Column.FieldName == "ContactName")
    {
        e.Column.HeaderText = "Contact";
    }
}
Private Sub RadListView1_ColumnCreating(ByVal sender As Object, ByVal e As ListViewColumnCreatingEventArgs) Handles RadListView1.ColumnCreating
    If e.Column.FieldName = "CustomerID" OrElse e.Column.FieldName = "ParentID" Then
        e.Column.Visible = False
    End If
    If e.Column.FieldName = "CompanyName" Then
        e.Column.HeaderText = "Company"
    End If
    If e.Column.FieldName = "ContactName" Then
        e.Column.HeaderText = "Contact"
    End If
End Sub
Data Binding at Run Time
The following tutorial will demonstrate how to bind a RadListView to a list of business objects.
1. First let's create our business object. Note that it is important that our custom object implements the INotifyPropertyChanged interface, since this will allow notifications between the object and the control:
Person Class
public class Person : INotifyPropertyChanged
{
    private int _id;
    private string _name;
    private string _address;
    private DateTime _dateOfBirth;
    private Image _picture;
    public event PropertyChangedEventHandler PropertyChanged;
    public Person(int Id, string Name, string Address, DateTime DateOfBirth, Image Picture)
    {
        this._id = Id;
        this._name = Name;
        this._address = Address;
        this._dateOfBirth = DateOfBirth;
        this._picture = Picture;
    }
    public int ID
    {
        get
        {
            return this._id;
        }
        set
        {
            if (this._id != value)
            {
                this._id = value;
                OnPropertyChanged("ID");
            }
        }
    }
    public string Name
    {
        get
        {
            return this._name;
        }
        set
        {
            if (this._name != value)
            {
                this._name = value;
                OnPropertyChanged("Name");
            }
        }
    }
    public string Address
    {
        get
        {
            return this._address;
        }
        set
        {
            if (this._address != value)
            {
                this._address = value;
                OnPropertyChanged("Address");
            }
        }
    }
    public DateTime DateOfBirth
    {
        get
        {
            return this._dateOfBirth;
        }
        set
        {
            if (this._dateOfBirth != value)
            {
                this._dateOfBirth = value;
                OnPropertyChanged("DateOfBirth");
            }
        }
    }
    public Image Picture
    {
        get
        {
            return this._picture;
        }
        set
        {
            if (this._picture != value)
            {
                this._picture = value;
                OnPropertyChanged("Picture");
            }
        }
    }
    protected virtual void OnPropertyChanged(string propertyName)
    {
        if (PropertyChanged != null)
        {
            PropertyChanged(this, new PropertyChangedEventArgs(propertyName));
        }
    }
}
Public Class Person
    Private _id As Integer
    Private _name As String
    Private _address As String
    Private _dateOfBirth As DateTime
    Private _picture As Image
    Public Event PropertyChanged As PropertyChangedEventHandler
    Public Sub New(Id As Integer, Name As String, Address As String, DateOfBirth As DateTime, Picture As Image)
        Me._id = Id
        Me._name = Name
        Me._address = Address
        Me._dateOfBirth = DateOfBirth
        Me._picture = Picture
    End Sub
    Public Property ID() As Integer
        Get
            Return Me._id
        End Get
        Set(value As Integer)
            If Me._id <> value Then
                Me._id = value
                OnPropertyChanged("ID")
            End If
        End Set
    End Property
    Public Property Name() As String
        Get
            Return Me._name
        End Get
        Set(value As String)
            If Me._name <> value Then
                Me._name = value
                OnPropertyChanged("Name")
            End If
        End Set
    End Property
    Public Property Address() As String
        Get
            Return Me._address
        End Get
        Set(value As String)
            If Me._address <> value Then
                Me._address = value
                OnPropertyChanged("Address")
            End If
        End Set
    End Property
    Public Property DateOfBirth() As DateTime
        Get
            Return Me._dateOfBirth
        End Get
        Set(value As DateTime)
            If Me._dateOfBirth <> value Then
                Me._dateOfBirth = value
                OnPropertyChanged("DateOfBirth")
            End If
        End Set
    End Property
    Public Property Picture() As Image
        Get
            Return Me._picture
        End Get
        Set(value As Image)
            If Me._picture IsNot value Then
                Me._picture = value
                OnPropertyChanged("Picture")
            End If
        End Set
    End Property
    Protected Overridable Sub OnPropertyChanged(propertyName As String)
        RaiseEvent PropertyChanged(Me, New PropertyChangedEventArgs(propertyName))
    End Sub
End Class
2. Then, create a collection of our objects. The collection should implement IBindingList to support notifications. This, together with the INotifyPropertyChanged establishes a two way connection between the control and the object. In this case, we can use BindingList since it implements the IBindingList interface internally:
Create a collection or person objects
BindingList<Person> dataSource = new BindingList<Person>()
{
    new Person(1, "Nancy Davolio","507 - 20th Ave. E.Apt. 2A", DateTime.Parse("12/8/1948"),  Resources.nancy),
    new Person(2, "Andrew Fuller","908 W. Capital Way", DateTime.Parse("2/19/1952"),  Resources.Andrew),
    new Person(3, "Janet Leverling","722 Moss Bay Blvd.", DateTime.Parse("8/30/1963"),  Resources.Janet),
    new Person(4, "Margaret Peacock","110 Old Redmond Rd.", DateTime.Parse("9/19/1937"), Resources.Margaret)
};
Dim dataSource As New BindingList(Of Person)()
dataSource.Add(New Person(1, "Nancy Davolio", "507 - 20th Ave. E.Apt. 2A", DateTime.Parse("12/8/1948"), My.Resources.nancy))
dataSource.Add(New Person(2, "Andrew Fuller", "908 W. Capital Way", DateTime.Parse("2/19/1952"), My.Resources.Andrew))
dataSource.Add(New Person(3, "Janet Leverling", "722 Moss Bay Blvd.", DateTime.Parse("8/30/1963"), My.Resources.Janet))
dataSource.Add(New Person(4, "Margaret Peacock", "110 Old Redmond Rd.", DateTime.Parse("9/19/1937"), My.Resources.Margaret))
3. To bind our RadListView to this collection, simply set its DataSource, DisplayMember and ValueMember properties:
Bind to the collection of custom objects
this.radListView1.DataSource = dataSource;
this.radListView1.DisplayMember = "Name";
this.radListView1.ValueMember = "ID";
Me.RadListView1.DataSource = dataSource
Me.RadListView1.DisplayMember = "Name"
Me.RadListView1.ValueMember = "ID"
As a result you will get the RadListView populated with items that display the value Name property of the business objects and have the ID property of the business object returned as value. Opening an item for editing will display the id.
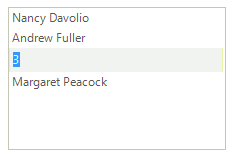
4. We can extend this example by handling the ItemDataBound event, which is fired when the ListViewDataItem is assigned an object from your data source. In the event handler we can access the data bound object properties and assign an image to the item:
Assign an image to the item
void radListView1_ItemDataBound(object sender, Telerik.WinControls.UI.ListViewItemEventArgs e)
{
    {
        if (radListView1.ViewType == Telerik.WinControls.UI.ListViewType.ListView)
        {
            e.Item.Image = ((Person)e.Item.DataBoundItem).Picture;
        }
    }
}
Private Sub RadListView1_ItemDataBound(ByVal sender As Object, ByVal e As Telerik.WinControls.UI.ListViewItemEventArgs)
    e.Item.Image = DirectCast(e.Item.DataBoundItem, Person).Picture
End Sub
Figure 4: Displying images

When RadListView is in DetailView mode and is bound to this collection, as a result, you will get all the properties of the business object displayed in columns. In this case the Picture column is hidden: