Getting Started with WinForms ListView
This tutorial will help you to quickly get started using the RadListView control.
Adding Telerik Assemblies Using NuGet
To use RadListView when working with NuGet packages, install the Telerik.UI.for.WinForms.AllControls package. The package target framework version may vary.
Read more about NuGet installation in the Install using NuGet Packages article.
With the 2025 Q1 release, the Telerik UI for WinForms has a new licensing mechanism. You can learn more about it here.
Adding Assembly References Manually
When dragging and dropping a control from the Visual Studio (VS) Toolbox onto the Form Designer, VS automatically adds the necessary assemblies. However, if you're adding the control programmatically, you'll need to manually reference the following assemblies:
- Telerik.Licensing.Runtime
- Telerik.WinControls
- Telerik.WinControls.UI
- TelerikCommon
The Telerik UI for WinForms assemblies can be install by using one of the available installation approaches.
Defining the RadListView
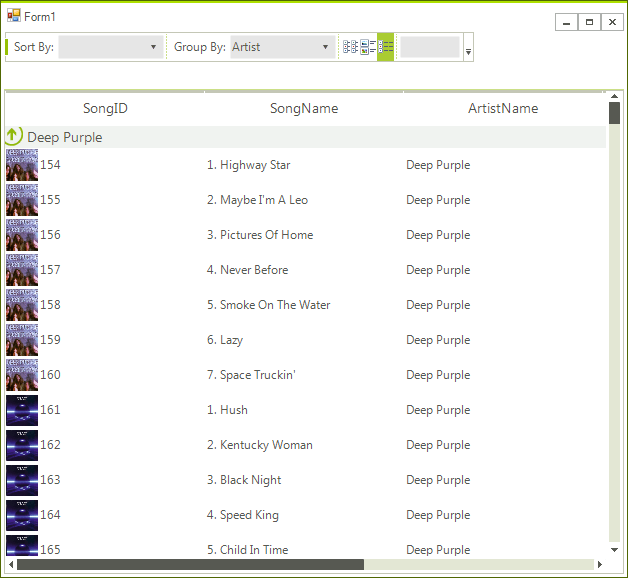
This article will demonstrate the basic capabilities of RadListView, like filtering, grouping, sorting, customizing items, etc. and it will show you in a step-by-step manner how to start creating applications with RadListView.
Figure 1: Getting started with RadListView

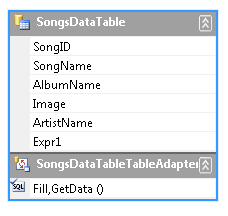
For the sake of this example, we are going to use a DataTable containing data about Artists, Albums, Songs and Image.
Figure 2: Songs DataTable

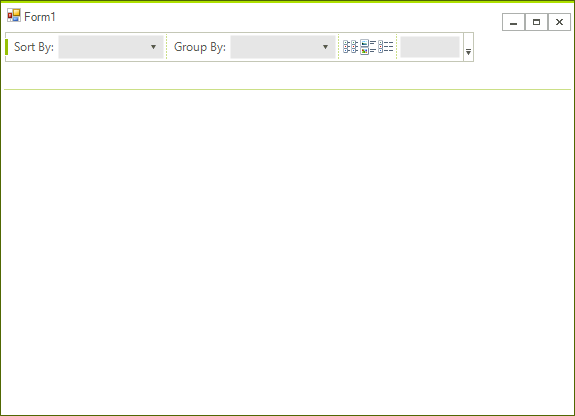
1. First let’s create a form with RadCommandBar docked Top and RadListView docked Fill. Add a Strip to RadCommandBar and populate it with the following items:
| CommandBarLabel |
|
| CommandBarDropDownList |
|
| CommandBarSeparatorItem | |
| CommandBarLabel |
|
| CommandBarDropDownList |
|
| CommandBarSeparatorItem | |
| CommandBarToggleButton |
|
| CommandBarToggleButton |
|
| CommandBarToggleButton |
|
| CommandBarSeparatorItem | |
| CommandBarTextBox |
|
At this point the form should like something similar to this:

2. Now, lets continue with setting the control DataSource, allow edit and remove operations and subscribe to the events that we are going to use in this example.
Initial settings
this.radListView1.ItemDataBound += new Telerik.WinControls.UI.ListViewItemEventHandler(radListView1_ItemDataBound);
this.radListView1.VisualItemFormatting += new Telerik.WinControls.UI.ListViewVisualItemEventHandler(radListView1_VisualItemFormatting);
this.radListView1.CellFormatting += new Telerik.WinControls.UI.ListViewCellFormattingEventHandler(radListView1_CellFormatting);
this.radListView1.ColumnCreating += new ListViewColumnCreatingEventHandler(radListView1_ColumnCreating);
this.radListView1.ViewTypeChanged += new EventHandler(radListView1_ViewTypeChanged);
this.radListView1.AllowEdit = false;
this.radListView1.AllowRemove = false;
this.radListView1.DataSource = this.songsDataTableBindingSource;
this.radListView1.DisplayMember = "SongName";
this.radListView1.ValueMember = "SongID";
this.radListView1.ViewType = ListViewType.IconsView;
AddHandler Me.RadListView1.ItemDataBound, AddressOf radListView1_ItemDataBound
AddHandler Me.RadListView1.VisualItemFormatting, AddressOf radListView1_VisualItemFormatting
AddHandler Me.RadListView1.ViewTypeChanged, AddressOf radListView1_ViewTypeChanged
AddHandler Me.RadListView1.CellFormatting, AddressOf radListView1_CellFormatting
AddHandler Me.RadListView1.ColumnCreating, AddressOf radListView1_ColumnCreating
Me.RadListView1.AllowEdit = False
Me.RadListView1.AllowRemove = False
Me.RadListView1.DataSource = Me.SongsDataTableBindingSource
Me.RadListView1.DisplayMember = "SongName"
Me.RadListView1.ValueMember = "SongID"
3. Now, lets handle those events. In the event handler for the ItemDataBound event, we will take the corresponding item image from the data source and we will assign it to the ListViewDataItem.
Set the item image to the data item
void radListView1_ItemDataBound(object sender, Telerik.WinControls.UI.ListViewItemEventArgs e)
{
    DataRowView row = e.Item.DataBoundItem as DataRowView;
    MusicCollectionDataSet.SongsDataTableRow songRow = row.Row as MusicCollectionDataSet.SongsDataTableRow;
    e.Item.Image = Image.FromStream(new MemoryStream(songRow.Image), false, false);
}
Private Sub radListView1_ItemDataBound(sender As Object, e As Telerik.WinControls.UI.ListViewItemEventArgs)
    Dim row As DataRowView = TryCast(e.Item.DataBoundItem, DataRowView)
    Dim songRow As MusicCollectionDataSet.SongsDataTableRow = TryCast(row.Row, MusicCollectionDataSet.SongsDataTableRow)
    e.Item.Image = Image.FromStream(New MemoryStream(songRow.Image), False, False)
End Sub
4. Next, lets handle the VisualItemFormatting event, where we will set the visual item image. Additionally, for IconsView we will set the visual item text to a html-like combination of the AlbumName, ArtistName and SongName.
Customize visual item
void radListView1_VisualItemFormatting(object sender, Telerik.WinControls.UI.ListViewVisualItemEventArgs e)
{
    if (e.VisualItem.Data.Image != null)
    {
        e.VisualItem.Image = e.VisualItem.Data.Image.GetThumbnailImage(32, 32, null, IntPtr.Zero);
        e.VisualItem.Layout.RightPart.Margin = new Padding(2, 0, 0, 0);
    }
    if (this.radListView1.ViewType == Telerik.WinControls.UI.ListViewType.IconsView && e.VisualItem.Data.DataBoundItem != null)
    {
        string albumName = ((MusicCollectionDataSet.SongsDataTableRow)(((System.Data.DataRowView)(e.VisualItem.Data.DataBoundItem)).Row)).AlbumName;
        string artisName = ((MusicCollectionDataSet.SongsDataTableRow)(((System.Data.DataRowView)(e.VisualItem.Data.DataBoundItem)).Row)).ArtistName;
        string songName = ((MusicCollectionDataSet.SongsDataTableRow)(((System.Data.DataRowView)(e.VisualItem.Data.DataBoundItem)).Row)).SongName;
        e.VisualItem.Text = "<html> " + songName + "<br><span style=\"color:#999999\"> " + artisName + "<br> " + albumName + "</span>";
    }
}
Private Sub radListView1_VisualItemFormatting(sender As Object, e As Telerik.WinControls.UI.ListViewVisualItemEventArgs)
    If e.VisualItem.Data.Image IsNot Nothing Then
        e.VisualItem.Image = e.VisualItem.Data.Image.GetThumbnailImage(32, 32, Nothing, IntPtr.Zero)
        e.VisualItem.Layout.RightPart.Margin = New Windows.Forms.Padding(2, 0, 0, 0)
    End If
    If Me.RadListView1.ViewType = Telerik.WinControls.UI.ListViewType.IconsView AndAlso e.VisualItem.Data.DataBoundItem IsNot Nothing Then
        Dim albumName As String = DirectCast(DirectCast(e.VisualItem.Data.DataBoundItem, System.Data.DataRowView).Row, MusicCollectionDataSet.SongsDataTableRow).AlbumName
        Dim artisName As String = DirectCast(DirectCast(e.VisualItem.Data.DataBoundItem, System.Data.DataRowView).Row, MusicCollectionDataSet.SongsDataTableRow).ArtistName
        Dim songName As String = DirectCast(DirectCast(e.VisualItem.Data.DataBoundItem, System.Data.DataRowView).Row, MusicCollectionDataSet.SongsDataTableRow).SongName
        e.VisualItem.Text = "<html> " + songName + "<br><span style=""color:#999999""> " + artisName + "<br> " + albumName + "</span>"
    End If
End Sub
The CellFormatting event is handled in order to customize the appearance of the cells, when RadListView is in DetailsView. Here we will set the cell image.
Set the cell image
void radListView1_CellFormatting(object sender, ListViewCellFormattingEventArgs e)
{
    if (e.CellElement.Image != null)
    {
        e.CellElement.Image = e.CellElement.Image.GetThumbnailImage(32, 32, null, IntPtr.Zero);
    }
}
Private Sub radListView1_CellFormatting(sender As Object, e As ListViewCellFormattingEventArgs)
    If e.CellElement.Image IsNot Nothing Then
        e.CellElement.Image = e.CellElement.Image.GetThumbnailImage(32, 32, Nothing, IntPtr.Zero)
    End If
End Sub
The ColumnCreating event is fired when a column is being created. This is convenient event to hide unwanted columns. Additionally, we will use this event to set some more user friendly column headers.
Customize columns
void radListView1_ColumnCreating(object sender, ListViewColumnCreatingEventArgs e)
{
    if (e.Column.FieldName == "SongID" || e.Column.FieldName == "Image")
    {
        e.Column.Visible = false;
    }
    if (e.Column.FieldName == "SongName")
    {
        e.Column.HeaderText = "Song Title";
    }
    if (e.Column.FieldName == "ArtistName")
    {
        e.Column.HeaderText = "Artist";
    }
    if (e.Column.FieldName == "AlbumName")
    {
        e.Column.HeaderText = "Album";
    }
}
Private Sub radListView1_ColumnCreating(sender As Object, e As ListViewColumnCreatingEventArgs)
    If e.Column.FieldName = "SongID" OrElse e.Column.FieldName = "Image" Then
        e.Column.Visible = False
    End If
    If e.Column.FieldName = "SongName" Then
        e.Column.HeaderText = "Song Title"
    End If
    If e.Column.FieldName = "ArtistName" Then
        e.Column.HeaderText = "Artist"
    End If
    If e.Column.FieldName = "AlbumName" Then
        e.Column.HeaderText = "Album"
    End If
End Sub
5. The last event of RadListView, which we are going to handle is the ViewTypeChanged event - fired when the ViewType of the control is changed. This event is convenient to set view specific settings. To handle the event, we will create three helper methods:
SetupDetailsView - here we will set the AllowArbitraryItemHeight, property to true, in order to allow the items to size themselves in height, according to their content.
SetupIconsView - here we will define a custom size for the items, set some spacing between the items and again set the AllowArbitraryItemHeight, property to true.
SetupSimpleListView - in this method we will only set the AllowArbitraryItemHeight, property to true.
In the ViewTypeChanged event handler, we will simply check which is the new view and call the corresponding setup method.
Handling view type changes
private void SetupDetailsView()
{
    this.radListView1.AllowArbitraryItemHeight = true;
}
private void SetupIconsView()
{
    this.radListView1.ItemSize = new Size(200, 64);
    this.radListView1.ItemSpacing = 5;
    this.radListView1.AllowArbitraryItemHeight = true;
}
private void SetupSimpleListView()
{
    this.radListView1.AllowArbitraryItemHeight = true;
}
void radListView1_ViewTypeChanged(object sender, EventArgs e)
{
    switch (radListView1.ViewType)
    {
        case ListViewType.ListView:
            SetupSimpleListView();
            break;
        case ListViewType.IconsView:
            SetupIconsView();
            break;
        case ListViewType.DetailsView:
            SetupDetailsView();
            break;
    }
}
Private Sub SetupDetailsView()
    Me.RadListView1.AllowArbitraryItemHeight = True
End Sub
Private Sub SetupIconsView()
    Me.RadListView1.ItemSize = New Size(200, 64)
    Me.RadListView1.ItemSpacing = 5
    Me.RadListView1.AllowArbitraryItemHeight = True
End Sub
Private Sub SetupSimpleListView()
    Me.RadListView1.AllowArbitraryItemHeight = True
End Sub
Private Sub radListView1_ViewTypeChanged(sender As Object, e As EventArgs)
    Select Case RadListView1.ViewType
        Case ListViewType.ListView
            SetupSimpleListView()
            Exit Select
        Case ListViewType.IconsView
            SetupIconsView()
            Exit Select
        Case ListViewType.DetailsView
            SetupDetailsView()
            Exit Select
    End Select
End Sub
6. Now, we only need to fill up the RadCommandBar elements functionality. First, we are going to handle the view changing buttons. For this purpose, subscribe for the ToggleStateChanged and ToggleStateChanging events of all the CommandBarToggleButtons that we have added earlier. In the ToggleStateChanged event handler, check which is the clicked button, and set the rest of the buttons to Off. Additionally, set the RadListView.ViewType according to the pressed button.
Handle the toggle buttons
private bool updatingToggleState = false;
private void ViewToggleButton_ToggleStateChanged(object sender, StateChangedEventArgs args)
{
    if (updatingToggleState)
    {
        return;
    }
    this.updatingToggleState = true;
    if (this.commandBarToggleButtonDetails != sender)
    {
        this.commandBarToggleButtonDetails.ToggleState = ToggleState.Off;
    }
    if (this.commandBarToggleButtonList != sender)
    {
        this.commandBarToggleButtonList.ToggleState = ToggleState.Off;
    }
    if (this.commandBarToggleButtonTiles != sender)
    {
        this.commandBarToggleButtonTiles.ToggleState = ToggleState.Off;
    }
    this.updatingToggleState = false;
    if (this.commandBarToggleButtonDetails.ToggleState == ToggleState.On)
    {
        this.radListView1.ViewType = ListViewType.DetailsView;
    }
    if (this.commandBarToggleButtonList.ToggleState == ToggleState.On)
    {
        this.radListView1.ViewType = ListViewType.ListView;
    }
    if (this.commandBarToggleButtonTiles.ToggleState == ToggleState.On)
    {
        this.radListView1.ViewType = ListViewType.IconsView;
    }
 }
private void ViewToggleButton_ToggleStateChanging(object sender, StateChangingEventArgs args)
{
    if (!updatingToggleState && args.OldValue == ToggleState.On)
    {
        args.Cancel = true;
    }
}
Private updatingToggleState As Boolean = False
Private Sub ViewToggleButton_ToggleStateChanged(sender As Object, args As StateChangedEventArgs) Handles commandBarToggleButtonTiles.ToggleStateChanged, commandBarToggleButtonList.ToggleStateChanged, commandBarToggleButtonDetails.ToggleStateChanged
    If updatingToggleState Then
        Return
    End If
    Me.updatingToggleState = True
    If Me.commandBarToggleButtonDetails IsNot sender Then
        Me.commandBarToggleButtonDetails.ToggleState = ToggleState.Off
    End If
    If Me.commandBarToggleButtonList IsNot sender Then
        Me.commandBarToggleButtonList.ToggleState = ToggleState.Off
    End If
    If Me.commandBarToggleButtonTiles IsNot sender Then
        Me.commandBarToggleButtonTiles.ToggleState = ToggleState.Off
    End If
    Me.updatingToggleState = False
    If Me.commandBarToggleButtonDetails.ToggleState = ToggleState.[On] Then
        Me.RadListView1.ViewType = ListViewType.DetailsView
    End If
    If Me.commandBarToggleButtonList.ToggleState = ToggleState.[On] Then
        Me.RadListView1.ViewType = ListViewType.ListView
    End If
    If Me.commandBarToggleButtonTiles.ToggleState = ToggleState.[On] Then
        Me.RadListView1.ViewType = ListViewType.IconsView
    End If
End Sub
Private Sub ViewToggleButton_ToggleStateChanging(sender As Object, args As StateChangingEventArgs) Handles commandBarToggleButtonTiles.ToggleStateChanging, commandBarToggleButtonList.ToggleStateChanging, commandBarToggleButtonDetails.ToggleStateChanging
    If Not updatingToggleState AndAlso args.OldValue = ToggleState.[On] Then
        args.Cancel = True
    End If
End Sub
7. Next, subscribe to the SelectedIndexChanged event of commandBarDropDownSortCommandBarDropDownList. In the event handler, we are going to add the desired SortDescriptors, according to the selected item in the drop down.
Handle sorting functionality
private void commandBarDropDownSort_SelectedIndexChanged(object sender, Telerik.WinControls.UI.Data.PositionChangedEventArgs e)
{
    this.radListView1.SortDescriptors.Clear();
    switch (this.commandBarDropDownSort.Text)
    {
        case "Song Name":
            this.radListView1.SortDescriptors.Add(new SortDescriptor("SongName", ListSortDirection.Ascending));
            this.radListView1.EnableSorting = true;
            break;
        case "Album":
            this.radListView1.SortDescriptors.Add(new SortDescriptor("AlbumName", ListSortDirection.Ascending));
            this.radListView1.EnableSorting = true;
            break;
        case "Artist":
            this.radListView1.SortDescriptors.Add(new SortDescriptor("ArtistName", ListSortDirection.Ascending));
            this.radListView1.EnableSorting = true;
            break;
    }
}
Private Sub commandBarDropDownSort_SelectedIndexChanged(sender As Object, e As Telerik.WinControls.UI.Data.PositionChangedEventArgs) Handles commandBarDropDownSort.SelectedIndexChanged
    Me.RadListView1.SortDescriptors.Clear()
    Select Case Me.commandBarDropDownSort.Text
        Case "Song Name"
            Me.RadListView1.SortDescriptors.Add(New SortDescriptor("SongName", ListSortDirection.Ascending))
            Me.RadListView1.EnableSorting = True
            Exit Select
        Case "Album"
            Me.RadListView1.SortDescriptors.Add(New SortDescriptor("AlbumName", ListSortDirection.Ascending))
            Me.RadListView1.EnableSorting = True
            Exit Select
        Case "Artist"
            Me.RadListView1.SortDescriptors.Add(New SortDescriptor("ArtistName", ListSortDirection.Ascending))
            Me.RadListView1.EnableSorting = True
            Exit Select
    End Select
End Sub
To add the grouping functionality, subscribe to the SelectedIndexChanged event of commandBarDropDownGroup, CommandBarDropDownList. Similar to the sorting functionality, add the desired GroupDescriptors according to the selected item.
Handle grouping functionality
private void commandBarDropDownGroup_SelectedIndexChanged(object sender, Telerik.WinControls.UI.Data.PositionChangedEventArgs e)
{
    this.radListView1.GroupDescriptors.Clear();
    switch (this.commandBarDropDownGroup.Text)
    {
        case "None":
            this.radListView1.EnableGrouping = false;
            this.radListView1.ShowGroups = false;
            break;
        case "Album":
            this.radListView1.GroupDescriptors.Add(new GroupDescriptor(
                new SortDescriptor[] { new SortDescriptor("AlbumName", ListSortDirection.Ascending) }));
            this.radListView1.EnableGrouping = true;
            this.radListView1.ShowGroups = true;
            break;
        case "Artist":
            this.radListView1.GroupDescriptors.Add(new GroupDescriptor(
                new SortDescriptor[] { new SortDescriptor("ArtistName", ListSortDirection.Ascending) }));
            this.radListView1.EnableGrouping = true;
            this.radListView1.ShowGroups = true;
            break;
    }
}
Private Sub commandBarDropDownGroup_SelectedIndexChanged(sender As Object, e As Telerik.WinControls.UI.Data.PositionChangedEventArgs) Handles commandBarDropDownGroup.SelectedIndexChanged
    Me.RadListView1.GroupDescriptors.Clear()
    Select Case Me.commandBarDropDownGroup.Text
        Case "None"
            Me.RadListView1.EnableGrouping = False
            Me.RadListView1.ShowGroups = False
            Exit Select
        Case "Album"
            Me.RadListView1.GroupDescriptors.Add(New GroupDescriptor(New SortDescriptor() {New SortDescriptor("AlbumName", ListSortDirection.Ascending)}))
            Me.RadListView1.EnableGrouping = True
            Me.RadListView1.ShowGroups = True
            Exit Select
        Case "Artist"
            Me.RadListView1.GroupDescriptors.Add(New GroupDescriptor(New SortDescriptor() {New SortDescriptor("ArtistName", ListSortDirection.Ascending)}))
            Me.RadListView1.EnableGrouping = True
            Me.RadListView1.ShowGroups = True
            Exit Select
    End Select
End Sub
8. Lastly, lets subscribe ot the TextChanged event of commandBarTextBoxFilterCommandBarTextBox. Here we will add FilterDescriptor according to the text entered in the text box:
Handle filtering functionality
private void commandBarTextBoxFilter_TextChanged(object sender, EventArgs e)
{
    this.radListView1.FilterDescriptors.Clear();
    if (String.IsNullOrEmpty(this.commandBarTextBoxFilter.Text))
    {
        this.radListView1.EnableFiltering = false;
    }
    else
    {
        this.radListView1.FilterDescriptors.LogicalOperator = FilterLogicalOperator.Or;
        this.radListView1.FilterDescriptors.Add("SongName", FilterOperator.Contains, this.commandBarTextBoxFilter.Text);
        this.radListView1.FilterDescriptors.Add("AlbumName", FilterOperator.Contains, this.commandBarTextBoxFilter.Text);
        this.radListView1.FilterDescriptors.Add("ArtistName", FilterOperator.Contains, this.commandBarTextBoxFilter.Text);
        this.radListView1.EnableFiltering = true;
    }
}
Private Sub commandBarTextBoxFilter_TextChanged(sender As Object, e As EventArgs) Handles commandBarTextBoxFilter.TextChanged
    Me.RadListView1.FilterDescriptors.Clear()
    If [String].IsNullOrEmpty(Me.commandBarTextBoxFilter.Text) Then
        Me.RadListView1.EnableFiltering = False
    Else
        Me.RadListView1.FilterDescriptors.LogicalOperator = FilterLogicalOperator.[Or]
        Me.RadListView1.FilterDescriptors.Add("SongName", FilterOperator.Contains, Me.commandBarTextBoxFilter.Text)
        Me.RadListView1.FilterDescriptors.Add("AlbumName", FilterOperator.Contains, Me.commandBarTextBoxFilter.Text)
        Me.RadListView1.FilterDescriptors.Add("ArtistName", FilterOperator.Contains, Me.commandBarTextBoxFilter.Text)
        Me.RadListView1.EnableFiltering = True
    End If
End Sub
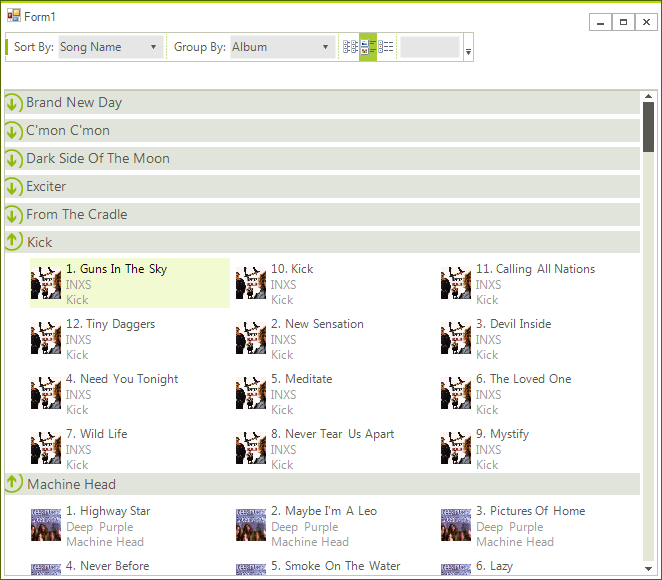
9. Run the application and try the different functionalities:
