ListView Cell Types
Cells in RadListView are the presentation of each data item from the control's ItemsSource. You can choose between two types of cells, namely:
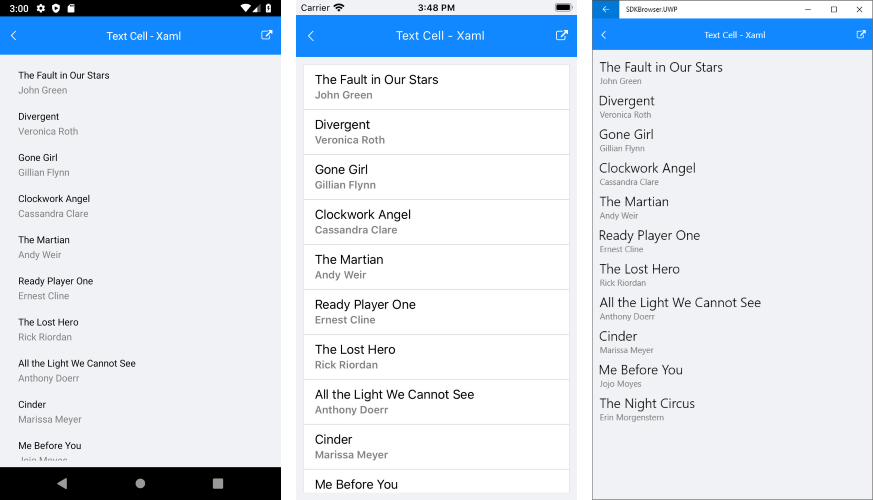
- ListViewTextCell derives from Xamarin.Forms.TextCell and displays text. It can optionally render detail text as a second row within a list view item. This is the default cell of the RadListView.
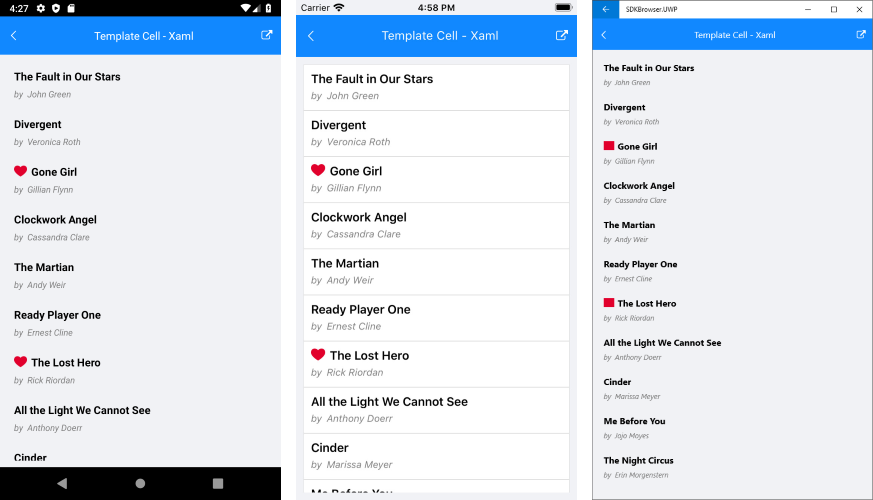
- ListViewTemplateCell derives from Xamarin.Forms.ViewCell and used to present complex data sets as RadListView.ItemTemplate.
ListViewTextCell Example
This example demonstrates how to create a list view with text cells, like this:
1. Create a view model that will be the source of the list view:
public class Book
{
    public string Title { get; set; }
    public string Author { get; set; }
}

public class ViewModel
{
    public ViewModel()
    {
        this.Source = new List<Book>{
            new Book{ Title = "The Fault in Our Stars ",  Author = "John Green"},
            new Book{ Title = "Divergent",  Author = "Veronica Roth"},
            new Book{ Title = "Gone Girl",  Author = "Gillian Flynn"},
            new Book{ Title = "Clockwork Angel",  Author = "Cassandra Clare"},
            new Book{ Title = "The Martian",  Author = "Andy Weir"},
            new Book{ Title = "Ready Player One",  Author = "Ernest Cline"},
            new Book{ Title = "The Lost Hero",  Author = "Rick Riordan"},
            new Book{ Title = "All the Light We Cannot See",  Author = "Anthony Doerr"},
            new Book{ Title = "Cinder",  Author = "Marissa Meyer"},
            new Book{ Title = "Me Before You",  Author = "Jojo Moyes"},
            new Book{ Title = "The Night Circus",  Author = "Erin Morgenstern"},
        };
    }

    public List<Book> Source { get; set; }
}
2. Add the definition of the listview control:
<telerikDataControls:RadListView ItemsSource="{Binding Source}" x:Name="listView">
    <telerikDataControls:RadListView.BindingContext>
        <local:ViewModel />
    </telerikDataControls:RadListView.BindingContext>
    <telerikDataControls:RadListView.ItemTemplate>
        <DataTemplate>
            <telerikListView:ListViewTextCell Text="{Binding Title}" Detail="{Binding Author}" TextColor="Black" DetailColor="Gray" />
        </DataTemplate>
    </telerikDataControls:RadListView.ItemTemplate>
    <telerikDataControls:RadListView.LayoutDefinition>
        <telerikListView:ListViewLinearLayout ItemLength="60" />
    </telerikDataControls:RadListView.LayoutDefinition>
</telerikDataControls:RadListView>
var listView = new RadListView
{
    ItemsSource = new ViewModel().Source,
    ItemTemplate = new DataTemplate(() =>
    {
        var cell = new ListViewTextCell
        {
            TextColor = Color.Black,
            DetailColor = Color.Gray,
        };

        cell.SetBinding(ListViewTextCell.TextProperty, new Binding(nameof(Book.Title)));
        cell.SetBinding(ListViewTextCell.DetailProperty, new Binding(nameof(Book.Author)));

        return cell;
    }),
    LayoutDefinition = new ListViewLinearLayout { ItemLength = 60 },
};
3. Add the following namespaces:
xmlns:telerikDataControls="clr-namespace:Telerik.XamarinForms.DataControls;assembly=Telerik.XamarinForms.DataControls"
xmlns:telerikListView="clr-namespace:Telerik.XamarinForms.DataControls.ListView;assembly=Telerik.XamarinForms.DataControls"
using Telerik.XamarinForms.DataControls;
using Telerik.XamarinForms.DataControls.ListView;
4. Finally, set the list view as the content of your page.
ListViewTemplateCell Example
This example demonstrates how to create a list view with templated cells, like this:
1. Create a view model that will be the source of the list view:
public class Book
{
    public string Title { get; set; }
    public string Author { get; set; }
    public bool IsFavourite { get; set; }
}

public class ViewModel
{
    public ViewModel()
    {
        this.Source = new List<Book>{
            new Book{ Title = "The Fault in Our Stars ",  Author = "John Green"},
            new Book{ Title = "Divergent",  Author = "Veronica Roth"},
            new Book{ Title = "Gone Girl",  Author = "Gillian Flynn", IsFavourite = true},
            new Book{ Title = "Clockwork Angel",  Author = "Cassandra Clare"},
            new Book{ Title = "The Martian",  Author = "Andy Weir"},
            new Book{ Title = "Ready Player One",  Author = "Ernest Cline"},
            new Book{ Title = "The Lost Hero",  Author = "Rick Riordan", IsFavourite = true},
            new Book{ Title = "All the Light We Cannot See",  Author = "Anthony Doerr"},
            new Book{ Title = "Cinder",  Author = "Marissa Meyer"},
            new Book{ Title = "Me Before You",  Author = "Jojo Moyes"},
            new Book{ Title = "The Night Circus",  Author = "Erin Morgenstern"},
        };
    }

    public List<Book> Source { get; set; }
}
2. Define the listview control either in Xaml or in code behind.
You can define the list view in Xaml like this:
<telerikDataControls:RadListView ItemsSource="{Binding Source}" x:Name="listView">
    <telerikDataControls:RadListView.BindingContext>
        <local:ViewModel />
    </telerikDataControls:RadListView.BindingContext>
    <telerikDataControls:RadListView.ItemTemplate>
        <DataTemplate>
            <telerikListView:ListViewTemplateCell>
                <telerikListView:ListViewTemplateCell.View>
                    <Grid>
                        <StackLayout Orientation="Horizontal" Margin="10, 10, 10, 0">
                            <Image IsVisible="{Binding IsFavourite}" Source="favourite.png" HeightRequest="16" VerticalOptions="Center" />
                            <Label Text="{Binding Title}" FontSize="16" FontAttributes="Bold" TextColor="Black" VerticalOptions="Center" />
                        </StackLayout>
                        <StackLayout Orientation="Horizontal" Grid.Row="1" Margin="10, 0, 10, 10">
                            <Label Text="by" FontSize="13" FontAttributes="Italic" TextColor="Gray" />
                            <Label Text="{Binding Author}" FontSize="13" FontAttributes="Italic" TextColor="Gray" />
                        </StackLayout>
                    </Grid>
                </telerikListView:ListViewTemplateCell.View>
            </telerikListView:ListViewTemplateCell>
        </DataTemplate>
    </telerikDataControls:RadListView.ItemTemplate>
</telerikDataControls:RadListView>
- Define the namespace
xmlns:telerikDataControls="clr-namespace:Telerik.XamarinForms.DataControls;assembly=Telerik.XamarinForms.DataControls"
xmlns:telerikListView="clr-namespace:Telerik.XamarinForms.DataControls.ListView;assembly=Telerik.XamarinForms.DataControls"
You can define the list view in code behind:
For clarity, let's build the template of the list view cell in a separate method:
public View GetCellContent()
{
    var content = new Grid();

    var book = new Label
    {
        FontAttributes = FontAttributes.Bold,
        TextColor = Color.Black,
        FontSize = 16,
        VerticalOptions = LayoutOptions.Center
    };

    book.SetBinding(Label.TextProperty, new Binding(nameof(Book.Title)));

    var fav = new Image
    {
        Source = ImageSource.FromFile("favourite.png"),
        HeightRequest = 16,
        VerticalOptions = LayoutOptions.Center
    };

    fav.SetBinding(Image.IsVisibleProperty, new Binding(nameof(Book.IsFavourite)));

    var author = new Label
    {
        TextColor = Color.Gray,
        FontAttributes = FontAttributes.Italic,
        FontSize = 13
    };

    author.SetBinding(Label.TextProperty, new Binding(nameof(Book.Author)));

    var by = new Label
    {
        Text = "by",
        TextColor = Color.Gray,
        FontAttributes = FontAttributes.Italic,
        FontSize = 13
    };

    var main = new StackLayout { Orientation = StackOrientation.Horizontal, Margin = new Thickness(10, 10, 10, 0) };
    main.Children.Add(fav);
    main.Children.Add(book);

    var detail = new StackLayout { Orientation = StackOrientation.Horizontal, Margin = new Thickness(10, 0, 10, 10) };
    detail.Children.Add(by);
    detail.Children.Add(author);

    content.Children.Add(main, 0, 0);
    content.Children.Add(detail, 0, 1);

    return content;
}
- Define the list view:
var listView = new RadListView
{
    ItemsSource = new ViewModel().Source,
    ItemTemplate = new DataTemplate(() =>
    {
        return new ListViewTemplateCell
        {
            View = GetCellContent()
        };
    }),
};
3. Finally, set the list view as the content of your page.