Implement Drag and Drop Between TreeView and ListBox
The goal of this tutorial is to show you how to implement drag and drop between RadTreeView and ListBox.
The final result should look like this 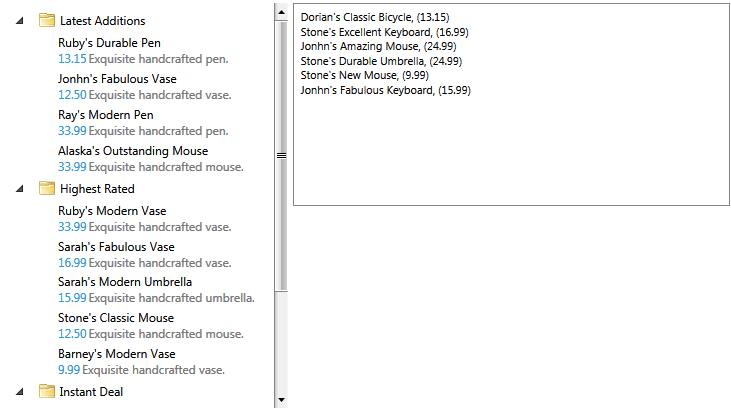
Implement Drag and Drop Between TreeView and ListBox
For the purpose of this example, you will need to create an empty application project and open it in Visual Studio.
The first step is to add references to the following assemblies:
- Telerik.Windows.Controls.Navigation
- Telerik.Windows.Controls
- Telerik.Windows.Data
Then you can define the controls in your view. As the purpose of this tutorial is to demonstrate how to implement drag and drop operations, we won't focus on the definitions of the controls in xaml. However, please note to set the RadTreeView IsDragDropEnabled property to true.
<Grid x:Name="LayoutRoot"
      Margin="8"
      Background="White">
    <Grid.Resources>
        <DataTemplate x:Key="WishlistProduct">
            <StackPanel Orientation="Horizontal">
                <TextBlock Foreground="#FF000000" Text="{Binding Name}" />
                <TextBlock Foreground="#FF000000" Text=", (" />
                <TextBlock Foreground="#FF000000" Text="{Binding UnitPrice}" />
                <TextBlock Foreground="#FF000000" Text=")" />
            </StackPanel>
        </DataTemplate>
        <DataTemplate x:Key="ProductTemplate">
            <telerik:RadDockPanel MaxWidth="200" Margin="2">
                <TextBlock Foreground="{telerik:Windows8Resource ResourceKey=MarkerBrush}"
                           Text="{Binding Name}"
                           telerik:RadDockPanel.Dock="Top" />
                <TextBlock Foreground="{telerik:Windows8Resource ResourceKey=AccentBrush}"
                           Text="{Binding UnitPrice}"
                           telerik:RadDockPanel.Dock="Left" />
                <TextBlock Margin="2 0 0 0"
                           Foreground="{telerik:Windows8Resource ResourceKey=StrongBrush}"
                           Text="{Binding Description}"
                           TextWrapping="Wrap"
                           telerik:RadDockPanel.Dock="Left" />
            </telerik:RadDockPanel>
        </DataTemplate>
        <HierarchicalDataTemplate x:Key="CategoryTemplate"
                                  ItemTemplate="{StaticResource ProductTemplate}"
                                  ItemsSource="{Binding Items}">
            <StackPanel Orientation="Horizontal">
                <Image Width="16"
                       Height="16"
                       Margin="3"
                       VerticalAlignment="Center"
                       Source="Images/folder_icon.png" />
                <TextBlock Margin="2"
                           VerticalAlignment="Center"
                           Foreground="{telerik:Windows8Resource ResourceKey=MarkerBrush}"
                           Text="{Binding Name}" />
            </StackPanel>
        </HierarchicalDataTemplate>
        <Style TargetType="telerik:RadTreeViewItem">
            <Setter Property="IsExpanded" Value="True" />
        </Style>
    </Grid.Resources>
    <Grid.RowDefinitions>
        <RowDefinition />
        <RowDefinition />
    </Grid.RowDefinitions>
    <Grid.ColumnDefinitions>
        <ColumnDefinition Width="2" />
        <ColumnDefinition Width="3" />
    </Grid.ColumnDefinitions>
    <!--  All Products  -->
    <telerik:RadTreeView x:Name="allProductsView"
                         Grid.Row="0"
                         Grid.RowSpan="2"
                         Grid.Column="0"
                         Margin="0,0,5,0"
                         IsDragDropEnabled="True"
                         ItemTemplate="{StaticResource CategoryTemplate}"
                         Padding="5" />
    <!--  Whishlist  -->
    <ListBox x:Name="wishlistView"
             Grid.Row="0"
             Grid.Column="1"
             FontSize="11"
             ItemTemplate="{StaticResource WishlistProduct}"
             Padding="5"
             SelectionMode="Extended">
        <ListBox.Resources>
            <DataTemplate x:Key="DraggedItemTemplate">
                <StackPanel>
                    <StackPanel Orientation="Horizontal">
                        <TextBlock Text="Dragging:" />
                        <TextBlock FontWeight="Bold" Text="{Binding CurrentDraggedItem.Name}" />
                    </StackPanel>
                    <StackPanel Orientation="Horizontal">
                        <TextBlock MinWidth="45"
                                   FontWeight="Bold"
                                   Text="{Binding CurrentDropPosition}" />
                        <TextBlock Foreground="Gray" Text=", (" />
                        <TextBlock Text="{Binding CurrentDraggedOverItem.Name}" />
                        <TextBlock Foreground="Gray" Text=")" />
                    </StackPanel>
                </StackPanel>
            </DataTemplate>
        </ListBox.Resources>
    </ListBox>
</Grid>
The next step is to use the DragDropManager to enable the drop operation on the ListBox control.
Find the ListBox declaration and set its AllowDrop property to True.
Now that the ListBox allows drop operations, we need to make sure that the ListItems are draggable. We can do so by applying an implicit style that sets the DragDropManager.AllowCapturedDrag attached property to True on every ListItem:
<!--  Note: With this style we make the ListBoxItems draggable:  -->
<Style TargetType="ListBoxItem">
    <Setter Property="telerik:DragDropManager.AllowCapturedDrag" Value="True" />
</Style>
telerik is alias for the following namespace declaration:
xmlns:telerik="http://schemas.telerik.com/2008/xaml/presentation"
Next we'll need to populate the controls with data but as the ViewModels definitions are outside the scope of this tutorial, we'll omit them for clarity. We'll only assume that the RadTreeView is populated with categories and each category displays a list of products. While, the ListBox displays a collection of products. This means that we'll have to implement a logic that allows you to drag a product from the ListBox and drop it inside a category in the tree.
Please have in mind that if the ItemsSource of the RadTreeView (RadTreeViewItem) is not an IList, then the drop operation won't be allowed. Moreover, we recommend using a collection that implements the INotifyCollectionChanged interface, for instance an ObservableCollection, as only then the changes implemented in the RadTreeView underlying data collection will be reflected in the UI of the control.
Now we're getting to the actual DragDrop implementation. And we'll start with configuring the ListBox as a participant in drag and drop operations.
Please note that this article is based on the TreeToGrid demo, which you can find by navigating to the DragAndDrop examples ->Tree To Grid Drag.
In this tutorial we'll use a custom behavior to define the ListBox DragDrop behavior. Essentially the behavior will attach handlers for the following events:
- DragInitialize
- GiveFeedback
- Drop
- DragDropCompleted
- DragOver
You can find more information about the DragDropManager events in this tutorial.
So we basically need a class that provides:
a ListBox object that will be associated with the ListBox instance that enables the behavior
IsEnabled property to control the enabled state of the behavior
a Dictionary that holds all ListBox instances enabling the behavior
methods that attach and detach the DragDropManager event handlers.
using Telerik.Windows.DragDrop;
using Telerik.Windows.Controls;
using Telerik.Windows.DragDrop.Behaviors;
using Telerik.Windows.Controls.TreeView;

public class ListBoxDragDropBehavior
{
    private System.Windows.Controls.ListBox _associatedObject;
    /// <summary>
    /// object that will be associated with the ListBox instance that enables the behavior
    /// </summary>
    public System.Windows.Controls.ListBox AssociatedObject
    {
        get
        {
            return _associatedObject;
        }
        set
        {
            _associatedObject = value;
        }
    }

    private static Dictionary<System.Windows.Controls.ListBox, ListBoxDragDropBehavior> instances;

    static ListBoxDragDropBehavior()
    {
        instances = new Dictionary<System.Windows.Controls.ListBox, ListBoxDragDropBehavior>();
    }

    public static bool GetIsEnabled(DependencyObject obj)
    {
        return (bool)obj.GetValue(IsEnabledProperty);
    }

    public static void SetIsEnabled(DependencyObject obj, bool value)
    {
        ListBoxDragDropBehavior behavior = GetAttachedBehavior(obj as System.Windows.Controls.ListBox);

        behavior.AssociatedObject = obj as System.Windows.Controls.ListBox;

        if (value)
        {
            behavior.Initialize();
        }
        else
        {
            behavior.CleanUp();
        }
        obj.SetValue(IsEnabledProperty, value);
    }

    // Using a DependencyProperty as the backing store for IsEnabled state of the behavior
    public static readonly DependencyProperty IsEnabledProperty =
        DependencyProperty.RegisterAttached("IsEnabled", typeof(bool), typeof(ListBoxDragDropBehavior),
            new PropertyMetadata(new PropertyChangedCallback(OnIsEnabledPropertyChanged)));

    public static void OnIsEnabledPropertyChanged(DependencyObject dependencyObject, DependencyPropertyChangedEventArgs e)
    {
        SetIsEnabled(dependencyObject, (bool)e.NewValue);
    }

    private static ListBoxDragDropBehavior GetAttachedBehavior(System.Windows.Controls.ListBox listBox)
    {
        if (!instances.ContainsKey(listBox))
        {
            instances[listBox] = new ListBoxDragDropBehavior();
            instances[listBox].AssociatedObject = listBox;
        }

        return instances[listBox];
    }

    //initializes the behavior by detaching from any existing DragDropManager event handlers and attaching new DragDropManager event handlers
    protected virtual void Initialize()
    {
        this.UnsubscribeFromDragDropEvents();
        this.SubscribeToDragDropEvents();
    }

    //cleans up after disabling the behavior by detaching from the DragDropManager event handlers
    protected virtual void CleanUp()
    {
        this.UnsubscribeFromDragDropEvents();
    }

    //attaching new DragDropManager event handlers
    private void SubscribeToDragDropEvents()
    {

    }

    //unsubscribing from the DragDropManager event handlers
    private void UnsubscribeFromDragDropEvents()
    {

    }
}
Imports Telerik.Windows.DragDrop
Imports Telerik.Windows.Controls
Imports Telerik.Windows.DragDrop.Behaviors
Imports Telerik.Windows.Controls.TreeView

Public Class ListBoxDragDropBehavior
    Private _associatedObject As System.Windows.Controls.ListBox
    ''' <summary> '''
    ''' object that will be associated with the ListBox instance that enables the behavior '''
    ''' </summary> '''
    Public Property AssociatedObject() As System.Windows.Controls.ListBox
        Get
            Return _associatedObject
        End Get
        Set(value As System.Windows.Controls.ListBox)
            _associatedObject = value
        End Set
    End Property

    Private Shared instances As Dictionary(Of System.Windows.Controls.ListBox, ListBoxDragDropBehavior)

    Shared Sub New()
        instances = New Dictionary(Of System.Windows.Controls.ListBox, ListBoxDragDropBehavior)()
    End Sub

    Public Shared Function GetIsEnabled(obj As DependencyObject) As Boolean
        Return CBool(obj.GetValue(IsEnabledProperty))
    End Function

    Public Shared Sub SetIsEnabled(obj As DependencyObject, value As Boolean)
        Dim behavior As ListBoxDragDropBehavior = GetAttachedBehavior(TryCast(obj, System.Windows.Controls.ListBox))

        behavior.AssociatedObject = TryCast(obj, System.Windows.Controls.ListBox)

        If value Then
            behavior.Initialize()
        Else
            behavior.CleanUp()
        End If
        obj.SetValue(IsEnabledProperty, value)
    End Sub

    ' Using a DependencyProperty as the backing store for IsEnabled state of the behavior '
    Public Shared ReadOnly IsEnabledProperty As DependencyProperty = DependencyProperty.RegisterAttached("IsEnabled", GetType(Boolean), GetType(ListBoxDragDropBehavior), New PropertyMetadata(New PropertyChangedCallback(AddressOf OnIsEnabledPropertyChanged)))

    Public Shared Sub OnIsEnabledPropertyChanged(dependencyObject As DependencyObject, e As DependencyPropertyChangedEventArgs)
        SetIsEnabled(dependencyObject, CBool(e.NewValue))
    End Sub

    Private Shared Function GetAttachedBehavior(listBox As System.Windows.Controls.ListBox) As ListBoxDragDropBehavior
        If Not instances.ContainsKey(listBox) Then
            instances(listBox) = New ListBoxDragDropBehavior()
            instances(listBox).AssociatedObject = listBox
        End If

        Return instances(listBox)
    End Function

    'initializes the behavior by detaching from any existing DragDropManager event handlers and attaching new DragDropManager event handlers'
    Protected Overridable Sub Initialize()
        Me.UnsubscribeFromDragDropEvents()
        Me.SubscribeToDragDropEvents()
    End Sub

    'cleans up after disabling the behavior by detaching from the DragDropManager event handlers'
    Protected Overridable Sub CleanUp()
        Me.UnsubscribeFromDragDropEvents()
    End Sub

    'attaching new DragDropManager event handlers'
    Private Sub SubscribeToDragDropEvents()

    End Sub

    'unsubscribing from the DragDropManager event handlers'
    Private Sub UnsubscribeFromDragDropEvents()

    End Sub
End Class
Now let's attach handlers for the DragDropManager events listed above. We'll do that in the SubscribeToDragDropEvents() method and we'll detach from these handlers in the implementation of the UnsubscribeFromDragDropEvents() method.
//attaching new DragDropManager event handlers
private void SubscribeToDragDropEvents()
{
    DragDropManager.AddDragInitializeHandler(this.AssociatedObject, OnDragInitialize);
    DragDropManager.AddGiveFeedbackHandler(this.AssociatedObject, OnGiveFeedback);
    DragDropManager.AddDropHandler(this.AssociatedObject, OnDrop);
    DragDropManager.AddDragDropCompletedHandler(this.AssociatedObject, OnDragDropCompleted);
    DragDropManager.AddDragOverHandler(this.AssociatedObject, OnDragOver);
}

//unsubscribing from the DragDropManager event handlers
private void UnsubscribeFromDragDropEvents()
{
    DragDropManager.RemoveDragInitializeHandler(this.AssociatedObject, OnDragInitialize);
    DragDropManager.RemoveGiveFeedbackHandler(this.AssociatedObject, OnGiveFeedback);
    DragDropManager.RemoveDropHandler(this.AssociatedObject, OnDrop);
    DragDropManager.RemoveDragDropCompletedHandler(this.AssociatedObject, OnDragDropCompleted);
    DragDropManager.RemoveDragOverHandler(this.AssociatedObject, OnDragOver);

}
private void OnDragInitialize(object sender, DragInitializeEventArgs e)
{
}

private void OnGiveFeedback(object sender, Telerik.Windows.DragDrop.GiveFeedbackEventArgs e)
{
}

private void OnDragDropCompleted(object sender, DragDropCompletedEventArgs e)
{
}

private void OnDrop(object sender, Telerik.Windows.DragDrop.DragEventArgs e)
{
}

private void OnDragOver(object sender, Telerik.Windows.DragDrop.DragEventArgs e)
{
}
'attaching new DragDropManager event handlers'
Private Sub SubscribeToDragDropEvents()
    DragDropManager.AddDragInitializeHandler(Me.AssociatedObject, AddressOf OnDragInitialize)
    DragDropManager.AddGiveFeedbackHandler(Me.AssociatedObject, AddressOf OnGiveFeedback)
    DragDropManager.AddDropHandler(Me.AssociatedObject, AddressOf OnDrop)
    DragDropManager.AddDragDropCompletedHandler(Me.AssociatedObject, AddressOf OnDragDropCompleted)
    DragDropManager.AddDragOverHandler(Me.AssociatedObject, AddressOf OnDragOver)
End Sub

'unsubscribing from the DragDropManager event handlers'
Private Sub UnsubscribeFromDragDropEvents()
    DragDropManager.RemoveDragInitializeHandler(Me.AssociatedObject, AddressOf OnDragInitialize)
    DragDropManager.RemoveGiveFeedbackHandler(Me.AssociatedObject, AddressOf OnGiveFeedback)
    DragDropManager.RemoveDropHandler(Me.AssociatedObject, AddressOf OnDrop)
    DragDropManager.RemoveDragDropCompletedHandler(Me.AssociatedObject, AddressOf OnDragDropCompleted)
    DragDropManager.RemoveDragOverHandler(Me.AssociatedObject, AddressOf OnDragOver)

End Sub
Private Sub OnDragInitialize(sender As Object, e As DragInitializeEventArgs)
End Sub

Private Sub OnGiveFeedback(sender As Object, e As Telerik.Windows.DragDrop.GiveFeedbackEventArgs)
End Sub

Private Sub OnDragDropCompleted(sender As Object, e As DragDropCompletedEventArgs)
End Sub

Private Sub OnDrop(sender As Object, e As Telerik.Windows.DragDrop.DragEventArgs)
End Sub

Private Sub OnDragOver(sender As Object, e As Telerik.Windows.DragDrop.DragEventArgs)
End Sub
Once we do so, we can start implementing our drag/drop logic. And we'll always have to keep in mind that we need to drag items from the RadTreeView and drop them in the ListBox and vice versa. This means that when we initialize a drag, we need to access the data displayed in the dragged ListBoxItem and add the data to the DragInitializeEventArgs Data object. This will allow us to pass the dragged information during the drag/drop operation. Also, in order to provide the user with elaborate visual information during the drag operation, we can create a helper class that describes the currently dragged item, the item that the drag is passing over, the drop position and the drop index calculated based on the drop position. For instance, we can use the following class definition:
using Telerik.Windows.Controls;

public class DropIndicationDetails : ViewModelBase
{
    private object currentDraggedItem;
    private DropPosition currentDropPosition;
    private object currentDraggedOverItem;

    public object CurrentDraggedOverItem
    {
        get
        {
            return currentDraggedOverItem;
        }
        set
        {
            if (this.currentDraggedOverItem != value)
            {
                currentDraggedOverItem = value;
                OnPropertyChanged("CurrentDraggedOverItem");
            }
        }
    }

    public int DropIndex { get; set; }

    public DropPosition CurrentDropPosition
    {
        get
        {
            return this.currentDropPosition;
        }
        set
        {
            if (this.currentDropPosition != value)
            {
                this.currentDropPosition = value;
                OnPropertyChanged("CurrentDropPosition");
            }
        }
    }

    public object CurrentDraggedItem
    {
        get
        {
            return this.currentDraggedItem;
        }
        set
        {
            if (this.currentDraggedItem != value)
            {
                this.currentDraggedItem = value;
                OnPropertyChanged("CurrentDraggedItem");
            }
        }
    }
}
Imports Telerik.Windows.Controls

Public Class DropIndicationDetails
    Inherits ViewModelBase
    Private m_currentDraggedItem As Object
    Private m_currentDropPosition As DropPosition
    Private m_currentDraggedOverItem As Object

    Public Property CurrentDraggedOverItem() As Object
        Get
            Return m_currentDraggedOverItem
        End Get
        Set(value As Object)
            If Me.m_currentDraggedOverItem IsNot value Then
                m_currentDraggedOverItem = value
                OnPropertyChanged("CurrentDraggedOverItem")
            End If
        End Set
    End Property

    Public Property DropIndex() As Integer
        Get
            Return m_DropIndex
        End Get
        Set(value As Integer)
            m_DropIndex = Value
        End Set
    End Property
    Private m_DropIndex As Integer

    Public Property CurrentDropPosition() As DropPosition
        Get
            Return Me.m_currentDropPosition
        End Get
        Set(value As DropPosition)
            If Me.m_currentDropPosition <> value Then
                Me.m_currentDropPosition = value
                OnPropertyChanged("CurrentDropPosition")
            End If
        End Set
    End Property

    Public Property CurrentDraggedItem() As Object
        Get
            Return Me.m_currentDraggedItem
        End Get
        Set(value As Object)
            If Me.m_currentDraggedItem IsNot value Then
                Me.m_currentDraggedItem = value
                OnPropertyChanged("CurrentDraggedItem")
            End If
        End Set
    End Property
End Class
We can use this definition to also pass and keep the drag operation details in the Data object provided by the DragDropManager. This means that we can implement the following drag initialization:
private void OnDragInitialize(object sender, DragInitializeEventArgs e)
{
    DropIndicationDetails details = new DropIndicationDetails();
    var listBoxItem = e.OriginalSource as System.Windows.Controls.ListBoxItem ?? (e.OriginalSource as FrameworkElement).ParentOfType<System.Windows.Controls.ListBoxItem>();

    var item = listBoxItem != null ? listBoxItem.DataContext : (sender as System.Windows.Controls.ListBox).SelectedItem;
    details.CurrentDraggedItem = item;

    IDragPayload dragPayload = DragDropPayloadManager.GeneratePayload(null);

    dragPayload.SetData("DraggedData", item);
    dragPayload.SetData("DropDetails", details);

    e.Data = dragPayload;

    e.DragVisual = new DragVisual()
    {
        Content = details,
        ContentTemplate = this.AssociatedObject.Resources["DraggedItemTemplate"] as DataTemplate
    };
    e.DragVisualOffset = e.RelativeStartPoint;
    e.AllowedEffects = DragDropEffects.All;
    e.Handled = true;
}
Private Sub OnDragInitialize(sender As Object, e As DragInitializeEventArgs)
    Dim details As New DropIndicationDetails()
    Dim listBoxItem = If(TryCast(e.OriginalSource, System.Windows.Controls.ListBoxItem), TryCast(e.OriginalSource, FrameworkElement).ParentOfType(Of System.Windows.Controls.ListBoxItem)())

    Dim item = If(listBoxItem IsNot Nothing, listBoxItem.DataContext, TryCast(sender, System.Windows.Controls.ListBox).SelectedItem)
    details.CurrentDraggedItem = item

    Dim dragPayload As IDragPayload = DragDropPayloadManager.GeneratePayload(Nothing)

    dragPayload.SetData("DraggedData", item)
    dragPayload.SetData("DropDetails", details)

    e.Data = dragPayload

    e.DragVisual = New DragVisual() With {
        .Content = details,
        .ContentTemplate = TryCast(Me.AssociatedObject.Resources("DraggedItemTemplate"), DataTemplate)
    }
    e.DragVisualOffset = e.RelativeStartPoint
    e.AllowedEffects = DragDropEffects.All
End Sub
Then we can implement the GiveFeedback event handler, which is quite straight-forward. As this event enables the drop source to give feedback information to the user, we'll use it to change the appearance of the mouse pointer to indicate the effects allowed by the drop target.
private void OnGiveFeedback(object sender, Telerik.Windows.DragDrop.GiveFeedbackEventArgs e)
{
    e.SetCursor(Cursors.Arrow);
    e.Handled = true;
}
Private Sub OnGiveFeedback(sender As Object, e As Telerik.Windows.DragDrop.GiveFeedbackEventArgs)
    e.SetCursor(Cursors.Arrow)
    e.Handled = True
End Sub
Next, we have to handle the DragOver event and implement a logic that decides if the current drag operation is supported over the current drop destination. In this example, we won't allow a drag operation within the ListBox, which means that we have to make sure that the drag operation is allowed only if it originates from the RadTreeView control.
RadTreeView drag operation creates an object of type TreeViewDragDropOptions that holds all information related to the drag. You can read more about the properties exposed by the type in the Drag and Drop article.
As the data object passed by a drag operation started in RadTreeView should be of type TreeViewDragDropOptions, this means that you can try to extract this object and if the operation is unsuccessful, then the drag doesn't originate from a RadTreeView. Furthermore, we'll have to make sure that the dragged data type matches the data type displayed in the ListBox - in our example this means that we'll make sure we're dragging products. So finally, we can create the following OnDragOver() implementation:
private void OnDragOver(object sender, Telerik.Windows.DragDrop.DragEventArgs e)
{
    TreeViewDragDropOptions options = DragDropPayloadManager.GetDataFromObject(e.Data, TreeViewDragDropOptions.Key) as TreeViewDragDropOptions;
    if (options == null)
    {
        e.Effects = DragDropEffects.None;
        e.Handled = true;
        return;
    }
    var draggedItem = options.DraggedItems.FirstOrDefault();
    var itemsType = (this.AssociatedObject.ItemsSource as IList).AsQueryable().ElementType;


    if (draggedItem.GetType() != itemsType)
    {
        e.Effects = DragDropEffects.None;
    }
    else
    {
        (options.DragVisual as TreeViewDragVisual).IsDropPossible = true;
        options.DropAction = DropAction.Move;
        options.UpdateDragVisual();
    }
    e.Handled = true;
}
Private Sub OnDragOver(sender As Object, e As Telerik.Windows.DragDrop.DragEventArgs)
    Dim options As TreeViewDragDropOptions = TryCast(DragDropPayloadManager.GetDataFromObject(e.Data, TreeViewDragDropOptions.Key), TreeViewDragDropOptions)
    If options Is Nothing Then
        e.Effects = DragDropEffects.None
        e.Handled = True
        Return
    End If
    Dim draggedItem = options.DraggedItems.FirstOrDefault()
    Dim itemsType = TryCast(Me.AssociatedObject.ItemsSource, IList).AsQueryable().ElementType

    If draggedItem.GetType <> itemsType Then
        e.Effects = DragDropEffects.None
    Else
        TryCast(options.DragVisual, TreeViewDragVisual).IsDropPossible = True
        options.DropAction = DropAction.Move
        options.UpdateDragVisual()
    End If
    e.Handled = True
End Sub
Finally we'll have to implement the actual drop logic and we'll also have to update the collection displayed in the source of the drag operation accordingly. We'll do that in the handlers of the Drop and DragDropCompleted events.
private void OnDrop(object sender, Telerik.Windows.DragDrop.DragEventArgs e)
{
    TreeViewDragDropOptions options = DragDropPayloadManager.GetDataFromObject(e.Data, TreeViewDragDropOptions.Key) as TreeViewDragDropOptions;
    if (options == null) return;
    var draggedItem = options.DraggedItems.FirstOrDefault();

    if (draggedItem == null)
    {
        return;
    }

    if (e.Effects != DragDropEffects.None)
    {
        var collection = (sender as System.Windows.Controls.ListBox).ItemsSource as IList;
        collection.Add(draggedItem);
    }

    e.Handled = true;
}

private void OnDragDropCompleted(object sender, DragDropCompletedEventArgs e)
{
    var draggedItem = DragDropPayloadManager.GetDataFromObject(e.Data, "DraggedData");

    if (e.Effects != DragDropEffects.None)
    {
        var collection = (sender as System.Windows.Controls.ListBox).ItemsSource as IList;
        collection.Remove(draggedItem);
    }
}
Private Sub OnDrop(sender As Object, e As Telerik.Windows.DragDrop.DragEventArgs)
    Dim options As TreeViewDragDropOptions = TryCast(DragDropPayloadManager.GetDataFromObject(e.Data, TreeViewDragDropOptions.Key), TreeViewDragDropOptions)
    If options Is Nothing Then
        Return
    End If
    Dim draggedItem = options.DraggedItems.FirstOrDefault()

    If draggedItem Is Nothing Then
        Return
    End If

    If e.Effects <> DragDropEffects.None Then
        Dim collection = TryCast(TryCast(sender, System.Windows.Controls.ListBox).ItemsSource, IList)
        collection.Add(draggedItem)
    End If

    e.Handled = True
End Sub

Private Sub OnDragDropCompleted(sender As Object, e As DragDropCompletedEventArgs)
    Dim draggedItem = DragDropPayloadManager.GetDataFromObject(e.Data, "DraggedData")

    If e.Effects <> DragDropEffects.None Then
        Dim collection = TryCast(TryCast(sender, System.Windows.Controls.ListBox).ItemsSource, IList)
        collection.Remove(draggedItem)
    End If
End Sub
With this the ListBox drag/drop logic is complete. All we have finalize now, is the definition of the control to enable the ListBoxDragDropBehavior. So please find the declaration of the ListBox and add the following line: 'example:ListBoxDragDropBehavior.IsEnabled="True"', where example is an alias pointing to the namespace in which we've defined the ListBoxDragDropBehavior class.
If you run the solution now, you should be able to drag items from the RadTreeView and drop them in the ListBox.
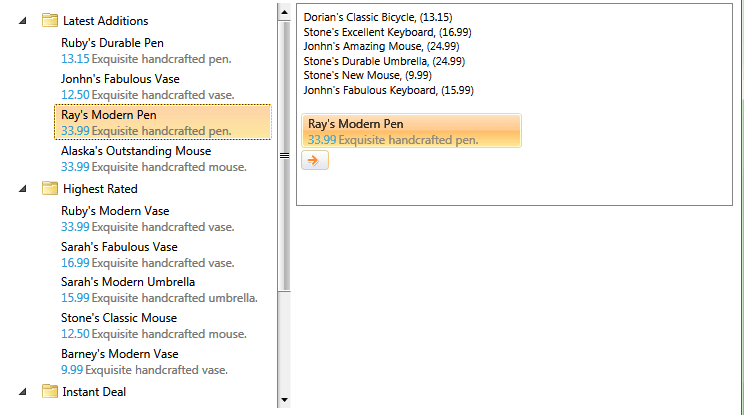
And if you start dragging an item from the ListBox, you'll be able to get the item's data and even display an informative tooltip describing the dragged item. However, this tooltip won't be updated while dragging over the RadTreeView and you won't be able to drop the item among the tree items. This is due to the fact that the RadTreeView built-in drag/drop logic is implemented to handle only drag originating from a RadTreeView. Therefore, you will also have to set up the tree to process a drag coming from a ListBox.
In order to configure the RadTreeView to process the drop of an item coming from another control, you need to attach a handler for the DragDropManager Drop event.
DragDropManager.AddDropHandler(allProductsView, OnDrop);
DragDropManager.AddDropHandler(allProductsView, OnDrop)
In the handler you need to get the dragged data, find the position where the item should be dropped at - before, after or inside a particular RadTreeViewItem and implement the drop by adding the dragged data in the RadTreeView ItemsSource collection:
IList destinationItems = null;
private void OnDrop(object sender, Telerik.Windows.DragDrop.DragEventArgs e)
{
    var data = DragDropPayloadManager.GetDataFromObject(e.Data, "DraggedData");
    if (data == null) return;
    if (e.Effects != DragDropEffects.None)
    {
        var destinationItem = (e.OriginalSource as FrameworkElement).ParentOfType<RadTreeViewItem>();
        var dropDetails = DragDropPayloadManager.GetDataFromObject(e.Data, "DropDetails") as DropIndicationDetails;

        if (destinationItems != null)
        {
            int dropIndex = dropDetails.DropIndex >= destinationItems.Count ? destinationItems.Count : dropDetails.DropIndex < 0 ? 0 : dropDetails.DropIndex;
            this.destinationItems.Insert(dropIndex, data);
        }
    }
}
Dim destinationItems As IList = Nothing
Private Sub OnDrop(sender As Object, e As Telerik.Windows.DragDrop.DragEventArgs)
    Dim data = DragDropPayloadManager.GetDataFromObject(e.Data, "DraggedData")
    If data Is Nothing Then
        Return
    End If
    If e.Effects <> DragDropEffects.None Then
        Dim destinationItem = TryCast(e.OriginalSource, FrameworkElement).ParentOfType(Of RadTreeViewItem)()
        Dim dropDetails = TryCast(DragDropPayloadManager.GetDataFromObject(e.Data, "DropDetails"), DropIndicationDetails)

        If destinationItems IsNot Nothing Then
            Dim dropIndex As Integer = If(dropDetails.DropIndex >= destinationItems.Count, destinationItems.Count, If(dropDetails.DropIndex < 0, 0, dropDetails.DropIndex))
            Me.destinationItems.Insert(dropIndex, data)
        End If
    End If
End Sub
And to make the dragging operation more informative, we can also subscribe to the DragDropManager DragOver event to update the drag operation information tooltip while dragging over the RadTreeView.
private void OnItemDragOver(object sender, Telerik.Windows.DragDrop.DragEventArgs e)
{
    var item = (e.OriginalSource as FrameworkElement).ParentOfType<RadTreeViewItem>();
    if (item == null)
    {
        e.Effects = DragDropEffects.None;
        e.Handled = true;
        return;
    }
    var position = GetPosition(item, e.GetPosition(item));
    if (item.Level == 0 && position != DropPosition.Inside)
    {
        e.Effects = DragDropEffects.None;
        e.Handled = true;
        return;
    }
    RadTreeView tree = sender as RadTreeView;
    var draggedData = DragDropPayloadManager.GetDataFromObject(e.Data, "DraggedData");
    var dropDetails = DragDropPayloadManager.GetDataFromObject(e.Data, "DropDetails") as DropIndicationDetails;

    if ((draggedData == null && dropDetails == null))
    {
        return;
    }
    if (position != DropPosition.Inside)
    {
        e.Effects = DragDropEffects.All;

        destinationItems = item.Level > 0 ? (IList)item.ParentItem.ItemsSource : (IList)tree.ItemsSource;
        int index = destinationItems.IndexOf(item.Item);
        dropDetails.DropIndex = position == DropPosition.Before ? index : index + 1;
    }
    else
    {
        destinationItems = (IList)item.ItemsSource;
        int index = 0;

        if (destinationItems == null)
        {
            e.Effects = DragDropEffects.None;
        }
        else
        {
            e.Effects = DragDropEffects.All;
            dropDetails.DropIndex = index;
        }
    }

    dropDetails.CurrentDraggedOverItem = item.Item;
    dropDetails.CurrentDropPosition = position;

    e.Handled = true;
}

private DropPosition GetPosition(RadTreeViewItem item, Point point)
{
    double treeViewItemHeight = 24;
    if (point.Y < treeViewItemHeight / 4)
    {
        return DropPosition.Before;
    }
    else if (point.Y > treeViewItemHeight * 3 / 4)
    {
        return DropPosition.After;
    }

    return DropPosition.Inside;
}
Private Sub OnItemDragOver(sender As Object, e As Telerik.Windows.DragDrop.DragEventArgs)
    Dim item = TryCast(e.OriginalSource, FrameworkElement).ParentOfType(Of RadTreeViewItem)()
    If item Is Nothing Then
        e.Effects = DragDropEffects.None
        e.Handled = True
        Return
    End If
    Dim position = GetPosition(item, e.GetPosition(item))
    If item.Level = 0 AndAlso position <> DropPosition.Inside Then
        e.Effects = DragDropEffects.None
        e.Handled = True
        Return
    End If
    Dim tree As RadTreeView = TryCast(sender, RadTreeView)
    Dim draggedData = DragDropPayloadManager.GetDataFromObject(e.Data, "DraggedData")
    Dim dropDetails = TryCast(DragDropPayloadManager.GetDataFromObject(e.Data, "DropDetails"), DropIndicationDetails)

    If (draggedData Is Nothing AndAlso dropDetails Is Nothing) Then
        Return
    End If
    If position <> DropPosition.Inside Then
        e.Effects = DragDropEffects.All

        destinationItems = If(item.Level > 0, DirectCast(item.ParentItem.ItemsSource, IList), DirectCast(tree.ItemsSource, IList))
        Dim index As Integer = destinationItems.IndexOf(item.Item)
        dropDetails.DropIndex = If(position = DropPosition.Before, index, index + 1)
    Else
        destinationItems = DirectCast(item.ItemsSource, IList)
        Dim index As Integer = 0

        If destinationItems Is Nothing Then
            e.Effects = DragDropEffects.None
        Else
            e.Effects = DragDropEffects.All
            dropDetails.DropIndex = index
        End If
    End If

    dropDetails.CurrentDraggedOverItem = item.Item
    dropDetails.CurrentDropPosition = position

    e.Handled = True
End Sub

Private Function GetPosition(item As RadTreeViewItem, point As Point) As DropPosition
    Dim treeViewItemHeight As Double = 24
    If point.Y < treeViewItemHeight / 4 Then
        Return DropPosition.Before
    ElseIf point.Y > treeViewItemHeight * 3 / 4 Then
        Return DropPosition.After
    End If

    Return DropPosition.Inside
End Function
If you take a closer look at the above code snippet, you'll notice that it basically tracks the current drop destination and position. Then based on its type and value, the code decides if the drag operation is allowed, updating the visual representation of the operation at the same time.
With that last piece of code, our application is ready. It can now provide a fluent drag-drop operation between a RadTreeView and a ListBox control.

Find a runnable project of the previous example in the WPF Samples GitHub repository.