Drag and Drop Support
This article will get you familiar with the RadDiagram drag/drop support.
The RadDiagram framework supports drag/drop operations out-of-the-box for a list of scenarios. For every scenario outside that list, it allows you to easily define your custom drop logic.
Enable Drag/Drop
To allow drag and drop functionality in the RadDiagram, set the AllowDrop attribute to True.
<telerik:RadDiagram x:Name="xDiagram" AllowDrop="True">

</telerik:RadDiagram>
The drag and drop behavior can be enabled in the code-behind as well. In order to do that you need to set the AllowDrop property of an instance of the RadDiagram class to True.
xDiagram.AllowDrop = true;
xDiagram.AllowDrop = True
Please note that the RadDiagram AllowDrop property is set to True by default.
Automatically Supported Drop Operations
The RadDiagram framework allows you to drop:
-
Image Files - You can just drag and drop onto the Diagramming surface any image file from the following list of supported formats:
- JPEG(*.jpg)
PNG(*.png)
BMP(*.bmp)
- TIFF(*.tiff)
- GIF(*.gif)
Text Files - You can drag .TXT files directly onto the diagramming surface to create text shapes. The operation will take the content of the .TXT file and will place it as a content of a text shape.
Text - You can drag chunks of text from your documents onto the diagramming surface directly.
Serialization XML string - You can drag the serialization xml string of a RadDiagram native element. You can find more information on how to serialize the RadDiagram native elements in an XML string, please have a look at the Serialization topic.
Custom Drop Operations
By default, the RadDiagram can handle drop operations out-of-the-box as long as the dropped data represents a serialized RadDiagramItem. This is why if you create an ItemsControl containing a list of RadDiagramItems, you will only have to set the dragged data to represent a serialized RadDiagramItem. However, if you have an ItemsControl displaying custom business data, then you will have to manually configure how to drag and drop the business items.
Please note that the examples in this tutorial are showcasing Telerik Windows8 theme. In the Setting a Theme article you can find more information on how to set an application-wide theme.
Dragging RadDiagramShapes from an ItemsControl
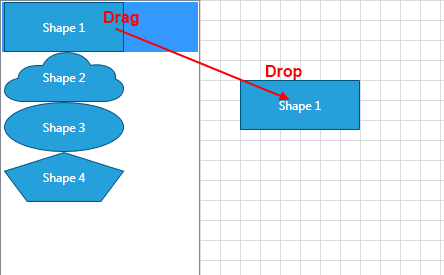
Let's examine a scenario where you create a ListBox populated with RadDiagramShapes and a RadDiagram component next to it:
<Grid>
    <Grid.ColumnDefinitions>
        <ColumnDefinition Width="Auto" />
        <ColumnDefinition Width="*" />
    </Grid.ColumnDefinitions>
    <ListBox x:Name="xListBox">
        <telerik:RadDiagramShape Width="120"
                                    Height="50"
                                    Content="Shape 1" />
        <telerik:RadDiagramShape Width="120"
                                    Height="50"
                                    Content="Shape 2"
                                    Geometry="{telerik:CommonShape ShapeType=CloudShape}" />
        <telerik:RadDiagramShape Width="120"
                                    Height="50"
                                    Content="Shape 3"
                                    Geometry="{telerik:CommonShape ShapeType=EllipseShape}" />
        <telerik:RadDiagramShape Width="120"
                                    Height="50"
                                    Content="Shape 4"
                                    Geometry="{telerik:CommonShape ShapeType=PentagonShape}" />
    </ListBox>
    <telerik:RadDiagram x:Name="xDiagram" Grid.Column="1" />
</Grid>
In order to allow a drag of a ListBoxItem, you need to apply a style that makes the ListBoxItems draggable:
<Style TargetType="ListBoxItem">
    <Setter Property="telerik:DragDropManager.AllowCapturedDrag" Value="True"/>
</Style>

In this scenario, the RadDiagram instance can automatically handle the drop of the RadDiagramShapes as long as they are serialized. In order to serialize them you need to create a handler for the ListBox DragDropManager.DragInitialized event:
public DragDropExample()
{
    InitializeComponent();
    DragDropManager.AddDragInitializeHandler(xListBox, OnDragInitialize);
}

//ListBox OnDragInitialize method implementation
private void OnDragInitialize(object sender, DragInitializeEventArgs args)
{
    args.AllowedEffects = DragDropEffects.All;
    RadDiagramShape draggedShape = (args.OriginalSource as ListBoxItem).Content as RadDiagramShape;
    List<RadDiagramShape> shapes = new List<RadDiagramShape>();
    shapes.Add(draggedShape);
    SerializationInfo serializaedInfo = SerializationService.Default.SerializeItems(shapes);
    args.Data = serializaedInfo;
}
Public Sub New()
    InitializeComponent()
    DragDropManager.AddDragInitializeHandler(xListBox, AddressOf OnDragInitialize)
End Sub

'ListBox OnDragInitialize method implementation '
Private Sub OnDragInitialize(sender As Object, args As DragInitializeEventArgs)
    args.AllowedEffects = DragDropEffects.All
    Dim draggedShape As RadDiagramShape = TryCast(TryCast(args.OriginalSource, ListBoxItem).Content, RadDiagramShape)
    Dim shapes As New List(Of RadDiagramShape)()
    shapes.Add(draggedShape)
    Dim serializaedInfo As SerializationInfo = SerializationService.[Default].SerializeItems(shapes)
    args.Data = serializaedInfo
End Sub
In the above example you can drag an entire ListBoxItem but you may need to only drag the RadDiagramShape contained within the item. In that case, you will have to create a custom style targeting the RadDiagramShapes within the ListBox control. Please note that you have to apply this style only on those shapes defined within the ListBox control.
<ListBox x:Name="xListBox">
    <ListBox.Resources>
        <Style TargetType="telerik:RadDiagramShape" x:Key="DraggableShapeStyle">
            <Setter Property="telerik:DragDropManager.AllowCapturedDrag" Value="True"/>
        </Style>
    </ListBox.Resources>
    <telerik:RadDiagramShape Width="120"
                    Height="50"
                    Content="Shape 1"
                    Style="{StaticResource DraggableShapeStyle}" />
    <telerik:RadDiagramShape Width="120"
                    Height="50"
                    Content="Shape 2"
                    Geometry="{telerik:CommonShape ShapeType=CloudShape}"
                    Style="{StaticResource DraggableShapeStyle}" />
    <telerik:RadDiagramShape Width="120"
                    Height="50"
                    Content="Shape 3"
                    Geometry="{telerik:CommonShape ShapeType=EllipseShape}"
                    Style="{StaticResource DraggableShapeStyle}" />
    <telerik:RadDiagramShape Width="120"
                    Height="50"
                    Content="Shape 4"
                    Geometry="{telerik:CommonShape ShapeType=PentagonShape}"
                    Style="{StaticResource DraggableShapeStyle}" />
</ListBox>
And you will also have to slightly modify the OnDragInitialize() implementation as it now looks for a ListBoxItem as its OriginalSource. Once the ListBoxItems aren't marked as draggable and only the shapes are defined as such, the OriginalSource of the event will be a shape instance.
public DragDropExample()
{
    InitializeComponent();
    DragDropManager.AddDragInitializeHandler(xListBox, OnDragInitialize);
}

//ListBox OnDragInitialize method implementation
private void OnDragInitialize(object sender, DragInitializeEventArgs args)
{
    args.AllowedEffects = DragDropEffects.All;
   RadDiagramShape draggedShape = args.OriginalSource as RadDiagramShape;
    List<RadDiagramShape> shapes = new List<RadDiagramShape>();
    shapes.Add(draggedShape);
    SerializationInfo serializaedInfo = SerializationService.Default.SerializeItems(shapes);
    args.Data = serializaedInfo;
}
Public Sub New()
    InitializeComponent()
    DragDropManager.AddDragInitializeHandler(xListBox, AddressOf OnDragInitialize)
End Sub

'ListBox OnDragInitialize method implementation
Private Sub OnDragInitialize(sender As Object, args As DragInitializeEventArgs)
    args.AllowedEffects = DragDropEffects.All
    Dim draggedShape As RadDiagramShape = TryCast(args.OriginalSource, RadDiagramShape)
    Dim shapes As New List(Of RadDiagramShape)()
    shapes.Add(draggedShape)
    Dim serializaedInfo As SerializationInfo = SerializationService.[Default].SerializeItems(shapes)
    args.Data = serializaedInfo
End Sub
Dragging business data from an ItemsControl
In MVVM scenarios, the business data is usually displayed within ItemsControls. And if you need to drag the items of these controls and drop them on a diagramming surface, you need to customize the drag/drop operations on both sides - in the source of the drag and in the targeted RadDiagram.
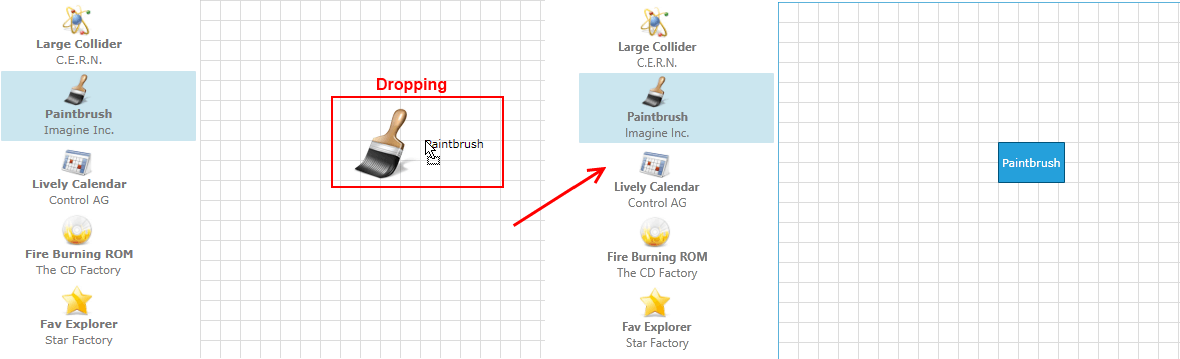
For the purpose of this tutorial, we will examine a sample scenario describing how to implement a drag operation from a ListBox control to a RadDiagram. Our goal would be to create a RadDiagramShape to wrap the dragged data.
-
First, let's create a sample data source for the ListBox:
    public class ApplicationInfo
    {
        public Double Price
        {
            get;
            set;
        }

        public String IconPath
        {
            get;
            set;
        }

        public String Name
        {
            get;
            set;
        }

        public String Author
        {
            get;
            set;
        }
    }
    public class MainViewModel
    {
        private ObservableCollection<ApplicationInfo> allApplications = GenerateApplicationInfos();

        public ObservableCollection<ApplicationInfo> AllApplications
        {
            get
            {
                return this.allApplications;
            }
            set
            {
                this.allApplications = value;
            }
        }

        public static ObservableCollection<ApplicationInfo> GenerateApplicationInfos()
        {
            ObservableCollection<ApplicationInfo> result = new ObservableCollection<ApplicationInfo>();

            ApplicationInfo info1 = new ApplicationInfo();
            info1.Name = "Large Collider";
            info1.Author = "C.E.R.N.";
            info1.IconPath = @"Images/Atom.png";
            result.Add(info1);

            ApplicationInfo info2 = new ApplicationInfo();
            info2.Name = "Paintbrush";
            info2.Author = "Imagine Inc.";
            info2.IconPath = @"Images/Brush.png";
            result.Add(info2);

            ApplicationInfo info3 = new ApplicationInfo();
            info3.Name = "Lively Calendar";
            info3.Author = "Control AG";
            info3.IconPath = @"Images/CalendarEvents.png";
            result.Add(info3);

            ApplicationInfo info4 = new ApplicationInfo();
            info4.Name = "Fire Burning ROM";
            info4.Author = "The CD Factory";
            info4.IconPath = @"Images/CDBurn.png";
            result.Add(info4);

            ApplicationInfo info5 = new ApplicationInfo();
            info5.Name = "Fav Explorer";
            info5.Author = "Star Factory";
            info5.IconPath = @"Images/favorites.png";
            result.Add(info5);

            return result;
        }
    }
Public Class ApplicationInfo Public Property Price() As [Double] Get Return m_Price End Get Set m_Price = Value End Set End Property Private m_Price As [Double] Public Property IconPath() As [String] Get Return m_IconPath End Get Set m_IconPath = Value End Set End Property Private m_IconPath As [String] Public Property Name() As [String] Get Return m_Name End Get Set m_Name = Value End Set End Property Private m_Name As [String] Public Property Author() As [String] Get Return m_Author End Get Set m_Author = Value End Set End Property Private m_Author As [String] End Class Public Class MainViewModel Private m_allApplications As ObservableCollection(Of ApplicationInfo) = GenerateApplicationInfos() Public Property AllApplications() As ObservableCollection(Of ApplicationInfo) Get Return Me.m_allApplications End Get Set Me.m_allApplications = value End Set End Property Public Shared Function GenerateApplicationInfos() As ObservableCollection(Of ApplicationInfo) Dim result As New ObservableCollection(Of ApplicationInfo)() Dim info1 As New ApplicationInfo() info1.Name = "Large Collider" info1.Author = "C.E.R.N." info1.IconPath = "Images/Atom.png" result.Add(info1) Dim info2 As New ApplicationInfo() info2.Name = "Paintbrush" info2.Author = "Imagine Inc." info2.IconPath = "Images/Brush.png" result.Add(info2) Dim info3 As New ApplicationInfo() info3.Name = "Lively Calendar" info3.Author = "Control AG" info3.IconPath = "Images/CalendarEvents.png" result.Add(info3) Dim info4 As New ApplicationInfo() info4.Name = "Fire Burning ROM" info4.Author = "The CD Factory" info4.IconPath = "Images/CDBurn.png" result.Add(info4) Dim info5 As New ApplicationInfo() info5.Name = "Fav Explorer" info5.Author = "Star Factory" info5.IconPath = "Images/favorites.png" result.Add(info5) Return result End Function End Class -
Now that we have defined our MainViewModel class, we can use it as a DataContext of our main view:
    <Window.DataContext>
        <local:MainViewModel />
    </Window.DataContext>
The local alias points to the namespace where the MainViewModel class is defined.
-
Next we can set up our layout. We will need a ListBox definition and a RadDiagram definition. Also, as we have to allow drag/drop operations between them, we need to apply the DragDropManager.AllowCapturedDrag attached property on the ListBoxItems and we can set the AllowDrop property to True in the RadDiagram definition.
<Grid> <Grid.ColumnDefinitions> <ColumnDefinition Width="200" /> <ColumnDefinition Width="*" /> </Grid.ColumnDefinitions> <ListBox x:Name="xListBox" Margin="0,0,3,0" Background="Transparent" BorderBrush="Transparent" BorderThickness="0" ItemsSource="{Binding AllApplications}" telerik:StyleManager.Theme="Windows8"> <ListBox.ItemContainerStyle> <Style TargetType="ListBoxItem"> <Setter Property="telerik:DragDropManager.AllowCapturedDrag" Value="True" /> </Style> </ListBox.ItemContainerStyle> <ListBox.ItemTemplate> <DataTemplate> <Grid Width="150"> <Grid.RowDefinitions> <RowDefinition /> <RowDefinition /> <RowDefinition /> </Grid.RowDefinitions> <Image Grid.Row="0" Width="32" Height="32" Margin="0 0 5 0" HorizontalAlignment="Center" Source="{Binding IconPath}" /> <TextBlock Grid.Row="1" HorizontalAlignment="Center" FontWeight="Bold" Text="{Binding Name}" /> <TextBlock Grid.Row="2" HorizontalAlignment="Center" Text="{Binding Author}" /> </Grid> </DataTemplate> </ListBox.ItemTemplate> </ListBox> <telerik:RadDiagram x:Name="xDiagram" Grid.Column="2" AllowDrop="True" /> </Grid> -
As the layout is all in place, we can go ahead and start implementing our dragging logic. For that purpose, we need to decide how to interpret the dragged items and what to pass as the Data of the drag operation. We can implement this logic in the DragInitialize event handler:
    public DragDropExample()
    {
        InitializeComponent();
        DragDropManager.AddDragInitializeHandler(xListBox, OnDragInitialize);
    }

    //ListBox OnDragInitialize method implementation
    private void OnDragInitialize(object sender, DragInitializeEventArgs args)
    {
        args.AllowedEffects = DragDropEffects.All;
        args.Data = ((FrameworkElement)args.OriginalSource).DataContext;
        args.DragVisual = new ContentControl { Content = args.Data, ContentTemplate = this.Resources["ApplicationTemplate"] as DataTemplate };
    }
Public Sub New() InitializeComponent() DragDropManager.AddDragInitializeHandler(xListBox, AddressOf OnDragInitialize) End Sub 'ListBox OnDragInitialize method implementation' Private Sub OnDragInitialize(sender As Object, args As DragInitializeEventArgs) args.AllowedEffects = DragDropEffects.All args.Data = DirectCast(args.OriginalSource, FrameworkElement).DataContext args.DragVisual = New ContentControl() With { _ Key .Content = args.Data, _ Key .ContentTemplate = TryCast(Me.Resources("ApplicationTemplate"), DataTemplate) _ } End SubAnd the ApplicationTemplate definition should be in the Resources section of our view:
    <Window.Resources>
        <DataTemplate x:Key="ApplicationTemplate">
            <StackPanel Orientation="Horizontal">
                <Image Source="{Binding IconPath}" Stretch="None" />
                <TextBlock Margin="5"
                           VerticalAlignment="Center"
                           Text="{Binding Name}" />
            </StackPanel>
        </DataTemplate>
    </Window.Resources>
You can find more information about the features and events of the DragDropManager in its documentation.
-
Finally, we need to customize the RadDiagram drop logic to create a RadDiagramShape to wrap the dragged data. We can also apply a Position property on the RadDiagramShape to reflect the exact position of the mouse during the drop.
The easiest way to get the position of the mouse in the Drop event handler is through the DragEventsArgs GetPosition() method. However, as RadDiagram supports different scaling operations (pan, zoom), you need to get the coordinates of the drop target point in the context of the RadDiagram. For that purpose you can use the RadDiagram GetTransformedPoint extension method. It takes a point, applies any pan and/or zoom settings defined by the RadDiagram current state and returns a point, transformed in the context of the diagram. This allows you to correctly position a RadDiagramItem in a panned or zoomed diagramming surface.
Please note that the GetTransformedPoint() extension method is defined in the Telerik.Windows.Controls.Diagrams namespace so you need to include this namespace in your class definition before getting advantage of the method.
    public DragDropExample()
    {
        InitializeComponent();
        DragDropManager.AddDropHandler(this.xDiagram, OnDiagramDrop);
    }

    private void OnDiagramDrop(object sender, Telerik.Windows.DragDrop.DragEventArgs e)
    {
        e.Handled = true;
        RadDiagramShape shape = new RadDiagramShape();
        ApplicationInfo draggedData = (e.Data as DataObject).GetData(typeof(ApplicationInfo)) as ApplicationInfo;
        shape.Content = draggedData != null ? draggedData.Name : e.Data.ToString();
        var currentPosition = xDiagram.GetTransformedPoint(e.GetPosition(xDiagram));
        shape.Position = new Point(currentPosition.X, currentPosition.Y);

        this.xDiagram.AddShape(shape);
    }
Public Sub New() InitializeComponent() DragDropManager.AddDropHandler(Me.xDiagram, AddressOf OnDiagramDrop) End Sub Private Sub OnDiagramDrop(sender As Object, e As Telerik.Windows.DragDrop.DragEventArgs) e.Handled = True Dim shape As New RadDiagramShape() Dim draggedData As ApplicationInfo = TryCast(TryCast(e.Data, DataObject).GetData(GetType(ApplicationInfo)), ApplicationInfo) shape.Content = If(draggedData IsNot Nothing, draggedData.Name, e.Data.ToString()) Dim currentPosition = xDiagram.GetTransformedPoint(e.GetPosition(xDiagram)) shape.Position = New Point(currentPosition.X, currentPosition.Y) Me.xDiagram.AddShape(shape) End SubPlease note that we've set the Position property of the RadDiagramShape
Please note that you have to handle the Drop event in order to stop its default logic and implement your own instead.