Commands
RadDiagram provides a vast set of RoutedUICommands that help you work easily with the control and its items to build better MVVM applications.
RadDiagram Commands
The static DiagramCommands class is located in Telerik.Windows.Controls.Diagrams assembly and defines the following RoutedUICommands:
-
Align—Aligns the selected shapes.(Read more) -
Snap—Snaps the selected shapes.(Read more) -
AutoFit—Centers and zooms the diagram to display all items.
-
Layout—Organizes the diagram automatically.(Read more) -
Copy—Copies selected diagram items.(Read More) -
Paste—Pastes selected diagram items.(Read More) -
Delete—Deletes selected diagram items.(Read More) -
Cut—Cut selected diagram items.(Read More) -
Duplicate—Duplicates selected item/s.
-
Undo—Undoes the last action.(Read More) -
Redo—Redoes the last action.(Read More) -
BringToFront—Brings to front selected diagram items.(Read More) -
BringForward—Brings forward selected diagram items.(Read More) -
SendToBack—Sends to back selected diagram items.(Read More) -
SendBackward—Sends backward selected diagram items.(Read More) -
Save—Saves the current diagram.(Read More) -
Clear—Clears the diagram.(Read More) -
Open—Opens a saved diagram.(Read More) -
BeginEdit—Begins editing diagram item.(Read More) -
CommitEdit—Commit the edited changes.(Read More) -
CancelEdit—Cancel the edited changes.(Read More) -
SelectAll—Selects all shapes in the diagram.(Read More) -
Nudge—Moves selected item/s in a specific direction. You can pass more specifics about the nudge operation through theCommandParameter. This parameter can be a single string representing the direction of the nudge:- "Left"
- "Right"
- "Up"
- "Down" It can also be a string in the form of "direction; amount", the 'direction' being a value from the above list of direction strings. The 'amount' options are:
"Small"—if RadDiagram's
IsSnapToGridEnabledproperty is set to true then this amount would mean that the nudge should happen once to the appointed direction using the SnapX/Y value as a step. The snap settings can be applied in the RadDiagram__ definition. If the RadDiagram IsSnapToGridEnabled property is false, a "Small" amount indicates a step of 5 pixels;"Large"—if RadDiagram's
IsSnapToGridEnabledproperty is set to true then this amount would mean that the nudge should happen once to the appointed direction using 5*SnapX/Y value as a step. The snap settings can be applied in the RadDiagram definition. If the RadDiagram IsSnapToGridEnabled property is false, a "Large" amount indicates a step of 10 pixels;any number—if you provide a number in the
CommandParameter, this number would indicate the number of pixels to be used as a step for theNudgecommand. In order for the number to be taken into account, theIsSnapToGridEnabledproperty has to be set to false.
-
Group— Groups the selected items.(Read More) -
Ungroup—Ungroups the selected groups.(Read More) -
SwitchGridVisibility—Hides or shows the background grid.
-
Load—Loads a diagram.
-
Export—Exports a diagram.(Read More)
ExtensionsCommands
In the Telerik.Windows.Controls.Diagrams.Extensions namespace you can find another set of commands described in the ExtensionsCommands class. This class describes the Print command that allows you to print a diagramming structure. You can use this command in XAML to print the content of a RadDiagram instance as follows:
<telerik:RadButton xmlns:extensions="clr-namespace:Telerik.Windows.Controls.Diagrams.Extensions;assembly=Telerik.Windows.Controls.Diagrams.Extensions"
                Content="Print"
                Command="extensions:DiagramExtensionCommands.Print"
                CommandTarget="{Binding ElementName=diagram}"
                HorizontalAlignment="Center"
                VerticalAlignment="Center"/>
Using Diagram Commands
A possible way to use DiagramCommands in XAML is to bind the Command property of a RadButton to a DiagramCommand and set the RadDiagram as a CommandTarget of the button:
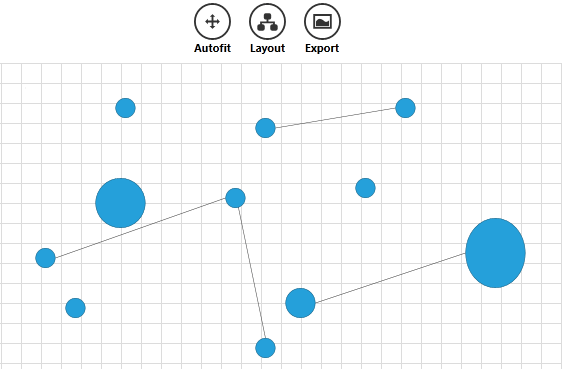
Below is shown how you can use some of the Diagram Commands in an application Note that this syntax is common for every Diagram Command.
<StackPanel Orientation="Horizontal" HorizontalAlignment="Center" x:Name="buttonsStack">
        <telerik:RadGeometryButton Height="55" Width="55" Command="telerik:DiagramCommands.AutoFit"
                ToolTipService.ToolTip="Autofit" CommandTarget="{Binding ElementName=diagram}" Content="Autofit"
                Foreground="Black"
                Background="White"
                Geometry="M8,0 L11,3 L9,3 L9,7 L13,7 L13,5 L16,8.1666641 L13,11 L13,9 L9,9 L9,13 L11,13 L8,16 L5,13 L7,13 L7,9 L3,9 L3,11 L0,7.9999971 L3,5 L3,7 L7,7 L7,3 L5,3 z" />
        <telerik:RadGeometryButton Height="55" Width="55" Command="telerik:DiagramCommands.Layout"
                ToolTipService.ToolTip="Layout" CommandTarget="{Binding ElementName=diagram}" Content="Layout"
                HorizontalContentAlignment="Stretch" VerticalContentAlignment="Stretch" Foreground="Black"
                Background="White"
                Geometry="M8.9999962,0 L12.999996,0 C14.104566,3.8743019E-07 14.999996,0.89543086 14.999996,2 L14.999996,5 C14.999996,6.1045694 14.104566,7 12.999996,7 L12,7 L12,9 L19,9 L19,11 L19,12 L20,12 C21.10457,12 22,12.895431 22,14 L22,17 C22,18.10457 21.10457,19 20,19 L16,19 C14.895432,19 14,18.10457 14,17 L14,14 C14,12.895431 14.895432,12 16,12 L17,12 L17,11 L5,11 L5,12 L6,12 C7.1045694,12 8,12.895431 8,14 L8,17 C8,18.10457 7.1045694,19 6,19 L2,19 C0.89543056,19 0,18.10457 0,17 L0,14 C0,12.895431 0.89543056,12 2,12 L3,12 L3,11 L3,9 L10,9 L10,7 L8.9999962,7 C7.8954268,7 6.9999962,6.1045694 6.9999962,5 L6.9999962,2 C6.9999962,0.89543086 7.8954268,3.8743019E-07 8.9999962,0 z" />
        <telerik:RadGeometryButton Height="55" Width="55" ToolTipService.ToolTip="Export As Png" Foreground="Black" Background="White" Content="Export" Command="telerik:DiagramCommands.Export"
                CommandParameter="Png" CommandTarget="{Binding ElementName=diagram}"
                Geometry="M6.7093377,5.0820007 C10.505837,5.0813236 12.205385,8.5835428 13.709369,8.4989958 C15.616847,8.3917685 16.999527,6.8087606 16.999527,6.8087606 L17.000025,13.080002 L3.0000243,13.080002 L3.0000243,7.9753876 C3.0000243,7.9753876 4.842936,5.0823336 6.7093377,5.0820007 z M1.9999999,2.0000048 L1.9999999,13.999995 L18,13.999995 L18,2.0000048 z M1.1920929E-06,0 L20,0 L20,16 L0,16 z" />
    </StackPanel>

Commands Parameters
You can customize the functionality of the Delete, Export and Align Commands currently.
-
Align—you can pass Top, Left, Right, Center, Middle, Bottom as CommandParameter.
-
Export—you can pass Bmp or Png. The default export format is Png.
-
Delete—you can pass the item you wish to delete.
Overriding Commands
You can see how to replace the default behavior of a command in the Override Diagram Command help article.