Views Walkthrough
In this walkthrough (part of the Telerik UI for WinForms Step-by-step Tutorial) you will dynamically change the view, change some of the view specific properties and handle the ActiveViewChanging event.
Project Setup
Create a new Windows Forms application.
In the Solution Explorer, delete the default form.
Also in the Solution Explorer, right-click the project and select Add | New Item... from the context menu.
Select the "Telerik RadForm" template and click the Add button to close the dialog.
Add the DesertTheme from the ToolBox to the form.
In the Properties window, set the form ThemeName to Desert.
Add a RadStatusStrip to the form. Set the ThemeName to Desert. Add a RadLabelElement to the status strip. Set the Name property to "lblStatus" and the Text to "".
-
Add a RadCommandBar to the form. Add elements to the bar:
- Add a RadCommandBarDropDownList. Set the Name to "ddlActiveViewType" and Text to "".
- Add a RadCommandBarDropDownList. Set the Name to "ddlRange" and Text to "".
- Add a RadCommandBarDropDownList. Set the Name to "ddlACount" and Text to "".
Change the new RadForm1 to be the startup form.
From the Toolbox, add a RadScheduler to the form and set the Dock property to "Fill" and the ThemeName to Desert.
Add code to the form load that will add values to the combo boxes in the tool strip for SchedulerViewType and ScaleRange enumerations. Also, add a simple range of integers to the "count" combo box.
foreach (SchedulerViewType viewType in Enum.GetValues(typeof(SchedulerViewType)))
{
    RadListDataItem item = new RadListDataItem();
    item.Text = viewType.ToString();
    item.Value = viewType;
    ddlActiveViewType.Items.Add(item);
}
foreach (ScaleRange range in Enum.GetValues(typeof(ScaleRange)))
{
    RadListDataItem item = new RadListDataItem();
    item.Text = range.ToString();
    item.Value = range;
    ddlRange.Items.Add(item);
}
for (int i = 1; i < 10; i++)
{
    RadListDataItem item = new RadListDataItem();
    item.Text = i.ToString();
    item.Value = i;
    ddlACount.Items.Add(item);
}
For Each viewType As SchedulerViewType In System.Enum.GetValues(GetType(SchedulerViewType))
    Dim item As New RadListDataItem()
    item.Text = viewType.ToString()
    item.Value = viewType
    ddlActiveViewType.Items.Add(item)
Next viewType
For Each range As ScaleRange In System.Enum.GetValues(GetType(ScaleRange))
    Dim item As New RadListDataItem()
    item.Text = range.ToString()
    item.Value = range
    ddlRange.Items.Add(item)
Next range
For i As Integer = 1 To 9
    Dim item As New RadListDataItem()
    item.Text = i.ToString()
    item.Value = i
    ddlCount.Items.Add(item)
Next i
12. Next add a SelectedIndexChanged event handler for the ddlActiveViewType combo box:
void ddlActiveViewType_SelectedIndexChanged(object sender, Telerik.WinControls.UI.Data.PositionChangedEventArgs e)
{
    RadDropDownListElement dropDownList = sender as RadDropDownListElement;
    radScheduler1.ActiveViewType = (SchedulerViewType)(dropDownList.SelectedValue);
}
Private Sub ddlActiveViewType_SelectedIndexChanged(ByVal sender As Object, ByVal e As Telerik.WinControls.UI.Data.PositionChangedEventArgs)
    Dim dropDownList As RadDropDownListElement = TryCast(sender, RadDropDownListElement)
    RadScheduler1.ActiveViewType = CType(dropDownList.SelectedValue, SchedulerViewType)
End Sub
13. Add another SelectedIndexChanged event handler for the ddlRange combo box element:
void ddlRange_SelectedIndexChanged(object sender, Telerik.WinControls.UI.Data.PositionChangedEventArgs e)
{
    RadDropDownListElement dropDownList = sender as RadDropDownListElement;
    ScaleRange range = (ScaleRange)(dropDownList.SelectedValue);
    // set the appropriate range factor based on the type of view
    switch (radScheduler1.ActiveViewType)
    {
        case SchedulerViewType.Day:
            (radScheduler1.ActiveView as SchedulerDayView).RangeFactor = range;
            break;
        case SchedulerViewType.MultiDay:
            (radScheduler1.ActiveView as SchedulerMultiDayView).RangeFactor = range;
            break;
        case SchedulerViewType.Week:
        case SchedulerViewType.WorkWeek:
            (radScheduler1.ActiveView as SchedulerWeekView).RangeFactor = range;
            break;
    }
}
Private Sub ddlRange_SelectedIndexChanged(ByVal sender As Object, ByVal e As Telerik.WinControls.UI.Data.PositionChangedEventArgs)
    Dim dropDownList As RadDropDownListElement = TryCast(sender, RadDropDownListElement)
    Dim range As ScaleRange = CType(dropDownList.SelectedValue, ScaleRange)
    ' set the appropriate range factor based on the type of view
    Select Case RadScheduler1.ActiveViewType
        Case SchedulerViewType.Day
            TryCast(RadScheduler1.ActiveView, SchedulerDayView).RangeFactor = range
        Case SchedulerViewType.MultiDay
            TryCast(RadScheduler1.ActiveView, SchedulerMultiDayView).RangeFactor = range
        Case SchedulerViewType.Week, SchedulerViewType.WorkWeek
            TryCast(RadScheduler1.ActiveView, SchedulerWeekView).RangeFactor = range
    End Select
End Sub
14. Add another SelectedIndexChanged event handler for the ddlCount combo box element:
void ddlCount_SelectedIndexChanged(object sender, Telerik.WinControls.UI.Data.PositionChangedEventArgs e)
{
    RadDropDownListElement dropDownList = sender as RadDropDownListElement;
    int count = (int)dropDownList.SelectedValue;
    // set the Day or WeekCount based on the current view
    switch (radScheduler1.ActiveViewType)
    {
        case SchedulerViewType.Day:
            (radScheduler1.ActiveView as SchedulerDayView).DayCount = count;
            break;
        case SchedulerViewType.MultiDay:
            (radScheduler1.ActiveView as SchedulerMultiDayView).DayCount = count;
            break;
        case SchedulerViewType.Month:
            (radScheduler1.ActiveView as SchedulerMonthView).WeekCount = count;
            break;
    }
}
Private Sub ddlCount_SelectedIndexChanged(ByVal sender As Object, ByVal e As Telerik.WinControls.UI.Data.PositionChangedEventArgs)
    Dim dropDownList As RadDropDownListElement = TryCast(sender, RadDropDownListElement)
    Dim count As Integer = CInt(Fix(dropDownList.SelectedValue))
    ' set the Day or WeekCount based on the current view
    Select Case RadScheduler1.ActiveViewType
        Case SchedulerViewType.Day
            TryCast(RadScheduler1.ActiveView, SchedulerDayView).DayCount = count
        Case SchedulerViewType.MultiDay
            TryCast(RadScheduler1.ActiveView, SchedulerMultiDayView).DayCount = count
        Case SchedulerViewType.Month
            TryCast(RadScheduler1.ActiveView, SchedulerMonthView).WeekCount = count
    End Select
End Sub
15. Handle the RadScheduler ActiveViewChanging event. Use the SchedulerViewChangingEventArgs OldView and NewView to display in the status label.
void radScheduler1_ActiveViewChanging(object sender, SchedulerViewChangingEventArgs e)
{
    lblStatus.Text = String.Format("Old: {0} New: {1}",
    e.OldView.ViewType.ToString(), e.NewView.ViewType.ToString());
}
Private Sub radScheduler1_ActiveViewChanging(ByVal sender As Object, ByVal e As SchedulerViewChangingEventArgs)
    lblStatus.Text = String.Format("Old: {0} New: {1}", e.OldView.ViewType.ToString(), e.NewView.ViewType.ToString())
End Sub
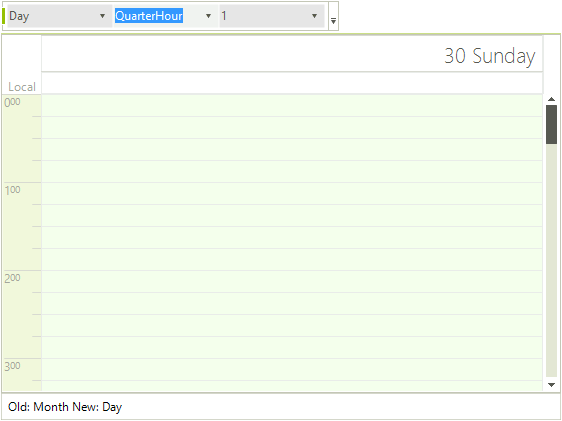
16. Run the application and test the various combinations of settings.
Figure 1: Views Walkthrough