ItemStyle Selector
RadTreeView component exposes conditional styling feature. It allows users to apply a different Style to each item depending on a specific condition.
Example
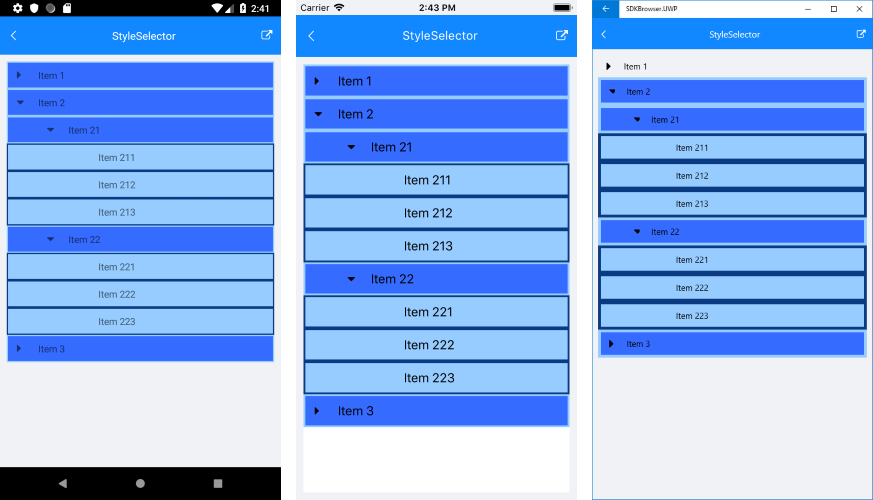
The following example will demonstrate how to apply different styles on parent items and leaf items.
First, create a sample TreeViewStyleSelector class and override its OnSelectStyle method - in it you will receive all the information on the current item through TreeViewStyleContext object, so you could return different styling per your preferences:
public class ExampleStyleSelector : TreeViewStyleSelector
{
    protected override void OnSelectStyle(object item, TreeViewStyleContext styleContext)
    {
        var dataItem = item as TreeViewDataItem;

        if (dataItem != null)
        {
            var style = new TreeViewItemStyle();
            if (dataItem.IsLeaf == true)
            {
                style.BackgroundColor = Color.FromHex("#96CCFF");
                style.BorderColor = Color.FromHex("#0A3A82");
                style.BorderLocation = Telerik.XamarinForms.Common.Location.All;
                style.BorderWidth =5 ;
            }
            else
            {
                style.BackgroundColor = Color.FromHex("#356BFF");
                style.BorderColor = Color.FromHex("#96CCFF");
                style.BorderLocation = Telerik.XamarinForms.Common.Location.All;
                style.BorderWidth = 5;
            }
            styleContext.ItemStyle = style;
        }
    }
}
All that is left is to set this custom style selector to the ItemStyleSelector property of the TreeView control:
<telerikDataControls:RadTreeView ItemsSource="{Binding Source}">
    <telerikDataControls:TreeViewDescriptor DisplayMemberPath="Name"
                                            ItemsSourcePath="Children"
                                            TargetType="{x:Type local:Item}"/>
    <telerikDataControls:RadTreeView.ItemStyleSelector>
      <styles:ExampleStyleSelector/>
    </telerikDataControls:RadTreeView.ItemStyleSelector>
</telerikDataControls:RadTreeView>
This is how the RadTreeView control will look like when conditional styling is used.

SDK Browser application contains an example that shows StyleSelector feature in RadTreeView cotrol. You can find the application in the Examples folder of your local Telerik UI for Xamarin installation.