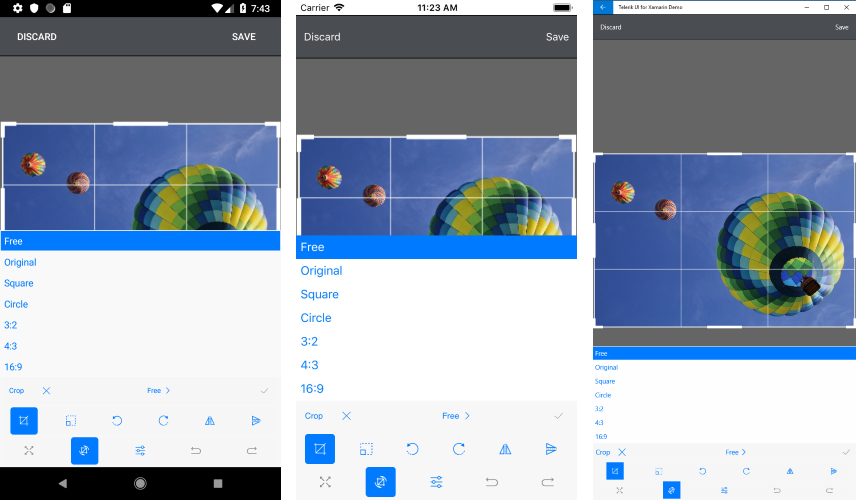
Crop
The RadImageEditor CropToolbarItem has properties which help you specify the geometry of the crop selection and the desired aspect ratio. The available options by default are:
- Free, Original, Square, Circle, 3:2, 4:3, 16:9

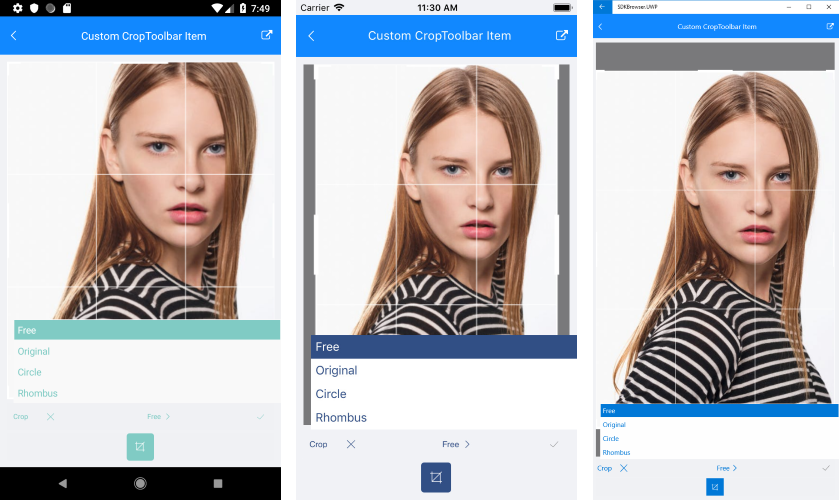
Custom Crop Toolbar
You could easily customize the crop definitions when setting AutoGenerateItems="False" to the RadImageEditorToolbar.
Crop Definitions
- AspectRatio: Specifies the aspect ratio of the crop selection.
- Geometry: Specifies the geometry of the crop selection.
- Text: Specifies the text visualized inside the crop tool.
<telerikImageEditor:RadImageEditorToolbar Grid.Row="1" ImageEditor="{x:Reference imageEditor}" AutoGenerateItems="False">
    <telerikImageEditor:CropToolbarItem>
        <telerikImageEditor:CropToolbarItem.CropDefinitions>
            <telerikImageEditor:CropDefinition AspectRatio="Free" Text="Free"/>
            <telerikImageEditor:CropDefinition Text="Circle" AspectRatio="1:1">
                <telerikImageEditor:CropDefinition.Geometry>
                    <telerikCommon:RadEllipseGeometry Center="0.5,0.5" Radius="0.5,0.5"/>
                </telerikImageEditor:CropDefinition.Geometry>
            </telerikImageEditor:CropDefinition>
        </telerikImageEditor:CropToolbarItem.CropDefinitions>
    </telerikImageEditor:CropToolbarItem>
</telerikImageEditor:RadImageEditorToolbar>
Crop Tool
-
AspectRatio (Telerik.XamarinForms.ImageEditor.AspectRatio): Represents the aspect ratio expressed as the ratio between the width and height of an image. The specific values are:
- Free: Special value, indicating the aspect ratio should not be constrained.
- Original: Special value, indicating the aspect ratio should match the original image.
- Square: Special value, indicating the width and height of the image should be equal.
When set custom values for the AspectRatio the separator must be ":", for example: "7:2", "6:2".
<telerikImageEditor:CropDefinition AspectRatio="7:2" Text="7:2"/>
If no aspect ratio is specified explicitly, the crop tool uses the default Free. When a custom aspect ratio is specified, the crop operation is performed with that ratio.
-
Geometry (RadGeometry): Specifies the geometry of the crop selection. The available geometries are:
- RadRectangleGeometry: Represents a rectangle geometry.
- RadLineGeometry: Represents a line geometry.
- RadEllipseGeometry: Represents an ellipse geometry.
-
RadPathGeometry: Represents a complex path geometry composed of one or more path figures. In order to create a specific geometry, you need to set a RadPathGeometry object to CropDefinition Geometry property. The RadPathGeometry object exposes a Figures property which is a collection of RadPathFigures. Each of the RadPathFigure objects is composed of one or several segments:
- RadArcSegment
- RadArcToSegment
- RadLineSegment
- RadConicSegment
- RadCubicSegment
- RadQuadraticSegment
More information about the RadPathGeomerty can be found in the RadPathGeometry article.
If no geometry is specified explicitly, the crop tool uses the default RadRectangleGeometry. When a custom geometry is specified, the crop operation is performed with that geometry.
Example
The snippet below shows a sample RadImageEditor and RadImageEditorToolbar definitions, where the CropToolbar is defined as follow:
<Grid>
    <Grid.RowDefinitions>
        <RowDefinition />
        <RowDefinition Height="Auto" />
    </Grid.RowDefinitions>
    <telerikImageEditor:RadImageEditor x:Name="imageEditor">
        <telerikImageEditor:RadImageEditor.Source>
            <OnPlatform x:TypeArguments="ImageSource" Default="custom_toolbar.png">
                <On Platform="UWP">Assets\custom_toolbar.png</On>
            </OnPlatform>
        </telerikImageEditor:RadImageEditor.Source>
    </telerikImageEditor:RadImageEditor>
    <telerikImageEditor:RadImageEditorToolbar Grid.Row="1" ImageEditor="{x:Reference imageEditor}" AutoGenerateItems="False">
        <telerikImageEditor:CropToolbarItem>
            <telerikImageEditor:CropToolbarItem.CropDefinitions>
                <telerikImageEditor:CropDefinition AspectRatio="Free" Text="Free"/>
                <telerikImageEditor:CropDefinition AspectRatio="Original" Text="Original"/>
                <telerikImageEditor:CropDefinition Text="Circle" AspectRatio="1:1">
                    <telerikImageEditor:CropDefinition.Geometry>
                        <telerikCommon:RadEllipseGeometry Center="0.5,0.5" Radius="0.5,0.5"/>
                    </telerikImageEditor:CropDefinition.Geometry>
                </telerikImageEditor:CropDefinition>
                <telerikImageEditor:CropDefinition Text="Rhombus">
                    <telerikImageEditor:CropDefinition.Geometry>
                        <telerikCommon:RadPathGeometry>
                            <telerikCommon:RadPathFigure StartPoint="0.5, 0.0">
                                <telerikCommon:RadLineSegment Point="1.0, 0.5" />
                                <telerikCommon:RadLineSegment Point="0.5, 1.0" />
                                <telerikCommon:RadLineSegment Point="0.0, 0.5" />
                                <telerikCommon:RadLineSegment Point="0.5, 0.0" />
                            </telerikCommon:RadPathFigure>
                        </telerikCommon:RadPathGeometry>
                    </telerikImageEditor:CropDefinition.Geometry>
                </telerikImageEditor:CropDefinition>
            </telerikImageEditor:CropToolbarItem.CropDefinitions>
        </telerikImageEditor:CropToolbarItem>
    </telerikImageEditor:RadImageEditorToolbar>
</Grid>
In addition, you need to add the following namespaces:
xmlns:telerikImageEditor="clr-namespace:Telerik.XamarinForms.ImageEditor;assembly=Telerik.XamarinForms.ImageEditor"
xmlns:telerikCommon="clr-namespace:Telerik.XamarinForms.Common;assembly=Telerik.XamarinForms.Common"

SDK Browser application contains a sample Custom Crop Toolbar example. You can find it in the ImageEditor/Features folder.