Getting Started with WinForms ColorDialog
This article shows how you can start using RadColorDialog.
Adding Telerik Assemblies Using NuGet
To use RadColorDialog when working with NuGet packages, install the Telerik.UI.for.WinForms.AllControls package. The package target framework version may vary.
Read more about NuGet installation in the Install using NuGet Packages article.
With the 2025 Q1 release, the Telerik UI for WinForms has a new licensing mechanism. You can learn more about it here.
Adding Assembly References Manually
When dragging and dropping a control from the Visual Studio (VS) Toolbox onto the Form Designer, VS automatically adds the necessary assemblies. However, if you're adding the control programmatically, you'll need to manually reference the following assemblies:
- Telerik.Licensing.Runtime
- Telerik.WinControls
- Telerik.WinControls.UI
- TelerikCommon
The Telerik UI for WinForms assemblies can be install by using one of the available installation approaches.
Defining the RadColorDialog
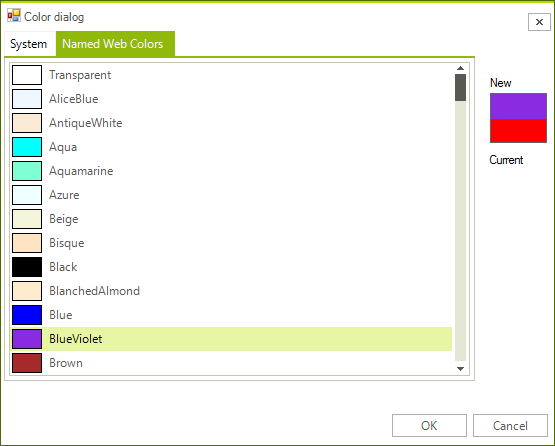
The following tutorial demonstrates configuring the RadColorDialog, localizing tab labeling and responding to the OK button click.
Figure 1: Getting Started with RadColorDialog

1. Drop a RadColorDialog on the form.
2. Set the ColorDialogForm.ShowBasicColors property to false.
3. Set the ColorDialogForm.ShowProfessionalColors property to false.
4. Set the ColorDialogForm.ShowHEXColorsValue property to false.
5. Set the ColorDialogForm.AllowPickColorFromScreen property to false.
6. Set the ColorDialogForm.ShowCustomColors property to false.
7. Change the ColorDialogForm.WebTabHeading property to read Named Web Colors.
8. Get the SelectedColor or SelectedHlsColor, check the returned DialogResult:
Check the selected values in RadColorDialog
if (radColorDialog1.ShowDialog() == DialogResult.OK)
{
    Color color = radColorDialog1.SelectedColor;
    HslColor hslColor = radColorDialog1.SelectedHslColor;
}
If RadColorDialog1.ShowDialog() = DialogResult.OK Then
    Dim color As Color = RadColorDialog1.SelectedColor
    Dim hslColor As Telerik.WinControls.HslColor = RadColorDialog1.SelectedHslColor
End If
9. Press F5 to run the application.
See Also
Telerik UI for WinForms Learning Resources
- Telerik UI for WinForms ColorDialog Component
- Getting Started with Telerik UI for WinForms Components
- Telerik UI for WinForms Setup
- Telerik UI for WinForms Application Modernization
- Telerik UI for WinForms Visual Studio Templates
- Deploy Telerik UI for WinForms Applications
- Telerik UI for WinForms Virtual Classroom(Training Courses for Registered Users)
- Telerik UI for WinForms License Agreement)