Telerik Testing Framework and CruiseControl.NET
1. What is CruiseControl.NET
CruiseControl.NET is an automated integration server. The Server automates the integration process by monitoring the team's source control repository directly. Every time a developer commits a new set of modifications, the server will automatically launch an integration build to validate the changes. When the build is complete, the server notifies the developer whether the changes that they committed integrated successfully or not. For more information about what CruiseControl.NET is and isn't and how to obtain it refer to their website at cruisecontrolnet.org. The installer is available at sourceforge.net/projects/ccnet/files. At the time this document was written, version 1.8.0.0 was the most current version of CruiseControl.NET available. It's pretty easy getting your test code to build using CruiseControl.NET but there are a couple of tricks to getting it to run your Telerik Testing Framework tests as unit tests. Don't fear however, the way to get your tests to run and viewable in the Web Dashboard Application is all done by adding or changing a few things in two configuration files.
2. Installing CruiseControl.NET
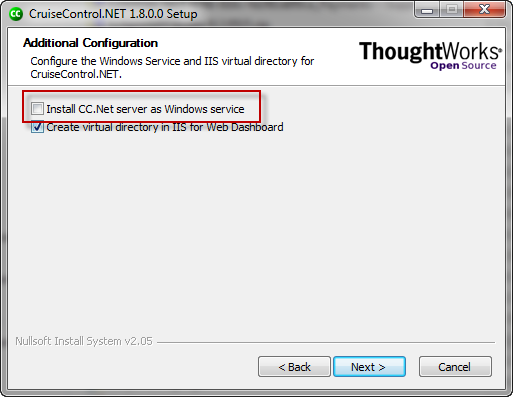
Installing CruiseControl.NET is very straightforward. The only thing that needs to be different from the default is to uncheck "Install CC.Net server as Windows service" as shown in the screen shot below. Because Test Studio tests utilize UI automation, a lot of these tests will not work when you try to run them under a Windows service. Windows does not grant services permission to use the mouse or keyboard. As a result any test that uses the mouse or keyboard will fail... and most UI automation tests rely on one or both at some point during the testing procedure.
3. Create Required Directories
You will need to create a directory to perform the build in before doing your first build:
- Create a unique directory for your project builds to run in. Don't try to mix different builds in the same folder. There's a potential that different builds can interfere with each other (especially if filenames are the same between the two projects). Make the directory name unique enough to identify it from all other project builds such as 'C:\Project builds\Sydney v1.1'. Later you'll enter this folder path into the ccnet.config file.
4. Modifying the Server's ccnet.config File
This paper was written referencing CruiseControl.NET version 1.8.0.0. Hopefully whatever version you're running is compatible with what I'm about to describe. Also to understand the changes I'm about to describe you need to have a basic understanding of where the ccnet.config file is and what belongs in it. This configuration file controls the builds for all of the projects CruiseControl.NET projects. First we need to get the server building our test code.
4.1 Adding a Build Task to Your Project
With CruiseControl.NET you have two different build configurations you can use. It doesn't really matter as far as building and running Test Studio or Telerik Testing Framework tests. Choose whichever method you feel most comfortable with (but don't add both to ccnet.config because CruiseControl.NET will blindly execute both build tasks).
4.1.1 Building Using the DevEnv Task in Your ccnet.config File
To build using the Visual Studio task, you simply add the task configuration to your project file. The following example assumes you're using Visual Studio 2010. Refer to the CruiseControl.NET documentation for other settings to make it work with other versions of Visual Studio. It should look something like this:
<cruisecontrol xmlns:cb="urn:ccnet.config.builder">
  <project name="Test Studio Unit Tests For Project Sydney">
    <sourcecontrol type="enter your type here">
    Configure CruiseControl.NET per their documentation to use whatever source control system you have.
    </sourcecontrol>
    <tasks>
      <devenv>
        <solutionfile>"c:\projects\SydneyTests\SydneyTests.sln"</solutionfile>
        <configuration>Debug</configuration>
        <version>VS2010</version>
        <buildTimeoutSeconds>90</buildTimeoutSeconds>
        <description>Building Sydney Test Studio tests</description>
      </devenv>
    We'll talk about another necessary task later.
    </tasks>

    <publishers>
    We'll talk about the necessary publishers configuration later
    </publishers>
  </project>
</cruisecontrol>
4.1.2 Building Using the MSBuild Task
This method is pretty much the same but instead of a Visual Studio task we replace it with a MSBuild task. It should look something like this:
<cruisecontrol xmlns:cb="urn:ccnet.config.builder">
  <project name="WebAii Unit Tests For Project Sydney">
    <sourcecontrol type="enter your type here">
    Configure CruiseControl.NET per their documentation to use whatever source control system you have.
    </sourcecontrol>
    <tasks>
      <msbuild>
        <executable>C:\WINDOWS\Microsoft.NET\Framework\v3.5\MSBuild.exe</executable>
        <workingDirectory>c:\projects\SydneyTests</workingDirectory>
        <projectFile>SydneyTests.csproj</projectFile>
        <buildArgs>/noconsolelogger /p:Configuration=Debug /v:diag</buildArgs>
        <timeout>900</timeout>
        <logger>C:\Program Files\CruiseControl.NET\server\ThoughtWorks.CruiseControl.MsBuild.dll</logger>
      </msbuild>
    We'll talk about another necessary task later.
    </tasks>

    <publishers>
    We'll talk about the necessary publisher configuration later
    </publishers>
  </project>
</cruisecontrol>
4.2 Adding a Run Tests Task
The program that runs Visual Studio unit tests is Microsoft's MSTest utility. This command line utility comes with Visual Studio. It has many command line options for specifying what project to run, what tests in that project to run, and where to log the results to. If you're using NUnit or something similar you can skip this section but be sure to add an appropriate NUnit (or whatever testing framework you use) test task to your project. An MSTest task is an "Exec" task to CruiseControl.NET. It should look something like this:
<cruisecontrol xmlns:cb="urn:ccnet.config.builder">
  <project name="QuickStarts_VSTS_CS_1.1">
    <sourcecontrol type="...">

    </sourcecontrol>
    <tasks>
      <msbuild>

      </msbuild>
      <exec>
        <!-- Call mstest to run the tests contained in the TestProject -->
        <executable>C:\Program Files (x86)\Microsoft Visual Studio 10.0\Common7\IDE\MSTest.exe</executable>
        <baseDirectory>c:\projects\SydneyTests</baseDirectory>
        <!-- testcontainer: points to the DLL that contains the tests -->
        <!-- runconfig: points to solutions testrunconfig that is created by vs.net, list what test to run -->
        <!-- resultsfile: normally the test run log is written to the uniquely named testresults directory  -->
        <!-- this option causes a fixed name copy of the file to be written as well-->
        <buildArgs>/testcontainer:bin\debug\SydneyTests.dll /test:LogInTest /resultsfile:testResults.trx</buildArgs>
        <buildTimeoutSeconds>30</buildTimeoutSeconds>
      </exec>
    </tasks>
    <publishers>

    </publishers>
  </project>
</cruisecontrol>
If you want to run a suite of tests, add them to a Visual Studio test list and use a buildArgs like this:
<cruisecontrol xmlns:cb="urn:ccnet.config.builder">
  <project name="QuickStarts_VSTS_CS_1.1">
    <sourcecontrol type="...">

    </sourcecontrol>
    <tasks>
      <msbuild>

      </msbuild>
      <exec>
        <!-- Call mstest to run the tests contained in the TestProject -->
        <executable>C:\Program Files (x86)\Microsoft Visual Studio 10.0\Common7\IDE\MSTest.exe</executable>
        <baseDirectory>c:\projects\SydneyTests</baseDirectory>
        <!-- testcontainer: points to the DLL that contains the tests -->
        <!-- runconfig: points to solutions testrunconfig that is created by vs.net, list what test to run -->
        <!-- resultsfile: normally the test run log is written to the uniquely named testresults directory  -->
        <!-- this option causes a fixed name copy of the file to be written as well-->
        <buildArgs>/testmetadata:SydneyTests.vsmdi /testlist:SampleVSTestList /testsettings:IE.testsettings /resultsfile:TestResults\testResults.trx</buildArgs>
        <buildTimeoutSeconds>30</buildTimeoutSeconds>
      </exec>
    </tasks>
    <publishers>

    </publishers>
  </project>
</cruisecontrol>
4.3 Publishing Test Results
You need to merge the generated .trx file from MSTest into the build results. Add something like this to the 'publishers' section of your project configuration:
  <publishers>
      <!--to get the test results in the dashboard we have to merge the results XML file -->
      <merge>
        <files>
          <file>c:\projects\SydneyTests\TestResults\testResults.trx</file>
        </files>
      </merge>
      <xmllogger />
    </publishers>
4.4 Publishing Test Results
One caveat to using MSTest is that you must delete the .trx file it creates before doing another test run. Otherwise MSTest will fail indicating it was unable to create the output file. This is done via another "Exec" task in ccnet.config. Place this section just in before your Exec task that runs MSTest. It probably would be best to place it at the beginning of the build because if a build fails (which causes CruiseControl.NET to skip any remaining tasks) to compile, CruiseControl.NET will still pick up and merge any left over .trx file into the build log:
<exec>
        <!--Delete the testResults.trx first. This is required as MsTest will not create the file if
            it exists this could be merged with the mstest action in a single batch file-->
        <executable>$(windir)\system32\cmd</executable>
        <baseDirectory>c:\projects\SydneyTests\TestResults</baseDirectory>
        <buildArgs>/c if exist testResults.trx del testResults.trx /f</buildArgs>
        <buildTimeoutSeconds>30</buildTimeoutSeconds>
      </exec>
4.5 Publishing Test Results
Now you're ready to run your CruiseControl.NET server and let it start building and running tests. CruiseControl.NET can be run in two modes:
Command line mode
Windows service mode
There is a problem with using Windows service mode. Test Studio tests and Telerik Testing Framework tests require the browser be able to run and interact with the desktop. When running builds and tests under a Windows service, desktop interaction is disabled. As a result virtually no Test Studio or Telerik Testing Framework test can successfully run in this environment. It is best to log onto your server using an account that has access to your source control and VisualStudio permissions and start the CruiseControl.NET server in command line mode. Leave this user logged on all the time. If you logoff this user the CruiseControl.NET server will shut down and you won't get any builds.
In order for Test Studio and Telerik Testing Framework tests that interact directly with the desktop to work you'll need to leave your CruiseControl.NET machine logged on and displaying the desktop all the time. This means you'll have to disable the screensaver and never lock the computer. Yes, this presents a security risk to your company. If you can lock this computer up into a secure room (such as a datacenter) you will minimize this security risk.
5. Modifying the Web Dashboard's dashboard.config File
As configured out of the box, CruiseControl.NET's Web Dashboard is preconfigured to only display build header information and modification details. We have to modify the dashboard.config file to get it to display the results of our tests. This file is located in the folder C:\Program Files (x86)\CruiseControl.NET\webdashboard
5.1 Modifying the xslFileNames Section
This section is a list of .xsl files that will be used after every build to generate the build's Build Report that's displayed in Web Dashboard. CruiseControl.NET runs them in sequence as listed in this section.
If you are running Test Studio tests you will want to install and use the TestStudioMSTest2010Report.xsl file. Download the file from the previous link and place it in the folder C:\Program Files (x86)\CruiseControl.NET\webdashboard\xsl. Next we need to add TestStudioMSTest2010Report.xsl so that it looks something like this:
<dashboard>
  <remoteServices>

  </remoteServices>
  <plugins>

    <buildPlugins>
      <buildReportBuildPlugin>
        <xslFileNames>
          <xslFile>xsl\header.xsl</xslFile>
          <xslFile>xsl\modifications.xsl</xslFile>
          <xslFile>xsl\compile-msbuild.xsl</xslFile>
          <xslFile>xsl\TestStudioMSTest2010Report.xsl</xslFile>
        </xslFileNames>
      </buildReportBuildPlugin>

    </buildPlugins>
  </plugins>
</dashboard>
If instead you are running Telerik Testing Framework coded unit tests we need to add MsTestSummary2010.xsl and MsTestReport2010 so that it looks something like this:
<dashboard>
  <remoteServices>

  </remoteServices>
  <plugins>

    <buildPlugins>
      <buildReportBuildPlugin>
        <xslFileNames>
          <xslFile>xsl\header.xsl</xslFile>
          <xslFile>xsl\modifications.xsl</xslFile>
          <xslFile>xsl\compile-msbuild.xsl</xslFile>
          <xslFile>xsl\MsTestSummary2010.xsl</xslFile>
          <xslFile>xsl\MsTestReport2010.xsl</xslFile>
        </xslFileNames>
      </buildReportBuildPlugin>

    </buildPlugins>
  </plugins>
</dashboard>
5.2 Modifying the xslReportBuildPlugin Section
This section is used to generate a menu of the different detail reports you can display. After you make these changes you'll get something that looks like this:

Note the last entry in the list. To obtain this entry we need to modify this section in the dashboard.config file to look something like this:
<?xml version="1.0" encoding="utf-8" ?>
<dashboard>

  <plugins>

    <buildPlugins>

      <buildLogBuildPlugin />
      <xslReportBuildPlugin description="Test Studio Report" actionName="TestStudioReport" xslFileName="xsl\TestStudioMSTest2010Report.xsl"/>
      <xslReportBuildPlugin description="MSBuild Report" actionName="MSBuildBuildReport" xslFileName="xsl\msbuild.xsl"/>
      <xslReportBuildPlugin description="MSTest 2010 Detail Report" actionName="MsTestReport2010" xslFileName="xsl\MsTestReport2010.xsl"/>
    </buildPlugins>
  </plugins>
</dashboard>
After making the above changes, the next build will successfully display test results.