Getting Started
This article will guide you through the steps needed to add a basic RadPath control in your application.
1. Setting up the app
Take a look at these articles and follow the instructions to setup your app:
2. Adding the required Telerik references
You have two options:
- Add the Telerik UI for Xamarin Nuget package following the instructions in Telerik NuGet package server topic.
If you don't want to add the all Telerik.UI.for.Xamarin nuget package, you have the option to add separate nuget packages. For RadPath control you have to install the Telerik.UI.for.Xamarin.Primitives and Telerik.UI.for.Xamarin.Input nuget packages. These nugets will automatically refer the Telerik.UI.for.Xamarin.Common, Telerik.UI.for.Xamarin.DataControls and Telerik.UI.for.Xamarin.SkiaSharp nuget packages.
- Add the references to Telerik assemblies manually, check the list below with the required assemblies for RadPath component:
| Platform | Assemblies |
|---|---|
| Portable | Telerik.XamarinForms.Common.dll Telerik.XamarinForms.DataControls.dll Telerik.XamarinForms.Input.dll Telerik.XamarinForms.Primitives.dll Telerik.XamarinForms.SkiaSharp.dll |
| Android | Telerik.Xamarin.Android.Common.dll Telerik.Xamarin.Android.Data.dll Telerik.Xamarin.Android.Input.dll Telerik.Xamarin.Android.List.dll Telerik.Xamarin.Android.Primitives.dll Telerik.XamarinForms.Common.dll Telerik.XamarinForms.DataControls.dll Telerik.XamarinForms.Input.dll Telerik.XamarinForms.Primitives.dll Telerik.XamarinForms.SkiaSharp.dll |
| iOS | Telerik.Xamarin.iOS.dll Telerik.XamarinForms.Common.dll Telerik.XamarinForms.DataControls.dll Telerik.XamarinForms.Input.dll Telerik.XamarinForms.Primitives.dll Telerik.XamarinForms.SkiaSharp.dll |
| UWP | Telerik.Core.dll Telerik.Data.dll Telerik.UI.Xaml.Controls.Data.UWP.dll Telerik.UI.Xaml.Input.UWP.dll Telerik.UI.Xaml.Primitives.UWP.dll Telerik.XamarinForms.Common.dll Telerik.XamarinForms.DataControls.dll Telerik.XamarinForms.Input.dll Telerik.XamarinForms.Primitives.dll Telerik.XamarinForms.SkiaSharp.dll |
RadPath is rendered via the SkiaSharp graphics library so you need to install also SkiaSharp.Views.Forms in all projects of the Xamarin solution (.Net Standard/Shared, Android, iOS, etc).
3. Adding RadPath control
If your app is correctly set, you are ready to add a RadPath control within your page.
RadPath control exposes Geometry property which should be assigned to a RadPathGeometry object. RadPathGeometry consists of different RadPathFigures such as line and arc. RadPath also provides a few predefined geometries such as star, circle and other. Below you can find two examples of creating a path with built-in as well as custom geometry.
Creating RadPath with built-in geometry
RadPath provides several built-in geometries that can be found in the Telerik.XamarinForms.Input.Geometries static class. Below you could find a list of the available geometries:
- Star;
- Circle;
- Heart;
- Diamond.
You can choose any of those and set it directly to the Geometry property of the Path component:
<telerikPrimitives:RadPath x:Name="starPath"
                           StrokeThickness="0"
                           Fill="#FFC325"
                           Geometry="{x:Static telerikInput:Geometries.Star}" />
var mainGrid = new Grid() { ColumnSpacing = 20, RowSpacing = 10};
mainGrid.RowDefinitions.Add(new RowDefinition() { Height = 200 });
mainGrid.ColumnDefinitions.Add(new ColumnDefinition { Width = GridLength.Star });
mainGrid.ColumnDefinitions.Add(new ColumnDefinition { Width = GridLength.Star });

var starPath = new RadPath()
{
    Geometry = Geometries.Star,
    StrokeThickness = 0,
    Fill = new RadSolidColorBrush(Color.FromHex("FFC325"))
};
mainGrid.Children.Add(starPath);
In addition to this you need to add the following namespaces:
xmlns:telerikPrimitives="clr-namespace:Telerik.XamarinForms.Primitives;assembly=Telerik.XamarinForms.Primitives"
xmlns:telerikInput="clr-namespace:Telerik.XamarinForms.Input;assembly=Telerik.XamarinForms.Input"
Creating RadPath with custom geometry
You are free to create a custom geometry which will be visualized by the RadPath control. For that purpose, you need to create object of type RadPathGeometry and add a RadPathFigure with the needed segments.
The next example shows a RadPath with an Arc definition:
<telerikPrimitives:RadPath x:Name="customPath"
                       Grid.Row="0"
                       StrokeThickness="4"
                       Stroke="#2EC262">
    <telerikCommon:RadPathGeometry>
        <telerikCommon:RadPathFigure StartPoint="0.85, 0.85">
            <telerikCommon:RadArcSegment Center = "0.5, 0.5"
                                         Size = "1, 1"
                                         StartAngle = "315"
                                         SweepAngle = "270" />
        </telerikCommon:RadPathFigure>
    </telerikCommon:RadPathGeometry>
</telerikPrimitives:RadPath>
var arcPath = new RadPath()
{
    StrokeThickness = 4,
    Stroke = new RadSolidColorBrush(Color.FromHex("2EC262"))
};
RadPathFigure arc = new RadPathFigure();
arc.StartPoint = new Point(0.85, 0.85);
arc.Segments.Add(new RadArcSegment()
{
    Center = new Point(0.5, 0.5),
    Size = new Size(1, 1),
    StartAngle = 315,
    SweepAngle = 270
});

RadPathGeometry geometry = new RadPathGeometry();
geometry.Figures.Add(arc);
arcPath.Geometry = geometry;

mainGrid.Children.Add(arcPath);
and add the following namespace:
xmlns:telerikCommon="clr-namespace:Telerik.XamarinForms.Common;assembly=Telerik.XamarinForms.Common"
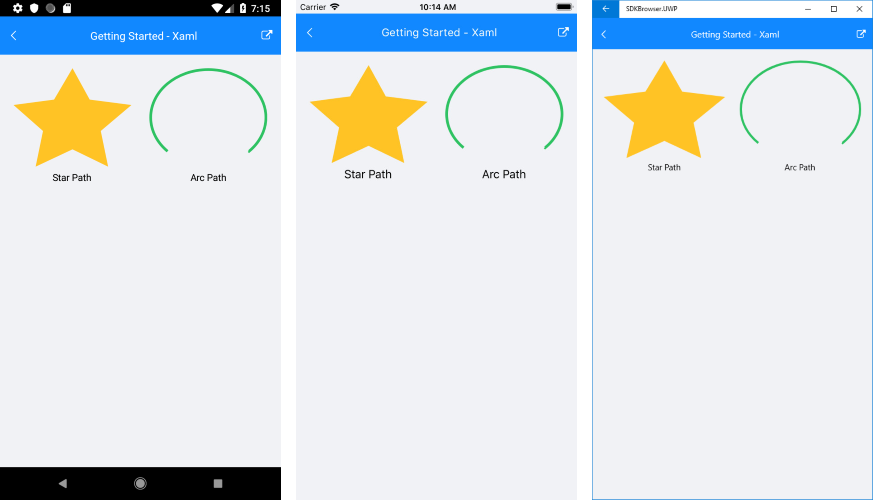
Both RadPath objects appearance can be reviewed in the image below:
SDK Browser and QSF applications contain different examples that show RadPath's main features. You can find the applications in the Examples and QSF folders of your local Telerik UI for Xamarin installation.