Getting Started
This article will guide you through the steps needed to add a RadChat control in your application.
1. Setting up the app
Take a look at these articles and follow the instructions to setup your app:
2. Adding the required Telerik references
You have two options:
Add the Telerik UI for Xamarin Nuget package following the instructions in Telerik NuGet package server topic. Note that RadChat control does not have a separate nuget package.
Add the references to Telerik assemblies manually, check the list below with the required assemblies for RadChat component:
| Platform | Assemblies |
|---|---|
| Portable | Telerik.XamarinForms.Common.dll Telerik.XamarinForms.ConversationalUI.dll Telerik.XamarinForms.DataControls.dll Telerik.XamarinForms.Input.dll Telerik.XamarinForms.Primitives.dll |
| Android | Telerik.Xamarin.Android.Common.dll Telerik.Xamarin.Android.Data.dll Telerik.Xamarin.Android.Input.dll Telerik.Xamarin.Android.List.dll Telerik.Xamarin.Android.Primitives.dll Telerik.XamarinForms.Common.dll Telerik.XamarinForms.ConversationalUI.dll Telerik.XamarinForms.DataControls.dll Telerik.XamarinForms.Input.dll Telerik.XamarinForms.Primitives.dll |
| iOS | Telerik.Xamarin.iOS.dll Telerik.XamarinForms.Common.dll Telerik.XamarinForms.ConversationalUI.dll Telerik.XamarinForms.DataControls.dll Telerik.XamarinForms.Input.dll Telerik.XamarinForms.Primitives.dll |
| UWP | Telerik.Core.dll Telerik.Data.dll Telerik.UI.Xaml.Controls.Data.UWP.dll Telerik.UI.Xaml.Input.UWP.dll Telerik.UI.Xaml.Primitives.UWP.dll Telerik.XamarinForms.Common.dll Telerik.XamarinForms.ConversationalUI.dll Telerik.XamarinForms.DataControls.dll Telerik.XamarinForms.Input.dll Telerik.XamarinForms.Primitives.dll |
3. Adding RadChat control
You could use one of the following approaches:
Drag the control from the Toolbox.
Take a look at the following topics on how to use the toolbox:
Create the control definition in XAML or C#.
The snippet below shows a simple RadChat definition:
<telerikConversationalUI:RadChat x:Name="chat" />
In addition to this you need to add the following namespace:
xmlns:telerikConversationalUI="clr-namespace:Telerik.XamarinForms.ConversationalUI;assembly=Telerik.XamarinForms.ConversationalUI"
So, for a simple demonstration purpose a sample echo bot will be defined.
public class RepeatBotService
{
    private Action<string> onReceiveMessage;
    internal void AttachOnReceiveMessage(Action<string> onMessageReceived)
    {
        this.onReceiveMessage = onMessageReceived;
    }
    internal void SendToBot(string text)
    {
        Task.Delay(500).ContinueWith(t => this.onReceiveMessage?.Invoke(text));
    }
}
Then, initialize the RepeatBotService and subscribe to the CollectionChanged event of the Items collection of the Chat instance:
private RepeatBotService botService;
private Author botAuthor;

public ChatGettingStartedXaml()
{
    InitializeComponent();

    this.botService = new RepeatBotService();
    this.botService.AttachOnReceiveMessage(this.OnBotMessageReceived);
    this.botAuthor = new Author { Name = "botty"};

    ((INotifyCollectionChanged)this.chat.Items).CollectionChanged += ChatItems_CollectionChanged; ;
}
Finally, add the needed event handlers:
private void ChatItems_CollectionChanged(object sender, NotifyCollectionChangedEventArgs e)
{
    if (e.Action == NotifyCollectionChangedAction.Add)
    {
        TextMessage chatMessage = (TextMessage)e.NewItems[0];
        if (chatMessage.Author == chat.Author)
        {
            this.botService.SendToBot(chatMessage.Text);
        }
    }
}
private void OnBotMessageReceived(string message)
{
    Device.BeginInvokeOnMainThread(() =>
    {
        TextMessage textMessage = new TextMessage();
        textMessage.Data = message;
        textMessage.Author = this.botAuthor;
        textMessage.Text = message;
        chat.Items.Add(textMessage);
    });
}
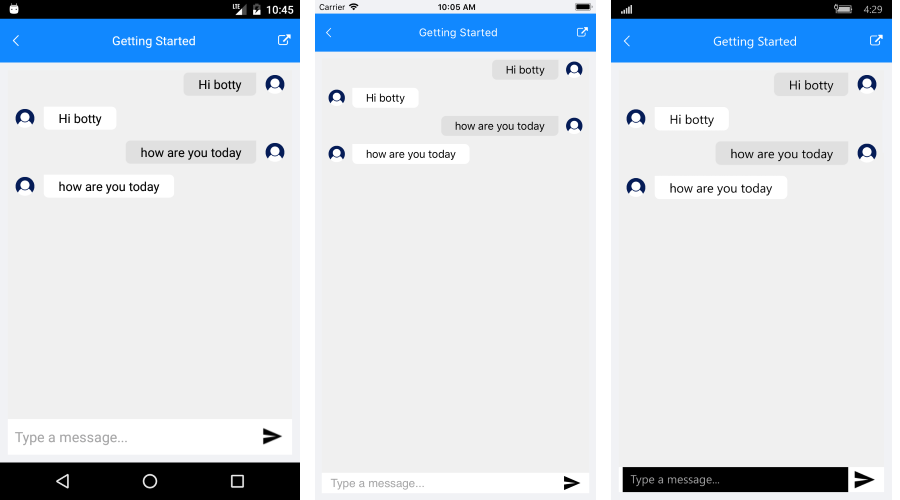
Figure 1: RadChat Getting Started

SDK Browser and QSF applications contain different examples that show RadChat's main features. You can find the applications in the Examples and QSF folders of your local Telerik UI for Xamarin installation.