Set Custom Appointment Height
With the Q2 2014 release version of UI for WPF, RadScheduleView provides brand new customization feature for the MonthViewDefinition. Now it is possible to set different heights of the appointments by using a custom AppointmentStyleSelector.
Getting Started
In order to be able to display appointments with different heights in the MonthViewDefinition you will first need to set the new AllowCustomAppointmentSize property of MonthViewDefinition to True:
<telerik:RadScheduleView AppointmentsSource="{Binding Appointments}">
    <telerik:RadScheduleView.ViewDefinitions>
        <telerik:MonthViewDefinition AllowCustomAppointmentSize="True" />
    </telerik:RadScheduleView.ViewDefinitions>
</telerik:RadScheduleView>
The default value of the AllowCustomAppointmentSize property is false - the appointments in the MonthViewDefinition are displayed with their default height.
Implementing Custom AppointmentStyleSelector
Now since you are able to display appointments with different heights you should apply the desired sizes by implementing a custom AppointmentStyleSelector. For example if you need to have three different heights depending on the duration of the appointments you would need to define the corresponding Styles in the StyleSelector. When the Appointment has duration equals or less an hour you should return the Style for the small appointments, if the Appointment has duration between an hour and two you should return the Style for the regular appointments and at last if the Appointment has duration higher than two hours you would need to return the Style for big appointments. The complete implementation of the custom AppointmentStyleSelector should look as shown below:
public class AppointmentStyleSelector : OrientedAppointmentItemStyleSelector
{
    public Style SmallAppointmentStyle { get; set; }
    public Style RegularAppointmentStyle { get; set; }
    public Style BigAppointmentStyle { get; set; }

    public override Style SelectStyle(object item, DependencyObject container, ViewDefinitionBase activeViewDefinition)
    {
        var appointment = item as Appointment;

        if (appointment != null)
        {
            if (appointment.Duration() <= new TimeSpan(1, 0, 0))
            {
                return this.SmallAppointmentStyle;
            }
            else if (appointment.Duration() <= new TimeSpan(2, 0, 0))
            {
                return this.RegularAppointmentStyle;
            }
            else if (appointment.Duration() > new TimeSpan(2, 0, 0))
            {
                return this.BigAppointmentStyle;
            }
        }

        return base.SelectStyle(item, container, activeViewDefinition);
    }
}
    Public Class AppointmentStyleSelector
        Inherits OrientedAppointmentItemStyleSelector

        Public Property SmallAppointmentStyle() As Style
        Public Property RegularAppointmentStyle() As Style
        Public Property BigAppointmentStyle() As Style

        Public Overrides Function SelectStyle(ByVal item As Object, ByVal container As DependencyObject, ByVal activeViewDefinition As ViewDefinitionBase) As Style
            Dim appointment = TryCast(item, Appointment)

            If appointment IsNot Nothing Then
                If appointment.Duration() <= New TimeSpan(1, 0, 0) Then
                    Return Me.SmallAppointmentStyle
                ElseIf appointment.Duration() <= New TimeSpan(2, 0, 0) Then
                    Return Me.RegularAppointmentStyle
                ElseIf appointment.Duration() > New TimeSpan(2, 0, 0) Then
                    Return Me.BigAppointmentStyle
                End If
            End If

            Return MyBase.SelectStyle(item, container, activeViewDefinition)
        End Function
    End Class
Afterwards you will have declare the custom AppointmentStyleSelector as resource in XAML. Here you can set the desired heights and background colors of the different Appointment types:
<local:AppointmentStyleSelector x:Key="AppointmentStyleSelector">
    <local:AppointmentStyleSelector.SmallAppointmentStyle>
        <Style TargetType="telerik:AppointmentItem" BasedOn="{StaticResource AppointmentItemBaseStyle}">
            <Setter Property="Background" Value="#FF3366CC" />
            <!-- Set the desired height -->
            <Setter Property="Height" Value="24" />
        </Style>
    </local:AppointmentStyleSelector.SmallAppointmentStyle>
    <local:AppointmentStyleSelector.RegularAppointmentStyle>
        <Style TargetType="telerik:AppointmentItem" BasedOn="{StaticResource AppointmentItemBaseStyle}">
            <Setter Property="Background" Value="#FF16ABA9" />
            <!-- Set the desired height -->
            <Setter Property="Height" Value="42" />
        </Style>
    </local:AppointmentStyleSelector.RegularAppointmentStyle>
    <local:AppointmentStyleSelector.BigAppointmentStyle>
        <Style TargetType="telerik:AppointmentItem" BasedOn="{StaticResource AppointmentItemBaseStyle}">
            <Setter Property="Background" Value="#FF8EBC00" />
            <!-- Set the desired height -->
            <Setter Property="Height" Value="64" />
        </Style>
    </local:AppointmentStyleSelector.BigAppointmentStyle>
</local:AppointmentStyleSelector>
And the final step would be to assign it to RadScheduleView:
<telerik:RadScheduleView AppointmentsSource="{Binding Appointments}"
                         AppointmentStyleSelector="{StaticResource AppointmentStyleSelector}">
    <telerik:RadScheduleView.ViewDefinitions>
        <telerik:MonthViewDefinition AllowCustomAppointmentSize="True" />
    </telerik:RadScheduleView.ViewDefinitions>
</telerik:RadScheduleView>
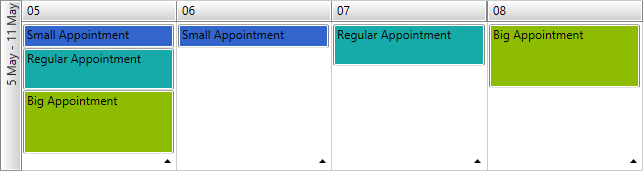
You can see the final result in Figure 1:
Figure 1: Appointments with different heights in MonthViewDefinition
You can find a runnable project demonstrating the approach from the previous example in our online demos here, the example is listed as ScheduleView / Custom Appointment Height.
The AppointmentItem in the Windows8, Windows8Touch and Office2013 themes has a small line visual container on the bottom or left part of the appointment (based on the currently applied view definition). If you need to remove this, extract the ControlTemplates (AppointmentItemHorizontalControlTemplate and AppointmentItemVerticalControlTemplate) of the AppointmentItem control and remove the Border control with x:Name set to LineVisual. Then set the customized templates to the Template property of AppointmentItem via the Style objects of the AppointmentStyleSelector.