Binding to Dynamic Data
The data displayed in the RadMenu has a hierarchical structure (similar to the RadTreeView). This means that each item may come with a set of items on its own. For that reason you have to use the HierarchicalDataTemplate. This tutorial will walk you through the most important steps in creating, configuring and applying a HierarchicalDataTemplate to your RadMenu, as follows:
Preparing the Data
For this tutorial the following sample class will be used:
Example 1: MenuItem sample class
public class MenuItem
{
    public MenuItem()
    {
        this.SubItems = new ObservableCollection<MenuItem>();
    }
    public string Text
    {
        get;
        set;
    }
    public Uri IconUrl
    {
        get;
        set;
    }
    public ObservableCollection<MenuItem> SubItems
    {
        get;
        set;
    }
}
Public Class MenuItem
    Public Sub New(text As String, iconUrl As Uri, subItems As ObservableCollection(Of MenuItem))
        Me.Text = text
        Me.IconUrl = iconUrl
        Me.SubItems = subItems
    End Sub
    Public Property Text() As String
        Get
        End Get
        Set(value As String)
        End Set
    End Property
    Public Property IconUrl() As Uri
        Get
        End Get
        Set(value As Uri)
        End Set
    End Property
    Public Property SubItems() As ObservableCollection(Of MenuItem)
        Get
        End Get
        Set(value As ObservableCollection(Of MenuItem))
        End Set
    End Property
End Class
The MenuItem class holds the information for the menu items.
Text - represents the text value for the item.
IconUrl - represents the url of the image that represents the icon of the menu item.
SubItems - a collection of the sub menu items of the current menu item.
On the next step a sample method, which creates the sample data, is needed. Here is one:
Example 2: Creating MenuItems collection
public ObservableCollection<MenuItem> GetMenuItems()
{
    ObservableCollection<MenuItem> items = new ObservableCollection<MenuItem>();
    ObservableCollection<MenuItem> fileSubItems = new ObservableCollection<MenuItem>();
    MenuItem newItem = new MenuItem()
    {
        IconUrl = new Uri("/Images/newFile.png", UriKind.Relative),
        Text = "New File"
    };
    fileSubItems.Add(newItem);
    MenuItem openItem = new MenuItem()
    {
        IconUrl = new Uri("/Images/open.png", UriKind.Relative),
        Text = "Open File"
    };
    fileSubItems.Add(openItem);
    MenuItem saveItem = new MenuItem()
    {
        IconUrl = new Uri("/Images/save.png", UriKind.Relative),
        Text = "Save File"
    };
    fileSubItems.Add(saveItem);
    MenuItem fileItem = new MenuItem()
    {
        SubItems = fileSubItems,
        Text = "File"
    };
    items.Add(fileItem);
    MenuItem editItem = new MenuItem()
    {
        Text = "Edit"
    };
    items.Add(editItem);
    MenuItem viewItem = new MenuItem()
    {
        Text = "View"
    };
    items.Add(viewItem);
    return items;
}
Public Function GetMenuItems() As ObservableCollection(Of MenuItem)
    Dim items As New ObservableCollection(Of MenuItem)()
    Dim fileSubItems As New ObservableCollection(Of MenuItem)()
    Dim newItem As New MenuItem("New File", New Uri("/Images/newFile.png", UriKind.Relative), Nothing)
    fileSubItems.Add(newItem)
    Dim openItem As New MenuItem("Open File", New Uri("/Images/open.png", UriKind.Relative), Nothing)
    fileSubItems.Add(openItem)
    Dim saveItem As New MenuItem("Save", New Uri("/Images/save.png", UriKind.Relative), Nothing)
    fileSubItems.Add(saveItem)
    Dim fileItem As New MenuItem("File", Nothing, fileSubItems)
    items.Add(fileItem)
    Dim editItem As New MenuItem("Edit", Nothing, Nothing)
    items.Add(editItem)
    Dim viewItem As New MenuItem("View", Nothing, Nothing)
    items.Add(viewItem)
    Return items
End Function
Finally, pass the generated collection to the ItemsSource of the RadMenu.
Example 3: Setting the ItemsSource of the Menu
public Default_Cs()
{
    InitializeComponent();
    this.radMenu.ItemsSource = this.GetMenuItems();
}
Public Sub New()
    InitializeComponent()
    Me.radMenu.ItemsSource = Me.GetMenuItems()
End Sub
Creating and Applying the ItemContainerStyle
In order to visualize the data in RadMenu you can use ItemContainerStyle property. When used in combination with ItemsSource, the Style is applied on all RadMenuItems. The only thing you have to do is set the bindings for the needed properties. For the "Icon" you will have to use "IconTemplate" as shown below. When you bind the "Icon" property to the "IconUrl", its value will be passed to the DataTemplate and used as a Source of an image.
Example 4: Defining MenuItemStyle
<Style x:Key="MenuItemStyle" TargetType="telerik:RadMenuItem">
    <Setter Property="Header" Value="{Binding Text}"/>
    <Setter Property="ItemsSource" Value="{Binding SubItems}"/>
    <Setter Property="Icon" Value="{Binding IconUrl}" />
    <Setter Property="IconTemplate" >
        <Setter.Value>
            <DataTemplate>
                <Image Source="{Binding}" Stretch="UniformToFill"/>
            </DataTemplate>
        </Setter.Value>
    </Setter>
</Style>
If you're using Implicit Styles note that the Style that targets RadMenuItem should be based on the default RadMenuItemStyle.
So it's time to define RadMenu and set "ItemContainerStyle" property:
Example 5: Applying the MenuItemStyle to RadMenu
<telerik:RadMenu x:Name="radMenu" ItemContainerStyle="{StaticResource MenuItemStyle}"/>
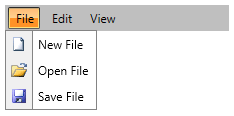
Figure 1 illustrates the final result.
Figure 1: RadMenu bound to dynamic data