Getting Started with WinUI LayoutTransformControl
This topic demonstrates how to use the RadLayoutTransformControl for .
Assembly References
In order to use the RadLayoutTransformControl suite in your projects, you have to add references to the following assembly:
Telerik.WinUI.Controls.dllTelerik.Licensing.Runtime.dll
Defining a RadLayoutTransformControl
Here is how RadLayoutTransformControl is declared in XAML:
You can access the RadLayoutTransformControl control through an alias pointing to the Telerik.UI.Xaml.Controls.Input namespace:
xmlns:telerikPrimitives="using:Telerik.UI.Xaml.Controls.Primitives"
Example 1: Adding a RadLayoutTransformControl in XAML
<telerikPrimitives:RadLayoutTransformControl />
Applying Transformations
The RadLayoutTransformControl exposes a LayoutTransform which you can use to apply transformations to the content of the control. It is of type Microsoft.UI.Xaml.Media.Transform. Here's a list of possible transformations:
- RotateTransform
- ScaleTransform
- SkewTransform
- MatrixTransform
- TransformGroup
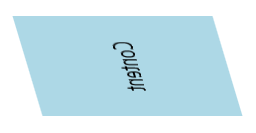
Example 2: Applying a TransformGroup
<telerik:RadLayoutTransformControl x:Name="LayoutTransformControl">
    <telerik:RadLayoutTransformControl.LayoutTransform>
        <TransformGroup>
            <RotateTransform Angle="45" />
            <ScaleTransform ScaleX="2" ScaleY="2" />
            <SkewTransform AngleX="10" AngleY="10" />
        </TransformGroup>
    </telerik:RadLayoutTransformControl.LayoutTransform>
    <Border Background="LightBlue" Width="100" Height="100">
        <TextBlock Text="Content" HorizontalAlignment="Center" VerticalAlignment="Center" />
    </Border>
</telerik:RadLayoutTransformControl>
Figure 1: Border and TextBlock with applied transformations

You can also set the transformations in code, as shown in Example 3:
Example 3: Applying a MatrixTransform
this.LayoutTransformControl.LayoutTransform = new MatrixTransform()
{
    Matrix = new Matrix()
    {
        M11 = 0.3,
        M12 = 1,
        M21 = 2,
        M22 = 0,
        OffsetX = 10,
        OffsetY = 50
    }
};
Figure 2: RadLayoutTransformControl with MatrixTransform
