Setting Up Your Telerik UI for WinForms License Key
Starting with the Q1 2025 release, the UI components from the Telerik UI for WinForms library require activation through a license key (trial or commercial). This article describes how to download your personal license key and use it to activate the Telerik UI for WinForms components. An invalid license results in errors and warnings during build and run-time indicators such as watermarks and banners.
Downloading the License Key
To download a license key for Telerik UI for WinForms, you must have either a developer license or a trial license. If you are new to Telerik UI for WinForms, sign up for a free trial first, and then follow the steps below.
Depending on your development environment and preferences, you can install your license key in either of the following ways:
- Automatic installation - suitable for developers using Telerik productivity tools like the Telerik extensions for Visual Studio and the Progress Control Panel.
- Manual installation - suitable for trial users and developers who prefer to manage their projects and Telerik product versions manually.
Update your license key whenever you renew or purchase a new Telerik license.
Automatic License Key Installation
To download and install your Telerik license key automatically, you can use either of the following Telerik productivity tools. They can automatically download and store the license key in your home directory (%appdata%\Telerik) and make it available for all projects that you develop on your local machine.
These tools include Telerik UI for WinForms Visual Studio extensions and Telerik Control Panel
Installing a License Key with the VS Extensions
To install your license key by using the Telerik UI for WinForms Visual Studio extensions:
- Open Visual Studio.
-
Go to Extensions > Telerik > Licensing > Download Key.
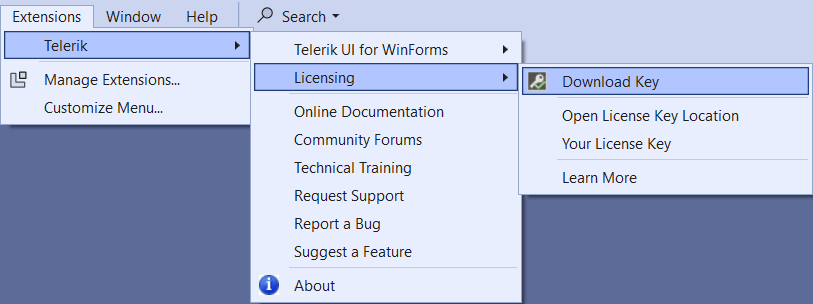
- You might be asked to enter your Telerik credentials to log into your Telerik account.
The Visual Studio extension automatically downloads the license key file to your home directory (%appdata%\Telerik), which activates the Telerik WinForms components.
Installing a License Key with the Progress Control Panel
To install your Telerik License Key by using the Progress Control Panel, start the application. It automatically downloads the license key file to your home directory (%appdata%\Telerik), which activates the Telerik WinForms components.
Manual License Key Installation
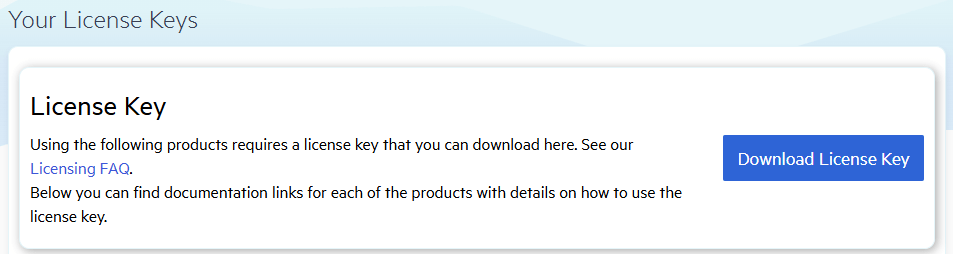
Go to the License Keys page in your Telerik account.
-
Click the Download License Key button.
Activating the Telerik UI for WinForms Components
To activate the Telerik UI for WinForms controls:
-
Copy the downloaded
telerik-license.txtlicense key file to your home directory. This makes the license key available to all projects that you develop on your computer:- For Windows:
%AppData%\Telerik\telerik-license.txt - For Mac/Linux:
~/.telerik/telerik-license.txt - Alternatively, copy the
telerik-license.txtlicense key file to the root folder of your project. This makes the license key available only to this project. Do not commit the file to source control, as this is your personal license key.
- For Windows:
Download the
Telerik.LicensingNuGet package from NuGet.org. It will add the Telerik.Licensing.Runtime assembly in your project, which is required to activate the WinForms controls.
When you build the project, the Telerik.Licensing NuGet package automatically locates the license file and uses it to activate the WinForms controls.
If your project doesn't use NuGet packages, see the Adding a License Key to Projects without NuGet references.
Installing a License Key in Projects by Using Telerik Assembly References (without NuGet packages)
Telerik strongly recommends the use of NuGet packages whenever possible. Only include the license key as a code snippet when NuGet packages are not an option.
If you add the Telerik components to your project by referencing the Telerik assemblies, you must add the license to the project as a code snippet:
Go to the License Keys page in your Telerik account.
-
On the Telerik UI for WinForms row, click the View key link in the SCRIPT KEY column.

-
A new Script Key window is shown with your C#/VB Script License Key. The code snippet from the Script Key contains an assembly attribute called EvidenceAttribute that holds information about the license key.
- For C#: Copy the C# code snippet into a new file, for example,
TelerikLicense.cs.
- For VB: Copy the VB code snippet into a new file, for example,
TelerikLicense.vb.
- For C#: Copy the C# code snippet into a new file, for example,
Add the
TelerikLicense.cs(orTelerikLicense.vb) file to your project.
TelerikLicense.cs file example using Script Key
[assembly: global::Telerik.Licensing.EvidenceAttribute("your-WINFORMS-script-key-here")]
In case you use multiple Telerik products in the same application (e.g. Wpf, Telerik Document Processing, Telerik Reporting), you will need to add seperate license script keys for all products that you use.
TelerikLicense.cs file with multiple Script Keys for different products
[assembly: global::Telerik.Licensing.EvidenceAttribute("your-WPF-script-key-here")]
[assembly: global::Telerik.Licensing.EvidenceAttribute("your-Document-Processing-script-key-here")]
[assembly: global::Telerik.Licensing.EvidenceAttribute("your-REPORTING-script-key-here")]
Do not publish the license key code snippet in publicly accessible repositories. This is your personal license key.
Updating Your License Key
Whenever you purchase a new Telerik UI for WinForms license or renew an existing one, always download a new license key, either automatically or manually. The new license key includes information about all previous license purchases. This process is referred to as a license key update. Once you have the new license key, use it to activate the components.