Getting Started with WinForms Dock
This article shows how you can start using RadDock.
Adding Telerik Assemblies Using NuGet
To use RadDock when working with NuGet packages, install the Telerik.UI.for.WinForms.AllControls package. The package target framework version may vary.
If you don’t need all controls, you can instead install a more lightweight package targeting only RadDock: UI.for.WinForms.Dock. This package has a dependency on UI.for.WinForms.Common, which will be automatically installed when adding the Dock NuGet.
Read more about NuGet installation in the Install using NuGet Packages article.
With the 2025 Q1 release, the Telerik UI for WinForms has a new licensing mechanism. You can learn more about it here.
Adding Assembly References Manually
When dragging and dropping a control from the Visual Studio (VS) Toolbox onto the Form Designer, VS automatically adds the necessary assemblies. However, if you're adding the control programmatically, you'll need to manually reference the following assemblies:
- Telerik.Licensing.Runtime
- Telerik.WinControls
- Telerik.WinControls.RadDock
- Telerik.WinControls.UI
- TelerikCommon
The Telerik UI for WinForms assemblies can be install by using one of the available installation approaches.
Defining the RadDock
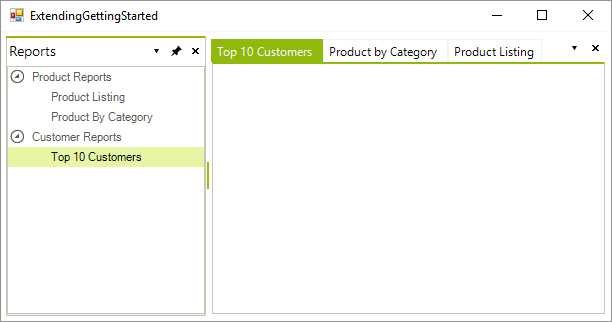
This tutorial creates a shell for a report viewer/explorer. A ToolWindow on the left represents a list of reports. The right side of the form in RadDock contains three DocumentWindows, each representing a report. This tutorial demonstrates the layout of ToolWindow and DocumentWindows. It also demonstrates adding a RadTreeView control to one of the created windows and synchronizing the active DockWindow with the selection in the RadTreeView instance.
Figure 1: The final application layout.
Configure the RadDock
1. Drop a RadDock control on the form.
2. Set the RadDock.Dock property to Fill.
3. Open the Smart Tag and select Show Advanced Layout Designer. This step will display the RadDock Advanced Layout Designer dialog.
4. In the RadRibbonBar on top, click the left green arrow to dock a new ToolWindow to the left.
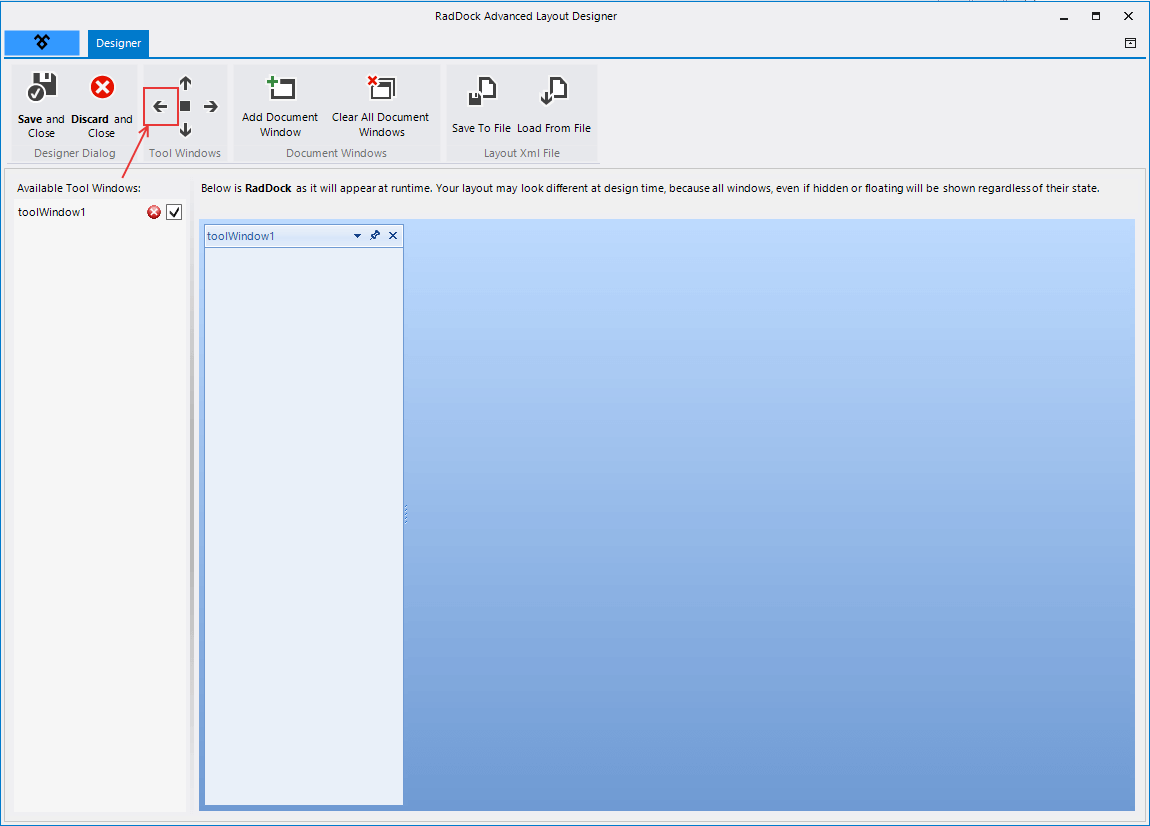
The list on the left side of the preview displays all created windows. From this list you can set the Visibility of the ToolWindows to false, if you do not need some of them visible at run time initially.
5. Again from the RadRibbonBar, click on the Add DocumentWindow button three times to add three DocumentWindows instances.
6. Click Save and Close button to close the dialog and save the layout to the RadDock.

For more complex scenarios the advanced layout designer provides full drag and drop and user interaction support in the preview RadDock control.
The real layout of RadDock which is displayed at run time is available only through RadDock Advanced Layout Designer. I.e. if you have hidden, auto-hidden or floating ToolWindows, they will be shown as such only in the advanced designer. In Visual Studio IDE we display ToolWindows in their docked state, which allows you to place and layout your controls in them.
7. In the designer select the ToolWindow on the left. You can verify this by checking that the currently selected component in the Properties Window of Visual Studio.
8. Set the ToolWindow Text property to "Reports".
9. Select one of the DocumentWindows. To do this in the designer, select the tab (i.e. on "Document1"), then click inside the client area. Check the Properties Window that you have selected a DocumentWindow.
10. Set the DocumentWindow Name property to "dwProductListing" and Text property to "Product Listing".
11. Select the next DocumentWindow, set the Name property to "dwProductByCategory" and the Text property to "Product By Category".
12. Select the last DocumentWindow, set the Name property to "dwTop10Customers" and Text property to "Top 10 Customers".
13. Drop a RadTreeView control to the "Reports" ToolWindow, set the control's Dock property to Fill.
14. Make sure that you have the Telerik.Wincontrols.UI and Telerik.Wincontrols.UI.Docking in the "using" (C#) or "Imports" (VB) section of the code.
Include namespaces
using Telerik.WinControls.UI;
using Telerik.WinControls.UI.Docking;
Imports Telerik.WinControls.UI
Imports Telerik.WinControls.UI.Docking
15. Create a Form.Load event handler and copy the code below to it. This code builds the TreeView node structure and links the Name of each DocumentWindow to the corresponding Node.Tag property. Each dockable object has a Name property, a String that uniquely identifies it. Later, we use the Name to locate the DocumentWindow and activate it.
Initializing RadTreeView
void Form1_Load(object sender, EventArgs e)
{
    RadTreeNode productNode = radTreeView1.Nodes.Add("Product Reports");
    RadTreeNode customerNode = radTreeView1.Nodes.Add("Customer Reports");
    RadTreeNode productListingNode = new RadTreeNode("Product Listing");
    productListingNode.Tag = dwProductListing.Name;
    RadTreeNode productCategoryNode = new RadTreeNode("Product By Category");
    productCategoryNode.Tag = dwProductByCategory.Name;
    RadTreeNode top10CustomerNode = new RadTreeNode("Top 10 Customers");
    top10CustomerNode.Tag = dwTop10Customers.Name;
    productNode.Nodes.Add(productListingNode);
    productNode.Nodes.Add(productCategoryNode);
    customerNode.Nodes.Add(top10CustomerNode);
    radTreeView1.ExpandAll();
}
Private Sub Form1_Load(ByVal sender As System.Object, ByVal e As System.EventArgs) Handles MyBase.Load
    Dim productNode As RadTreeNode = RadTreeView1.Nodes.Add("Product Reports")
    Dim customerNode As RadTreeNode = RadTreeView1.Nodes.Add("Customer Reports")
    Dim productListingNode As New RadTreeNode("Product Listing")
    productListingNode.Tag = dwProductListing.Name
    Dim productCategoryNode As New RadTreeNode("Product By Category")
    productCategoryNode.Tag = dwProductByCategory.Name
    Dim top10CustomerNode As New RadTreeNode("Top 10 Customers")
    top10CustomerNode.Tag = dwTop10Customers.Name
    productNode.Nodes.Add(productListingNode)
    productNode.Nodes.Add(productCategoryNode)
    customerNode.Nodes.Add(top10CustomerNode)
    RadTreeView1.ExpandAll()
End Sub
16. Create a SelectedNodeChanged event handler and add the following code to it. The code for this event handler verifies that the Tag of the selected node has a value. Further, if this value corresponds to the name of an existing window in RadDock, the appropriate DocumentWindow gets activated.
Handling the RadTreeView SelectedNodeChanged event
void radTreeView1_SelectedNodeChanged(object sender, RadTreeViewEventArgs e)
{
    if (e.Node.Tag != null)
    {
        DockWindow dw = this.radDock1[e.Node.Tag.ToString()];
        if (dw != null)
        {
            this.radDock1.ActiveWindow = dw;
        }
    }
}
Private Sub RadTreeView1_SelectedNodeChanged(ByVal sender As Object, ByVal e As RadTreeViewEventArgs)
    If Not e.Node.Tag Is Nothing Then
        Dim dw As DockWindow = Me.RadDock1(e.Node.Tag.ToString())
        If Not dw Is Nothing Then
            Me.RadDock1.ActiveWindow = dw
        End If
    End If
End Sub
Press F5 to run the application. Try experimenting with...
Dragging the panel and document tabs
Right-clicking document and panel tabs.
Pressing Ctrl-Tab to invoke the Quick Navigator.
Pinning and un-pinning the DockWindow.
Using the ToolWindow and DocumentWindow menus by clicking the downward arrows.
| RELATED VIDEOS | |
|---|---|
| The new and improved RadDock for WinForms has landed and this is your opportunity to get a first look. Join Developer Evangelist John Kellar as he shows you how quickly you can get up and running with the new version of RadDock. John will cover the new features so you know what to expect and how you can use RadDock in your applications once it is officially released. (Runtime: 32:54) Introducing the new RadDock for WinForms 
|
In this video, you will learn how to get started with the run-time and design-time features in the new RadDock for WinForms. You will see the rich RadDock run-time features in action and you will see how easy it is to get started with RadDock in Visual Studio. You will also be introduced to the new Advanced Layout Designer for RadDock, a design-time tool that makes it easy to customize yoru RadDock layouts. (Runtime: 09:42) Getting Started with RadDock for WinForms 
|
See Also
Telerik UI for WinForms Learning Resources
- Telerik UI for WinForms Dock Component
- Getting Started with Telerik UI for WinForms Components
- Telerik UI for WinForms Setup
- Telerik UI for WinForms Application Modernization
- Telerik UI for WinForms Visual Studio Templates
- Deploy Telerik UI for WinForms Applications
- Telerik UI for WinForms Virtual Classroom(Training Courses for Registered Users)
- Telerik UI for WinForms License Agreement)