Getting Started with WinForms Callout
This article shows how you can start using RadCallout. The following result will be achieved at the end of this tutorial:
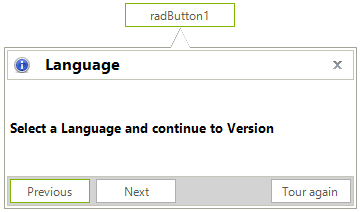
The design may vary according to the applied theme to the application.
Adding Telerik Assemblies Using NuGet
To use RadCallout when working with NuGet packages, install the Telerik.UI.for.WinForms.AllControls package. The package target framework version may vary.
Read more about NuGet installation in the Install using NuGet Packages article.
With the 2025 Q1 release, the Telerik UI for WinForms has a new licensing mechanism. You can learn more about it here.
Adding Assembly References Manually
When dragging and dropping a control from the Visual Studio (VS) Toolbox onto the Form Designer, VS automatically adds the necessary assemblies. However, if you're adding the control programmatically, you'll need to manually reference the following assemblies:
- Telerik.Licensing.Runtime
- Telerik.WinControls
- Telerik.WinControls.UI
- TelerikCommon
The Telerik UI for WinForms assemblies can be install by using one of the available installation approaches.
Defining the RadCallout
Follow the steps:
1. Go ahead and add a RadCallout and a RadButton from the toolbox.
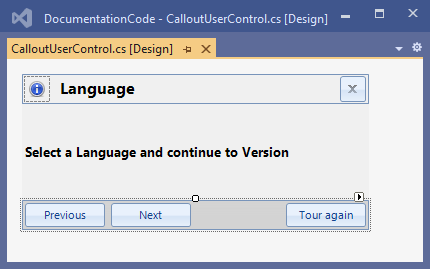
2. Add a UserControl to the form. Its design depends on the exact requirement a developer may have.
The following UserControl contains:
- Header RadPanel which is docked to Top. It hosts a RadPictureBox showing the information image, a RadLabel displaying the "Language" caption and a RadButton for closing purposes.
Please ensure that the close RadButton's Name property is set to closeButton and the RadPanel.Name property is set to headerPanel.
Footer RadPanel which is docked to Bottom. It hosts three RadButton controls for the "Previous", "Next" and "Tour again" actions.
RadLabel for displaying the main information message "Select a Language and continue to a Version".
3. Build the project and then add the UserControl from the toolbox to the form.
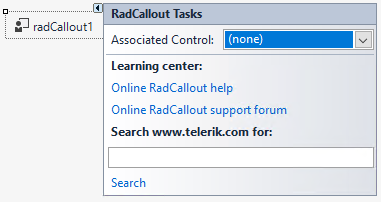
4. Select RadCallout and click the small arrow on the top right position in order to open the Smart Tag. Then set the AssociatedControl to the UserControl we just added onto the form:
5. At design time double-click the RadButton that we added in step 1. Thus, its Click event handler will be generated. Now, when the button is clicked, the RadCallout will be shown:
Showing the RadCallout
private void radButton1_Click(object sender, EventArgs e)
{
    this.radCallout1.Show(this.radButton1);
}
Private Sub RadButton1_Click(sender As Object, e As EventArgs) Handles RadButton1.Click
    Me.RadCallout1.Show(Me.RadButton1)
End Sub
6. Run the project and click the button. Once the callout is shown, it will be automatically hidden if you click outside the callout's bounds.
7. It is possible to force closing the callout when the user hits the close button in the header. For this purpose it is necessary to access the close button from the UserControl and handle its Click event:
Closing the RadCallout
public CalloutSettings()
{
    InitializeComponent();

    RadButton closeButton = calloutUserControl1.Controls["headerPanel"].Controls["closeButton"] as RadButton;
    closeButton.Click += CloseButton_Click;
}

private void CloseButton_Click(object sender, EventArgs e)
{
    if (this.radCallout1.CalloutForm.Visible)
    {
        this.radCallout1.Close();
    }
}
Public Sub New()
    InitializeComponent()
    Dim closeButton As RadButton = TryCast(CalloutUserControl1.Controls("headerPanel").Controls("closeButton"), RadButton)
    AddHandler closeButton.Click, AddressOf CloseButton_Click
End Sub

Private Sub CloseButton_Click(ByVal sender As Object, ByVal e As EventArgs)
    If Me.RadCallout1.CalloutForm.Visible Then
        Me.RadCallout1.Close()
    End If
End Sub
See Also
Telerik UI for WinForms Learning Resources
- Telerik UI for WinForms Callout Component
- Getting Started with Telerik UI for WinForms Components
- Telerik UI for WinForms Setup
- Telerik UI for WinForms Application Modernization
- Telerik UI for WinForms Visual Studio Templates
- Deploy Telerik UI for WinForms Applications
- Telerik UI for WinForms Virtual Classroom(Training Courses for Registered Users)
- Telerik UI for WinForms License Agreement)