Getting Started with WinForms DropDownButton
This article shows how you can start using RadDropDownButton.
Adding Telerik Assemblies Using NuGet
To use RadDropDownButton when working with NuGet packages, install the Telerik.UI.for.WinForms.AllControls package. The package target framework version may vary.
Read more about NuGet installation in the Install using NuGet Packages article.
With the 2025 Q1 release, the Telerik UI for WinForms has a new licensing mechanism. You can learn more about it here.
Adding Assembly References Manually
When dragging and dropping a control from the Visual Studio (VS) Toolbox onto the Form Designer, VS automatically adds the necessary assemblies. However, if you're adding the control programmatically, you'll need to manually reference the following assemblies:
- Telerik.Licensing.Runtime
- Telerik.WinControls
- Telerik.WinControls.UI
- TelerikCommon
The Telerik UI for WinForms assemblies can be install by using one of the available installation approaches.
Defining the RadDropDownButton
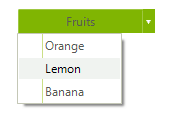
You can add RadDropDownButton either at design time or at run time:
Design Time
- To add a RadDropDownButton to your form, drag a RadDropDownButton from the toolbox onto the surface of the form designer.
- Like a standard button, you can control the displayed text by setting the Text property.
- Unlike a standard button, RadDropDownButton displays drop-down items when clicked. So handling the Click event of this button is not appropriate. Instead, work directly with the events for each item.
Run Time
To programmatically add a RadDropDownButton to a form, create a new instance of a RadDropDownButton, and add it to the form Controls collection.
Adding a RadButton at runtime
RadDropDownButton radDropDownButton = new RadDropDownButton();
radDropDownButton1.Text = "Fruits";
RadMenuItem item1 = new RadMenuItem("Orange");
radDropDownButton1.Items.Add(item1);
RadMenuItem item2 = new RadMenuItem("Lemon");
radDropDownButton1.Items.Add(item2);
RadMenuItem item3 = new RadMenuItem("Banana");
radDropDownButton1.Items.Add(item3);
this.Controls.Add(radDropDownButton);
Dim radDropDownButton As New RadDropDownButton()
radDropDownButton1.Text = "Fruits"
Dim item1 As New RadMenuItem("Orange")
radDropDownButton1.Items.Add(item1)
Dim item2 As New RadMenuItem("Lemon")
radDropDownButton1.Items.Add(item2)
Dim item3 As New RadMenuItem("Banana")
radDropDownButton1.Items.Add(item3)
Me.Controls.Add(radDropDownButton)

Similarly, you can create item hierarchies in code by adding new RadMenuItem objects to the Items collection of your existing RadMenuItem.
Adding sub items
using Telerik.WinControls.UI;
namespace RadDropDownButtonDemo
{
    public partial class Form1 : Form
    {
        private void Form1_Load(object sender, EventArgs e)
        {
            RadMenuItem mainItem = radDropDownButton1.Items[0] as RadMenuItem;
            RadMenuItem mySubMenuItem = new RadMenuItem();
            mySubMenuItem.Text = "Submenu Item";
            mySubMenuItem.Click += new EventHandler(mySubMenuItem_Click);
            mainItem.Items.Add(mySubMenuItem);
        }
        void mySubMenuItem_Click(object sender, EventArgs e)
        {
            MessageBox.Show((sender as RadMenuItem).Text +
                " was clicked.");
        }
    }
}
Imports System.Windows.Forms
Imports Telerik.WinControls.UI
Namespace RadDropDownButtonDemo
    Public Class Form1
        Private Sub Form1_Load(ByVal sender As Object, ByVal e As EventArgs)
            Dim mainItem As RadMenuItem = TryCast(radDropDownButton1.Items(0), RadMenuItem)
            Dim mySubMenuItem As New RadMenuItem()
            mySubMenuItem.Text = "Submenu Item"
            AddHandler mySubMenuItem.Click, AddressOf mySubMenuItem_Click
            mainItem.Items.Add(mySubMenuItem)
        End Sub
        Sub mySubMenuItem_Click(ByVal sender As Object, ByVal e As EventArgs)
            MessageBox.Show((TryCast(sender, RadMenuItem)).Text + " was clicked.")
        End Sub
    End Class
End Namespace
Displaying Images with Items
You can display images and text on your menu items.

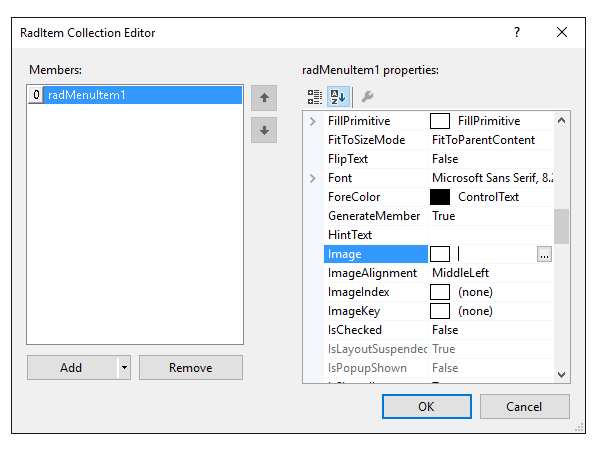
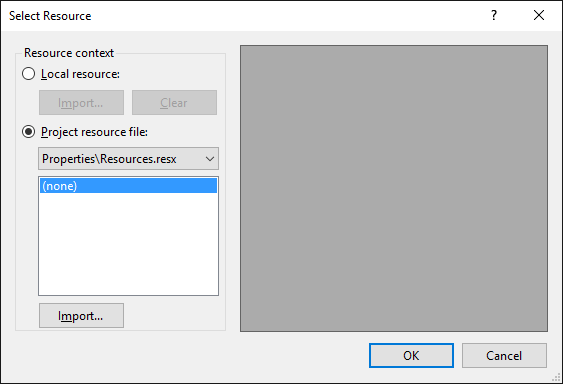
To add an image to your menu item, click in the Image property of the RadMenuItem, and then click the ellipsis button to launch the Select Resource dialog. From this dialog you can select an image file from a project resource file or from an image resource on your local hard drive.

Using the Click Event
To handle the Click event of individual RadMenuItems on the drop down menu at Design Time, locate the RadMenuItem in the drop down list in the Properties window of the Windows Form designer. Click the events button, then double-click the Click event to generate an event handler. Then fill in your event-handling code.
Telerik UI for WinForms Learning Resources
- Telerik UI for WinForms DropDownButton Component
- Getting Started with Telerik UI for WinForms Components
- Telerik UI for WinForms Setup
- Telerik UI for WinForms Application Modernization
- Telerik UI for WinForms Visual Studio Templates
- Deploy Telerik UI for WinForms Applications
- Telerik UI for WinForms Virtual Classroom(Training Courses for Registered Users)
- Telerik UI for WinForms License Agreement)