List
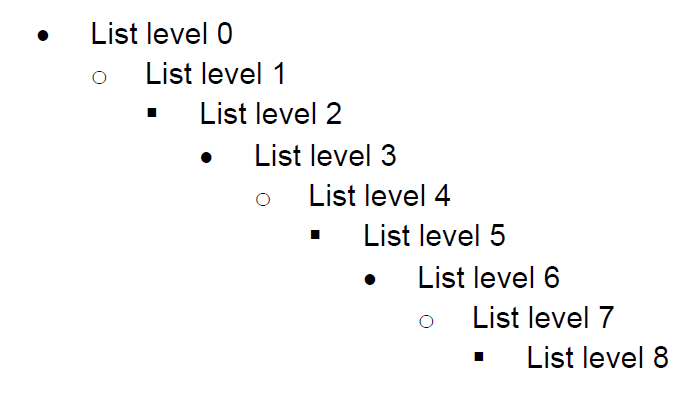
List is a class that helps you easily create a list of numbered paragraphs. You can use lists by adding them to RadFixedDocumentEditor’s Lists collection or by simply creating List class instances and setting the list bullets to some Block instances.
Figure 1

This article aims to present the lists related API in RadPdfProcessing. It contains the following sections:
Creating List from ListTemplateType
Each List contains a ListLevelCollection where the presentation of each list level is defined by a ListLevel class instance. For the most common cases you do not need to define each separate list level. Instead, you can use the ListTemplateType enumeration to create a list with one of the predefined list templates.
The code snippet from Example 1 shows how to create a list with NumberedParentheses template.
[C#] Example 1: Create numbered parentheses list template type
List numberedParenthesesList = new List(ListTemplateType.NumberedParentheses);
On the following image you may see the available list template types and how they look:
Figure 2

In .NET Standard due to font limitations, the BulletDefault list requires a Wingdings font be provided so its bullets are rendered properly. You can read how to handle these retrictions in the Fonts and FontsProvider articles.
Creating Custom ListLevel
When you need to create a custom List, you should define the presentation of each list level. The appearance of the list level is defined with the properties of the ListLevel class. The following list level properties are available in RadPdfProcessing:
StartIndex: Specifies the index from which the list items' numbering will start. The default value of this property is 1.
RestartAfterLevel: Specifies the index of the level, which restarts the current level numbering. The default value is negative, which means that all previous levels should restart the current level numbering. If this property has non-negative value, all previous levels that have level index less than or equal to the RestartAfterLevel value should restart the current level numbering.
ParagraphProperties: Specifies the paragraph properties of the paragraphs from this list level.
CharacterProperties: Specifies the character properties of the bullet element on this list level.
BulletNumberingFormat: Specifies how the bullet element should be formatted on this list level.
IndentAfterBullet: Specifies the amount of indent after the bullet element.
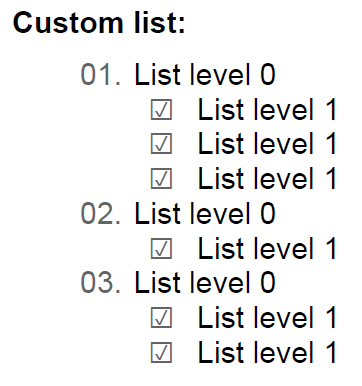
Example 2 shows how to create an empty list and add two custom list levels to its ListLevelsCollection. Level 0 has a bullet which displays its current numbering as two digit number with a leading zero. Level 1 displays a checkbox as a bullet symbol for all of the corresponding list items. Additionally, each of the levels defines custom values for the LeftIndent, ForegroundColor and IndentAfterBullet properties.
[C#] Example 2: Create custom list levels
List bulletList = new List();

ListLevel levelZero = bulletList.Levels.AddListLevel();
levelZero.ParagraphProperties.LeftIndent = 30;
levelZero.CharacterProperties.ForegroundColor = new RgbColor(100, 100, 100);
levelZero.IndentAfterBullet = 5;
levelZero.BulletNumberingFormat =
    new TextBulletNumberingFormat((indexer) => string.Format("{0:D2}.", indexer.GetCurrentIndex(0)));

ListLevel levelOne = bulletList.Levels.AddListLevel();
levelOne.ParagraphProperties.LeftIndent = 60;
levelOne.CharacterProperties.ForegroundColor = new RgbColor(100, 100, 100);
levelOne.IndentAfterBullet = 10;
levelOne.BulletNumberingFormat = new TextBulletNumberingFormat((indexer) => "☑");
The image in Figure 3 shows how the list created in Example 2 will look like when used.
Figure 3

Creating Custom Bullet
When you are creating custom list level, you need to specify how the bullet numbering should be formatted. With RadPdfProcessing by implementing IBulletNumberingFormat you may choose what PositionContentElement should be used for each bullet appearance. This way knowing the current indexes of all list levels you can easily create bullets with text, geometry or image.
If you require using a text bullet, you may use TextBulletNumberingFormat class. This class implements IBulletNumberingFormat. When initializing an instance of this class, its constructor requires a function that returns the string representation of the bullet.
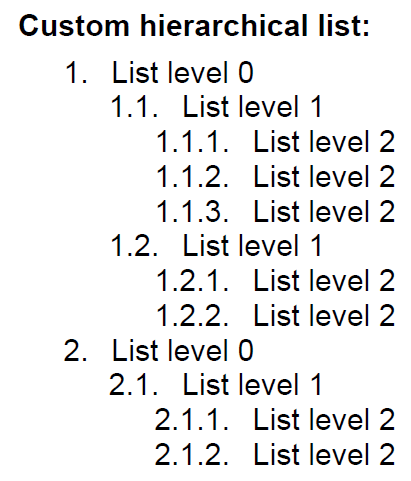
The following code snippet shows how to create the bullets of a numbered hierarchical list using TextBulletNumberingFormat class:
[C#] Example 3: Create custom text numbering bullet
List list = new List();

for (int i = 0; i < 3; i++)
{
    ListLevel level = list.Levels.AddListLevel();
    level.ParagraphProperties.LeftIndent = (i + 1) * 20;
    level.IndentAfterBullet = 10;
    int currentLevelIndex = i;

    level.BulletNumberingFormat = new TextBulletNumberingFormat((indexer) =>
    {
        StringBuilder builder = new StringBuilder();

        for (int levelIndex = 0; levelIndex <= currentLevelIndex; levelIndex++)
        {
            builder.AppendFormat("{0}.", indexer.GetCurrentIndex(levelIndex));
        }

        return builder.ToString();
    });
}
When using the list created in Example 3 its bullets will look as shown in Figure 4.
Figure 4

Using Lists with RadFixedDocumentEditor
In order to use lists with RadFixedDocumentEditor, you should first add them to the editor’s ListCollection. Each time you add a list item you should simply set the ListId and ListLevel values in the editor’s Paragraph properties and call the InsertParagraph() method.
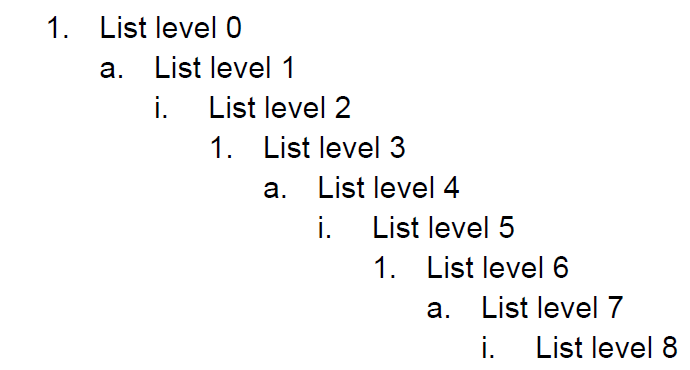
Example 4 shows how to create a list with RadFixedDocumentEditor and insert a single item for each of the list levels. The appearance of the list is from the values in the predefined ListTemplateType enumeration
[C#] Example 4: Using lists with RadFixedDocumentEditor
RadFixedDocument document = new RadFixedDocument();
using (RadFixedDocumentEditor editor = new RadFixedDocumentEditor(document))
{
    List numlist = editor.Lists.AddList(ListTemplateType.NumberedDefault);
    editor.ParagraphProperties.ListId = list.Id;

    for (int listLevel = 0; listLevel < list.Levels.Count; listLevel++)
    {
        editor.ParagraphProperties.ListLevel = listLevel;
        editor.InsertParagraph();
        editor.InsertRun(string.Format("List level {0}", listLevel));
    }
}
The resulting document looks like the image in Figure 5.
Figure 5

Using Lists with Block Class
As the Block class has Bullet and IndentAfterBullet properties you can easily set some custom bullet to any Block instance. However, if you want to get automatically formatted bullet corresponding to some List class instance, you should use the SetBullet(List list, int listLevel) method. This way you can easily set the bullet-related properties so that the bullet displays the correct list numbering and formatting.
The following code snippet shows how to create List with BulletDefault template and set the bullet of the first list level to a Block:
[C#] Example 5: Using lists with Block class
List defaultBulletlist = new List(ListTemplateType.BulletDefault);
Block block = new Block();
block.SetBullet(defaultBulletlist, 0);
block.InsertText("Sample block text.");
The list style is applied for the whole Block element. Generating a list consisting of several paragraphs in different list items should be done using the same count of Block instances as the number of the different list items.
Figure 6 demonstrates how the block form Example 5 will look like when exported.
Figure 6
