Appointment Template for Calendar for Xamarin
With R3 2019 Release of Telerik UI for Xamarin RadCalendar control provides the option to apply a ContentTemplate to the Appointments for DayView and MultiDayView. You could easily set a Template or TemplateSelector to the appointments through the AppointmentContentTemplate property of the DayViewSettings or MultiDaySettings.
- AppointmentContentTemplate (DataTemplate): Defines the DataTemplate of the Appointment based on the data object.
Appointment Template in DayView and MultiDayView
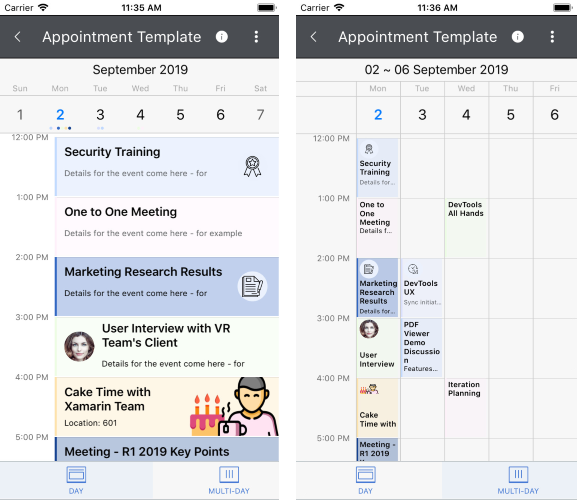
Appointment Template Example
The following example shows how to set AppointmentContentTemplate in DayView Mode using DataTemplateSelector.
First, create a ViewModel class with a collection of Appointment objects:
public class AppointmentsTemplateViewModel
{
    public AppointmentsTemplateViewModel()
    {
        var date = DateTime.Today;
        this.Appointments = new ObservableCollection<Appointment>
        {
            new Appointment{ Title = "Tom Birthday", IsAllDay = true, Color = Color.FromHex("#C1D8FF"), Detail ="Buy present!", StartDate = date, EndDate = date.AddHours(12)},
            new Appointment{ Title = "Lunch with Sara", IsAllDay = false, Color = Color.FromHex("#EDFDE3"), Detail ="Discuss the new marketing strategy", StartDate = date.AddDays(1).AddHours(12), EndDate = date.AddDays(1).AddHours(13).AddMinutes(30)},
            new Appointment{ Title = "Security Training", IsAllDay = false, Color = Color.FromHex("#EDFDE3"), Detail ="Details for the event come here", StartDate = date.AddHours(15), EndDate = date.AddHours(16)},
            new Appointment{ Title = "Elle Birthday", IsAllDay = true, Color = Color.FromHex("#FFF1F9"), Detail ="Buy present!", StartDate = date.AddDays(1), EndDate = date.AddDays(1).AddHours(12)},
            new Appointment{ Title = "One to One Meeting", IsAllDay = false, Color = Color.FromHex("#EBF2FD"), Detail ="Details for the event come here - for example place, participants and add information", StartDate = date.AddHours(16), EndDate = date.AddHours(17)},
            new Appointment{ Title = "Marathon", IsAllDay = false, Color = Color.FromHex("#FDE2AC"), Detail ="Enjoy running", StartDate = date.AddHours(8), EndDate = date.AddHours(11)},
        };
    }
    public ObservableCollection<Appointment> Appointments { get; set; }
}
Create a custom appointment template selector class which inherits from DataTemplateSelector and override the OnSelectTemplate method:
public class DayViewAppointmentTemplateSelector : DataTemplateSelector
{
    public DataTemplate AllDay { get; set; }
    public DataTemplate NotAllDay { get; set; }

    protected override DataTemplate OnSelectTemplate(object item, BindableObject container)
    {
        var appointmentsTemplate = item as Appointment;

        if (appointmentsTemplate.IsAllDay)
        {
            return this.AllDay;
        }
        return this.NotAllDay;
    }
}
Add the created DayViewAppointmentTemplateSelector as a Resource and define both DataTemplates:
<local:DayViewAppointmentTemplateSelector x:Key="DayViewAppointmentTemplateSelector">
    <local:DayViewAppointmentTemplateSelector.AllDay>
        <DataTemplate>
            <Grid>
                <Label Text="{Binding Title}" FontSize="16" TextColor="Black"/>
            </Grid>
        </DataTemplate>
    </local:DayViewAppointmentTemplateSelector.AllDay>
    <local:DayViewAppointmentTemplateSelector.NotAllDay>
        <DataTemplate>
            <Grid>
                <Grid.ColumnDefinitions>
                    <ColumnDefinition/>
                    <ColumnDefinition/>
                </Grid.ColumnDefinitions>
                <StackLayout>
                    <Label Text="{Binding Title}" FontSize="20" TextColor="Black"/>
                    <Label Text="{Binding Detail}" FontSize="14" TextColor="Black"/>
                </StackLayout>
                <Image Source="favourite.png" VerticalOptions="Center" HorizontalOptions="Center" Grid.Column="1"/>
            </Grid>
        </DataTemplate>
    </local:DayViewAppointmentTemplateSelector.NotAllDay>
</local:DayViewAppointmentTemplateSelector>
Finally, set the AppointmentContentTemplate property of the DayViewSettings:
<telerikInput:RadCalendar x:Name="calendar"
                          ViewMode="Day"
                          AppointmentsSource="{Binding Appointments}"
                          SchedulingUiEnabled="True">
    <telerikInput:RadCalendar.BindingContext>
        <local:AppointmentsTemplateViewModel/>
    </telerikInput:RadCalendar.BindingContext>
    <telerikInput:RadCalendar.DayViewSettings>
        <telerikInput:DayViewSettings AppointmentContentTemplate="{StaticResource DayViewAppointmentTemplateSelector}"/>
    </telerikInput:RadCalendar.DayViewSettings>
</telerikInput:RadCalendar>
Here is the result:
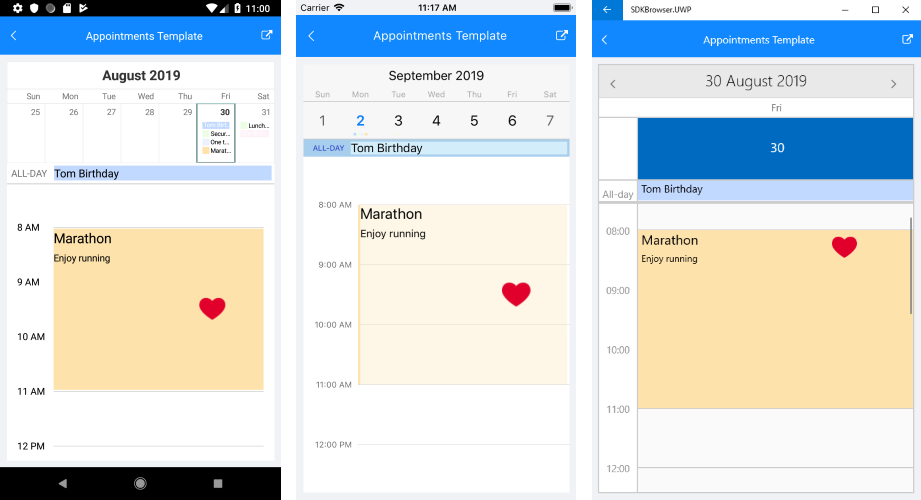
SDK Browser application contains a sample Appointments Template example. You can find it in the Calendar & Scheduling /Features folder.