Item Images
RadTreeView gives you the ability to define images for each item state. This tutorial will walk you through the following common tasks:
- Setting the base images directory.
- Setting the default image for a treeview item.
- Setting image when the item is selected.
- Setting image when the item is expanded.
- Using different images from client bin, relative directory, dll.
For the purpose of this tutorial, the treeview defined in the next XAML snippet will be used:
<telerik:RadTreeView Margin="8" x:Name="radTreeView">
    <telerik:RadTreeViewItem Header="Sport Categories">
        <telerik:RadTreeViewItem Header="Football">
            <telerik:RadTreeViewItem Header="Futsal"/>
            <telerik:RadTreeViewItem Header="Soccer"/>
        </telerik:RadTreeViewItem>
        <telerik:RadTreeViewItem Header="Tennis">
            <telerik:RadTreeViewItem Header="Table Tennis"/>
        </telerik:RadTreeViewItem>
        <telerik:RadTreeViewItem Header="Cycling">
            <telerik:RadTreeViewItem Header="Road Cycling"/>
            <telerik:RadTreeViewItem Header="Indoor Cycling"/>
            <telerik:RadTreeViewItem Header="Mountain Bike"/>
        </telerik:RadTreeViewItem>
    </telerik:RadTreeViewItem>
</telerik:RadTreeView>

Using the ImagesBaseDir, DefaultImagesSrc, ExpandedImageSrc and SelectedImageSrc Properties
RadTreeView gives you the ability to define images for each item state. The following states are supported:
Default (collapsed) - use the DefaultImageSrc property of the RadTreeViewItem to set the image that will be displayed for the default/collapsed state. If you don't define images for the rest of the states, this image will be used.
Expanded - use the ExpandedImageSrc property of the RadTreeViewItem to set the image that will be displayed for the expanded state.
Selected - use the SelectedImageSrc property of the RadTreeViewItem to set the image that will be displayed for the selected state.
When you store all your images for the TreeView into a single folder you can use the ImagesBaseDir property of the RadTreeView to set the location of this folder. Then when settings the DefaultImagesSrc, ExpandedImageSrc, SelectedImageSrc properties of the RadTreeViewItem you will need to set only the image name, not the entire path to the image. See the example below:
<telerik:RadTreeView Margin="8" x:Name="radTreeView"
    ImagesBaseDir="/Examples/Common/Images/Vista Icons/">
    <telerik:RadTreeViewItem Header="Sport Categories" DefaultImageSrc="Icon1.png">
        <telerik:RadTreeViewItem Header="Football" DefaultImageSrc="Icon2.png">
            <telerik:RadTreeViewItem Header="Futsal" DefaultImageSrc="Icon3.png"/>
            <telerik:RadTreeViewItem Header="Soccer" DefaultImageSrc="Icon4.png"/>
        </telerik:RadTreeViewItem>
        <telerik:RadTreeViewItem Header="Tennis" DefaultImageSrc="Icon5.png">
            <telerik:RadTreeViewItem Header="Table Tennis" DefaultImageSrc="Icon6.png"/>
        </telerik:RadTreeViewItem>
        <telerik:RadTreeViewItem Header="Cycling" DefaultImageSrc="Icon7.png" ExpandedImageSrc="Icon11.png">
            <telerik:RadTreeViewItem Header="Road Cycling" DefaultImageSrc="Icon8.png"/>
            <telerik:RadTreeViewItem Header="Indoor Cycling" DefaultImageSrc="Icon9.png" SelectedImageSrc="Icon10.png"/>
            <telerik:RadTreeViewItem Header="Mountain Bike"/>
        </telerik:RadTreeViewItem>
    </telerik:RadTreeViewItem>
</telerik:RadTreeView>
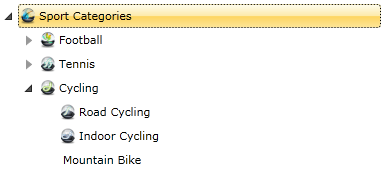
The result is:
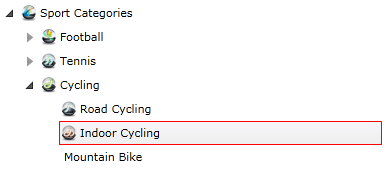
When you select the treeview item with Header "Indoor Cycling" the default image will be changed:
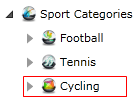
When you collapse the treeview item "Cycling", then its default image will also be changed:
Setting DefaultImagesSrc, ExpandedImageSrc and SelectedImageSrc Properties from Code Behind
When setting the DefaultImageSrc, ExpandedImageSrc and SelectedImageSrc properties from code behind you can either
-
set the path to the image as a string
    private void radTreeView_ItemPrepared(object sender, RadTreeViewItemPreparedEventArgs e)
    {
     e.PreparedItem.DefaultImageSrc = "/Examples/Common/Images/Vista Icons/Icon1.png";
     e.PreparedItem.ExpandedImageSrc = "/Examples/Common/Images/Vista Icons/Icon2.png";
     e.PreparedItem.SelectedImageSrc = "/Examples/Common/Images/Vista Icons/Icon3.png";
    }
Private Sub radTreeView_ItemPrepared(sender As Object, e As RadTreeViewItemPreparedEventArgs) e.PreparedItem.DefaultImageSrc = "/Examples/Common/Images/Vista Icons/Icon1.png" e.PreparedItem.ExpandedImageSrc = "/Examples/Common/Images/Vista Icons/Icon2.png" e.PreparedItem.SelectedImageSrc = "/Examples/Common/Images/Vista Icons/Icon3.png" End Sub
or
-
set the path using an object of type BitmapImage
    private void radTreeView_ItemPrepared(object sender, RadTreeViewItemPreparedEventArgs e)
    {
     BitmapImage defaultImage = new BitmapImage(new Uri("Icon1.png", UriKind.Relative));
     e.PreparedItem.DefaultImageSrc = defaultImage;
     BitmapImage expandedImage = new BitmapImage(new Uri("Icon2.png", UriKind.Relative));
     e.PreparedItem.ExpandedImageSrc = expandedImage;
     BitmapImage selectedImage = new BitmapImage(new Uri("Icon3.png", UriKind.Relative));
     e.PreparedItem.SelectedImageSrc = selectedImage;
    }
Private Sub radTreeView_ItemPrepared(sender As Object, e As RadTreeViewItemPreparedEventArgs) Dim defaultImage As New BitmapImage(New Uri("Icon1.png", UriKind.Relative)) e.PreparedItem.DefaultImageSrc = defaultImage Dim expandedImage As New BitmapImage(New Uri("Icon2.png", UriKind.Relative)) e.PreparedItem.ExpandedImageSrc = expandedImage Dim selectedImage As New BitmapImage(New Uri("Icon3.png", UriKind.Relative)) e.PreparedItem.SelectedImageSrc = selectedImage End Sub
Using Images from the Client Bin Directory or a Relative Directory
In the previous section you found how to use images which are located in the same directory as the .XAP file, more accurately in a directory which is relative to the directory where the .XAP file is placed.
For example, see these cases:
The images are placed in the same directory as the .XAP file. In this case you don't need to specify the ImagesBaseDir. You directly specify the file name of the image in the DefaultImagesSrc, ExpandedImageSrc and SelectedImageSrc properties of the RadTreeViewItem.
The images are placed in a relative directory. In this case you need to specify a relative path in the ImagesBaseDir property. In the previous example the ImagesBaseDir property was set to:
ImagesBaseDir="/Examples/Common/Images/Vista Icons/"
Which means that the "Examples" directory is located in the same directory where the .XAP file is placed and the images are located in the "Vista Icons" directory.
Using Images from the .XAP file
Sometimes your images may be packed in the .XAP file. In this case you have the same options as in the previous section:
If the images are placed in the root of the directory, then you don't need to specify the ImagesBaseDir. You directly specify the file name of the image in the DefaultImagesSrc, ExpandedImageSrc and SelectedImageSrc properties of the RadTreeViewItem.
If the images are placed in a directory, then you should set the ImagesBaseDir with a relative path.