Enable and Disable Items
By using the API of the RadTreeView control you can easily disable or enable a node. You can set the boolean property IsEnabled to each one of the following objects:
- RadTreeView
- RadTreeViewItem
This tutorial will walk you through the common tasks of enabling and disabling treeview item(s) declaratively and programmatically.
Enable and Disable Items Declaratively
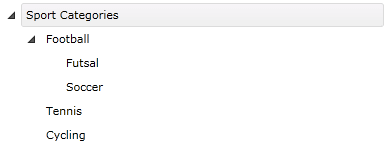
This is a snapshot of a regular RadTreeView with a couple of items.

And here is the XAML declaration:
<telerik:RadTreeView Margin="8" x:Name="radTreeView">
    <telerik:RadTreeViewItem Header="Sport Categories">
        <telerik:RadTreeViewItem Header="Football">
            <telerik:RadTreeViewItem Header="Futsal"/>
            <telerik:RadTreeViewItem Header="Soccer"
                x:Name="radTreeViewItemSoccer"/>
        </telerik:RadTreeViewItem>
        <telerik:RadTreeViewItem Header="Tennis"/>
        <telerik:RadTreeViewItem Header="Cycling"/>
    </telerik:RadTreeViewItem>
</telerik:RadTreeView>
By default all items in the treeview are enabled (their IsEnabled property is set to True). That means you can select, expand, collapse, drag and drop these items. If you want to disable a specific item, just add the following attribute to the treeview item declaration:
<telerik:RadTreeViewItem IsEnabled="False"/>
If you want to disable the whole treeview then add the same attribute to the treeview declaration. On the next snapshot the whole treeview is disabled.

Here is the XAML declaration. Note that if you set the IsEnabled property to False for the RadTreeView object then all treeview items will be disabled.
<telerik:RadTreeView Margin="8" x:Name="radTreeView" IsEnabled="False">
    <telerik:RadTreeViewItem Header="Sport Categories" IsExpanded="True">
        <telerik:RadTreeViewItem Header="Football" IsExpanded="True">
            <telerik:RadTreeViewItem Header="Futsal"/>
            <telerik:RadTreeViewItem Header="Soccer"
                x:Name="radTreeViewItemSoccer"/>
        </telerik:RadTreeViewItem>
        <telerik:RadTreeViewItem Header="Tennis"/>
        <telerik:RadTreeViewItem Header="Cycling"/>
    </telerik:RadTreeViewItem>
</telerik:RadTreeView>
Enable and Disable Items Programmatically
In order to disable a treeview item, you have to set the IsEnabled property of an instance of the RadTreeViewItem class.
private void DisableTreeViewItem()
{
    radTreeViewItemSoccer.IsEnabled = false;
}
Private Sub DisableTreeViewItem()
    radTreeViewItemSoccer.IsEnabled = False
End Sub
If you want to disable the whole treeview then you have to set the IsEnabled property of an instance of the RadTreeView class.
private void DisableTreeView()
{
    radTreeView.IsEnabled = false;
}
Private Sub DisableTreeView()
    radTreeView.IsEnabled = False
End Sub
Consider disabling treeview items in XAML instead of code-behind whenever it's possible. This includes situations when you know what items you need to disable at design time.
Events
Both RadTreeView and RadTreeViewItem offer you IsEnabledChanged event which is raised, when the tree or an item is enabled/disabled.
<telerik:RadTreeViewItem Header="Soccer"
    x:Name="radTreeViewItemSoccer" IsEnabledChanged="radTreeViewItemSoccer_IsEnabledChanged"/>
You can also attach to the IsEnabledChanged event in the code-behind.
this.radTreeViewItemSoccer.IsEnabledChanged += new DependencyPropertyChangedEventHandler( radTreeViewItemSoccer_IsEnabledChanged );
AddHandler Me.radTreeViewItemSoccer.IsEnabledChanged, AddressOf radTreeViewItemSoccer_IsEnabledChanged