Styling the RadialMenuButton
This topic explains how you could customize the look & feel of the RadialMenuButton used for opening and closing the RadialMenu as well as for navigating to the parent items.
Before proceeding, please check Setting a Theme topic.
In order to change the look of the RadialMenuButton you will need to customize the default Style with TargetType set to it from the used RadialMenu theme.
We will go through the following sections:
How to extract the default RadialMenuButtonStyle
The default Style could be extracted from the UI for WPF installation folder. Go into the Themes.Implicit folder and select the theme that you have chosen to use. Drill down to find the Telerik.Windows.Controls.Navigation.xaml file in the directory that corresponds to your theme. From this resource dictionary extract the RadialMenuButtonStyle and copy it into your project. Example 1 shows the expected result:
Example 1: Extracting the default Style
<UserControl.Resources>
    <Style x:Key="RadialMenuButtonStyle" TargetType="telerik:RadialMenuButton">
        <Setter Property="BorderThickness" Value="2"/>
        <Setter Property="BorderBrush" Value="{StaticResource RadialMenuButtonBorderBrush}"/>
        <Setter Property="Background" Value="{StaticResource RadialMenuButtonBackgroundBrush}"/>
        <Setter Property="Foreground" Value="{StaticResource RadialMenuButtonForegroundBrush}"/>
        <Setter Property="MinWidth" Value="0"/>
        <Setter Property="Width" Value="45"/>
        <Setter Property="Height" Value="45"/>
        <Setter Property="VerticalAlignment" Value="Top"/>
        <Setter Property="HorizontalAlignment" Value="Left"/>
        <Setter Property="FontWeight" Value="Normal"/>
        <Setter Property="FontSize" Value="12"/>
        <Setter Property="FocusVisualStyle" Value="{x:Null}"/>
        <Setter Property="ContentTemplate">
            <Setter.Value>
                <DataTemplate>
                    <!--...-->
                </DataTemplate>
            </Setter.Value>
        </Setter>
        <Setter Property="BackContentTemplate">
            <Setter.Value>
                <DataTemplate>
                    <!--...-->
                </DataTemplate>
            </Setter.Value>
        </Setter>
        <Setter Property="Template">
            <Setter.Value>
                <ControlTemplate TargetType="telerikRadialMenu:RadialMenuButton">
                    <!--...-->
                </ControlTemplate>
            </Setter.Value>
        </Setter>
    </Style>
</UserControl.Resources>
How to customize the RadialMenuButton ContentTemplate
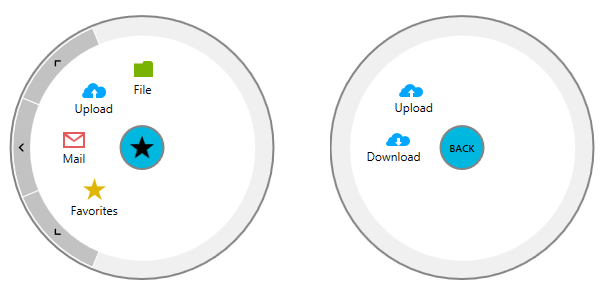
In this section we will change the ContentTemplate as well as BackContentTemplate of the RadialMenuButton.
We will need to create a new Style based on the default RadialMenuButtonStyle only with the changed properties. Example 2 demonstrates the approach.
Example 2: Custom ContentTemplate and BackContentTemplate
<Style TargetType="telerik:RadialMenuButton" BasedOn="{StaticResource RadialMenuButtonStyle}">
    <Setter Property="Background" Value="#FF00B7E0" />
    <Setter Property="ContentTemplate">
        <Setter.Value>
            <DataTemplate>
                <Image Source="28-star.png" Height="24" Width="24" />
            </DataTemplate>
        </Setter.Value>
    </Setter>
    <Setter Property="BackContentTemplate">
        <Setter.Value>
            <DataTemplate>
                <TextBlock Text="BACK" Margin="0 4 0 0" FontFamily="Segoe UI Semibold" FontSize="10"/>
            </DataTemplate>
        </Setter.Value>
    </Setter>
</Style>
Figure 1: Customized RadialMenuButton
