Zooming
The RadMap allows the user to zoom in and zoom out the content of the map.
This can be done via the mouse wheel or through the Zoom Bar control in the Commands Bar panel.
ZoomBar Control
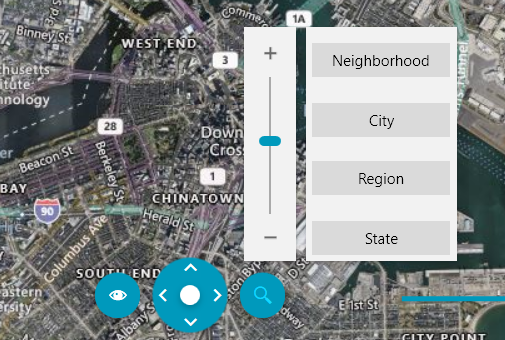
By hovering on the button with an icon representing a magnifier, the user is provided with different options to zoom in and zoom out. The main tool is the zoom slider which allows the user to slide between the maximum and minimum zoom level. Together with the slider there are several zoom presets, which represent different ranges from the slider.
Figure 1: The ZoomBar control
Zoom and ZoomLevel
You can also zoom in and out programmatically by using the Zoom and ZoomLevel properties.
The zoom level determines how much of the world is visible on a map. At low zoom levels, a small set of map tiles covers a large geographical area and vice versa. You can use the ZoomLevel property to set an integer value corresponding to the desired zoom level. If you want more precise zooming, you can set the Zoom property and assign a double value to it.
Example 1: Setting Zoom declaratively
<telerik:RadMap Zoom="8.2" />
ZoomStep
By default, the control will zoom in and out by one level. You can enable smoother zooming by defining a smaller value as the ZoomStep property of the control. This will affect both the zooming initiated by the mouse wheel and the buttons of the zoom slider.
Example 2: Setting ZoomStep
<telerik:RadMap ZoomStep="0.2" />
MinZoomLevel and MaxZoomLevel
Via the MinZoomLevel and MaxZoomLevel you can limit the zoom level between a certain interval.
Example 3: Setting MinZoomLevel and MaxZoomLevel
<telerik:RadMap MinZoomLevel="3" ZoomLevel="6" MaxZoomLevel="13" />
MouseWheelMode
The MouseWheelMode property controls the behavior of the mouse wheel. It has three possible values:
- ZoomToPoint: Zooms to the location over the mouse pointer.
- ZoomToCenter: Zooms to the center of the current visible area.
- None: Disables zooming via the mouse wheel.
Example 4: Setting MouseWheelMode
<telerik:RadMap MouseWheelMode="None" />
Disable Zooming
To disable the user from zooming, set the ZoomBarVisibility property of the RadMap to Collapsed. Additionally you have to disable the default zooming performed on double click or mouse wheel. To do this, set he MouseDoubleClickMode and MouseWheelMode properties to None.
Example 5: Disabling zooming
<telerik:RadMap ZoomBarVisibility="Collapsed"
                MouseWheelMode="None"
                MouseDoubleClickMode="None" />
ZoomBar outside of RadMap
Note that the UI control is represented by the MapZoomBar control. You are able to use it outside the RadMap and place it somewhere around it. In this case you have to either hide the original zoom bar by using the ZoomBarVisibility property of the RadMap or the UseDefaultLayout one.
Setting the UseDefaultLayout property to False will hide all of the UI controls inside the RadMap. To learn more read here.
In order to use the MapZoomBar outside the RadMap you have to also set its MapControl property to the respective RadMap instance. Here is an example:
Example 6: Placing the ZoomBar outside of the RadMap
<Grid>
    <Grid.ColumnDefinitions>
        <ColumnDefinition Width="Auto" />
        <ColumnDefinition Width="*" />
    </Grid.ColumnDefinitions>
    <telerik:MapZoomBar MapControl="{Binding ElementName=map}" />
    <telerik:RadMap Grid.Column="1" ZoomBarVisibility="Collapsed" />
</Grid>
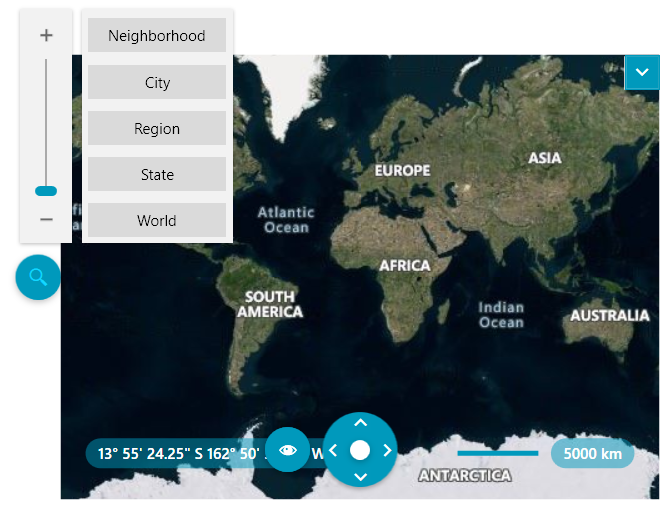
Figure 2: ZoomBar outside of RadMap
Note that if you're using the StyleManager approach for theming the controls, you need to explicitly set the StyleManager.Theme property of the MapZoomBar as it cannot be inferred automatically with this setup.
Hide Presets
You can hide the panel which holds the zoom presets by setting the ZoomBarPresetsVisibility.
Example 7: Placing the ZoomBar outside of the RadMap
<telerik:RadMap ZoomBarPresetsVisibility="Collapsed" />
Change Default Presets
If you want to modify the default preset labels, you can get ahold of the respective commands of the MapZoomBar and change their Text as demonstrated in Example 5.
Example 8: Changing the default preset labels
public MainWindow()
{
    InitializeComponent();
    this.map.InitializeCompleted += map_InitializeCompleted;
}

private void map_InitializeCompleted(object sender, EventArgs e)
{
    this.SetCustomZoomLevelLabel(18, "My Level");
}

private void SetCustomZoomLevelLabel(int zoomLevel, string label)
{
    CommandDescription description = (from cmd in this.map.MapZoomBar.Commands
                                      where (int)cmd.CommandParameter == zoomLevel
                                      select cmd).FirstOrDefault();
    if (description != null)
    {
        RoutedUICommand command = description.Command as RoutedUICommand;
        if (command != null)
        {
            command.Text = label;
        }
    }
}
Public Sub New()
    InitializeComponent()
    AddHandler map.InitializeCompleted, AddressOf map_InitializeCompleted
End Sub

Private Sub map_InitializeCompleted(ByVal sender As Object, ByVal e As EventArgs)
      Me.SetCustomZoomLevelLabel(18, "My Level")
End Sub

Private Sub SetCustomZoomLevelLabel(ByVal zoomLevel As Integer, ByVal label As String)
      Dim description As CommandDescription = (
          From cmd In Me.map.MapZoomBar.Commands
          Where CInt(Fix(cmd.CommandParameter)) = zoomLevel
          Select cmd).FirstOrDefault()
      If description IsNot Nothing Then
            Dim command As RoutedUICommand = TryCast(description.Command, RoutedUICommand)
            If command IsNot Nothing Then
                  command.Text = label
            End If
      End If
End Sub
Figure 2: RadMap with a custom preset label

Register New Presets
You can add your own custom presets by utilizing the RegisterSetZoomLevelCommand method of the MapZoomBar as shown in
Example 9: Registering new presets
this.map.MapZoomBar.RegisterSetZoomLevelCommand(zoomLevel, label, presetDataTemplate, new Uri(imagePath, UriKind.RelativeOrAbsolute));
Me.map.MapZoomBar.RegisterSetZoomLevelCommand(zoomLevel, label, presetDataTemplate, New Uri(imagePath, UriKind.RelativeOrAbsolute))
You can find a working example demonstrating how to achieve this in the "Command and Zoom Customization" demo from our WPF Controls Examples application.
ZoomBarDropDownHeight
To change the height of the dropdown shown when hovering over the zoom bar, you can set the ZoomBarDropDownHeight property.
Example 10: Placing the ZoomBar outside of the RadMap
<telerik:RadMap ZoomBarDropDownHeight="300" />