New to Telerik UI for WPF? Download free 30-day trial

MVVM Usage

This article shows how to create a database using the code-first approach and display data with the help of RadEntityFrameworkDataSource and RadGridView.

Before proceeding with this tutorial, you should follow the "Entity Framework" MSDN articles including the Code First to a New Database one.

Creating the Application and Adding References

In order to get started, you can create a new project and add the EntityFramework NuGet.

Figure 1: EntityFramework NuGet

EntityFramework NuGet

Then you can add the needed Telerik references.

  • Telerik.Windows.Controls
  • Telerik.Windows.Controls.Data
  • Telerik.Windows.Controls.EntityFramework60
  • Telerik.Windows.Controls.GridView
  • Telerik.Windows.Controls.Input
  • Telerik.Windows.Data

Adding the Models and DbContext

We will create two classes, which will serve as our models: Customer and Order, where each customer will have a collection of orders. We will also define a DbContext that will hold the entities.

Example 1: Defining the Models, DbContext and ViewModel

public class Customer 
{ 
    [Key] 
    [DatabaseGenerated(DatabaseGeneratedOption.Identity)] 
    public int CustomerId { get; set; } 
    public string FirstName { get; set; } 
    public string LastName { get; set; } 
    public virtual List<Order> Orders { get; set; } 
} 
 
public class Order 
{ 
    [Key] 
    [DatabaseGenerated(DatabaseGeneratedOption.Identity)] 
    public int Id { get; set; } 
    public DateTime Date { get; set; } 
 
    public int CustomerId { get; set; } 
 
    [ForeignKey("CustomerId")] 
    public virtual Customer Customer { get; set; } 
} 
 
public class MyContext : DbContext 
{ 
    public MyContext(string connString) : base(connString) 
    { 
    } 
 
    public DbSet<Customer> Customers { get; set; } 
    public DbSet<Order> Orders { get; set; } 
} 

Populating the Database

We will create a viewmodel that will populate our database and also hold an instance of a QueryableEntityCollectionView that will be the bridge between the RadGridView and our database. We will also introduce a command that will execute the SaveChanges method of the DbContext on a button's click.

Example 2: Defining the ViewModel

public class ViewModel : ViewModelBase 
{ 
    private QueryableEntityCollectionView<Customer> entityCollectionView; 
 
    private MyContext context; 
 
    public ViewModel() 
    { 
        // You might need to update the connection string to suit the setup on your machine  
        this.context = new MyContext(@"Data Source=.\SQLEXPRESS;Initial Catalog=CustomerDB;Integrated security=true"); 
        this.SaveCommand = new DelegateCommand(Save); 
 
        this.AddData(context); 
        this.EntityCollectionView = new QueryableEntityCollectionView<Customer>(((IObjectContextAdapter)context).ObjectContext, "Customers", new Collection<string>() { "Orders" }); 
    } 
 
    public DelegateCommand SaveCommand { get; } 
 
    public QueryableEntityCollectionView<Customer> EntityCollectionView 
    { 
        get { return entityCollectionView; } 
        set 
        { 
            this.entityCollectionView = value; 
            this.OnPropertyChanged(() => this.EntityCollectionView); 
        } 
    } 
 
    private void AddData(MyContext context) 
    { 
        for (int i = 1; i <= 25; i++) 
        { 
            var customer = new Customer() { FirstName = "First Name " + i, LastName = "Last Name" + i }; 
 
            for (int j = 1; j <= 10; j++) 
            { 
                var order = new Order() { CustomerId = i, Customer = customer, Date = DateTime.Today.AddDays(-j) }; 
                context.Orders.Add(order); 
            } 
            context.Customers.Add(customer); 
        } 
 
        context.SaveChanges(); 
    } 
 
    public void Save(object obj) 
    { 
        this.context.SaveChanges(); 
    } 
} 

Displaying the Data

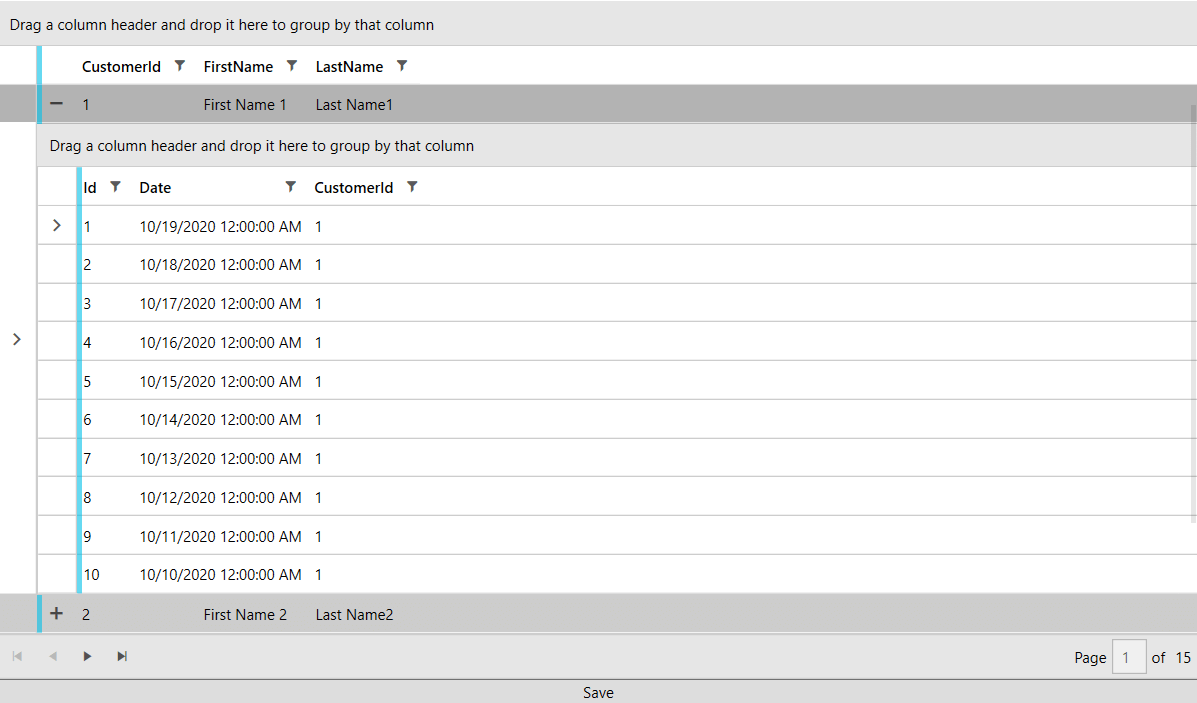
All that is left is to declare our XAML and wire up the viewmodel. We will display the data in a RadGridView with a Row Details Template and use a RadDataPager to add paging functionality.

Example 3: Seting up the XAML

 <Grid> 
    <Grid.DataContext> 
        <local:ViewModel /> 
    </Grid.DataContext> 
    <Grid.RowDefinitions> 
        <RowDefinition /> 
        <RowDefinition Height="Auto"/> 
        <RowDefinition Height="Auto"/> 
    </Grid.RowDefinitions> 
    <telerik:RadGridView GroupRenderMode="Flat" ItemsSource="{Binding PagedSource, ElementName=pager}" AutoGenerateColumns="False"> 
        <telerik:RadGridView.Columns> 
            <telerik:GridViewToggleRowDetailsColumn /> 
            <telerik:GridViewDataColumn DataMemberBinding="{Binding CustomerId}" /> 
            <telerik:GridViewDataColumn DataMemberBinding="{Binding FirstName}" /> 
            <telerik:GridViewDataColumn DataMemberBinding="{Binding LastName}" /> 
        </telerik:RadGridView.Columns> 
        <telerik:RadGridView.RowDetailsTemplate> 
            <DataTemplate> 
                <telerik:RadGridView GroupRenderMode="Flat"  ItemsSource="{Binding Orders}" AutoGenerateColumns="False"> 
                    <telerik:RadGridView.Columns> 
                        <telerik:GridViewDataColumn DataMemberBinding="{Binding Id}" /> 
                        <telerik:GridViewDataColumn DataMemberBinding="{Binding Date}" /> 
                        <telerik:GridViewDataColumn DataMemberBinding="{Binding CustomerId}" /> 
                    </telerik:RadGridView.Columns> 
                </telerik:RadGridView> 
            </DataTemplate> 
        </telerik:RadGridView.RowDetailsTemplate> 
    </telerik:RadGridView> 
    <telerik:RadDataPager x:Name="pager" Source="{Binding EntityCollectionView}" PageSize="5"  Grid.Row="1" /> 
    <Button Content="Save" Grid.Row="2"> 
        <telerik:EventToCommandBehavior.EventBindings> 
            <telerik:EventBinding EventName="Click" Command="{Binding SaveCommand}" /> 
        </telerik:EventToCommandBehavior.EventBindings> 
    </Button> 
</Grid> 

Figure 2: Result from running the example in the Fluent theme

RadGridView and RadDataPager in the Fluent theme

See also

In this article