Getting Started with WPF BulletGraph
This tutorial will walk you through the creation of a RadBulletGraph.
Adding Telerik Assemblies Using NuGet
To use RadBulletGraph when working with NuGet packages, install the Telerik.Windows.Controls.DataVisualization.for.Wpf.Xaml package. The package name may vary slightly based on the Telerik dlls set - Xaml or NoXaml
Read more about NuGet installation in the Installing UI for WPF from NuGet Package article.
With the 2025 Q1 release, the Telerik UI for WPF has a new licensing mechanism. You can learn more about it here.
Adding Assembly References Manually
If you are not using NuGet packages, you can add a reference to the following assemblies:
- Telerik.Licensing.Runtime
- Telerik.Windows.Controls
- Telerik.Windows.Controls.DataVisualization
- Telerik.Windows.Data
You can find the required assemblies for each control from the suite in the Controls Dependencies help article.
BulletGraph Types
The RadBulletGraph suite provides two controls - one horizontally arranged and one vertically.
RadHorizontalBulletGraph
RadVerticalBulletGraph
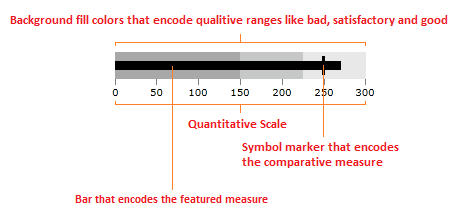
Visual Structure
The following image describes the main elements of the RadBulletGraph control.
Figure 1: BulletGraph visual elements
Defining the RadBulletGraph
The following examples show how to define a simple horizontal and vertical bullet graphs.
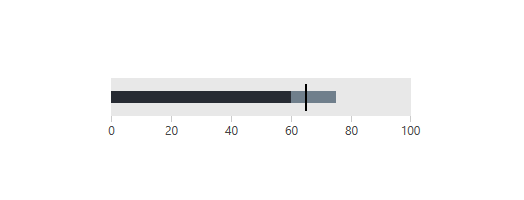
Example 1: Defining horizontal bullet graph control
<telerik:RadHorizontalBulletGraph FeaturedMeasure="60"
                                  ComparativeMeasure="65"
                                  ProjectedValue="75"
                                  Maximum="100">
    <telerik:RadHorizontalBulletGraph.QualitativeRanges>
        <telerik:QualitativeRange Brush="#A8A8A8" Value="150" />
        <telerik:QualitativeRange Brush="#C6C8C8" Value="225" />
        <telerik:QualitativeRange Brush="#E8E8E8" />
    </telerik:RadHorizontalBulletGraph.QualitativeRanges>
</telerik:RadHorizontalBulletGraph>
Figure 2: RadHorizontalBulletGraph
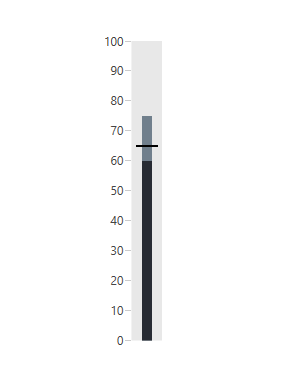
Example 2: Defining vertical bullet graph control
<telerik:RadVerticalBulletGraph FeaturedMeasure="60"
                                ComparativeMeasure="65"
                                ProjectedValue="75"
                                Maximum="100">
    <telerik:RadVerticalBulletGraph.QualitativeRanges>
        <telerik:QualitativeRange Brush="#A8A8A8" Value="150" />
        <telerik:QualitativeRange Brush="#C6C8C8" Value="225" />
        <telerik:QualitativeRange Brush="#E8E8E8" />
    </telerik:RadVerticalBulletGraph.QualitativeRanges>
</telerik:RadVerticalBulletGraph>
Figure 3: RadVerticalBulletGraph
Telerik UI for WPF Learning Resources
- Telerik UI for WPF BulletGraph Component
- Getting Started with Telerik UI for WPF Components
- Telerik UI for WPF Installation
- Telerik UI for WPF and WinForms Integration
- Telerik UI for WPF Visual Studio Templates
- Setting a Theme with Telerik UI for WPF
- Telerik UI for WPF Virtual Classroom (Training Courses for Registered Users)
- Telerik UI for WPF License Agreement