Creating custom rows
RadGridView provides a variety of visual cells per row with different functionality and purpose. However, in some cases you may need to display custom elements, not a single cell per column. This article demonstrates a sample approach how to create a custom row element.
Custom new row
Consider the RadGridView is populated with data form Northwind.Products table.
public static object DataSource;
private void CreateCustomNewRow_Load(object sender, EventArgs e)
{
    this.productsTableAdapter.Fill(this.nwindDataSet.Products);
    DataSource = this.nwindDataSet.Products.Take(20);

    this.radGridView1.TableElement.ViewInfo.TableAddNewRow.Height = 250;
    this.radGridView1.DataSource = this.nwindDataSet.Products;
    this.radGridView1.AutoSizeColumnsMode = Telerik.WinControls.UI.GridViewAutoSizeColumnsMode.Fill;
}
Public Shared DataSource As Object
Private Sub CreateCustomNewRow_Load(sender As Object, e As EventArgs) Handles MyBase.Load
    Me.ProductsTableAdapter.Fill(Me.NwindDataSet.Products)
    DataSource = Me.NwindDataSet.Products.Take(20)
    Me.RadGridView1.TableElement.ViewInfo.TableAddNewRow.Height = 250
    Me.RadGridView1.DataSource = Me.NwindDataSet.Products
    Me.RadGridView1.AutoSizeColumnsMode = Telerik.WinControls.UI.GridViewAutoSizeColumnsMode.Fill
End Sub
In order to enlarge the new row's height, you can set the TableElement.ViewInfo.TableAddNewRow. Height property.
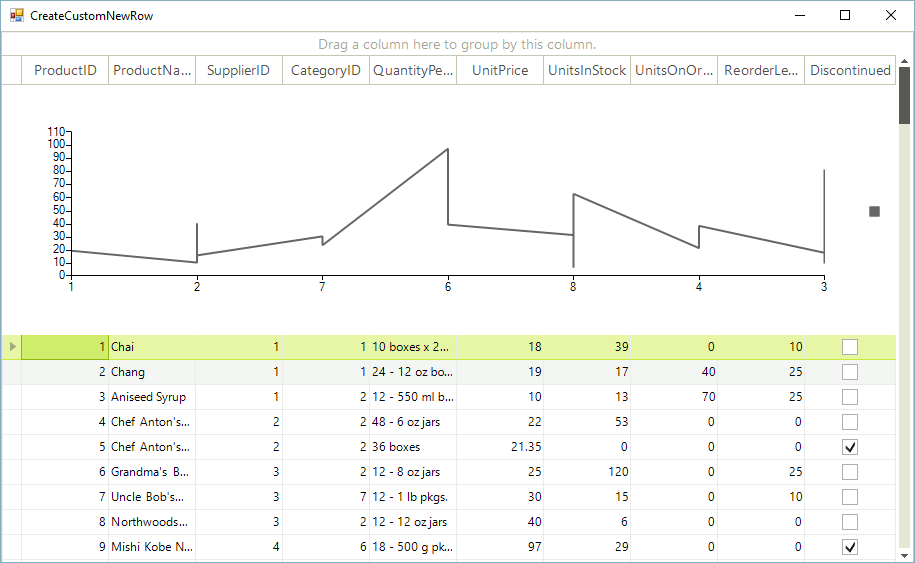
On the new row we will display a RadChartViewElement visualizing the Products data. For this purpose we should follow the steps below:
You can replace the RadChartViewElement with any RadElement or a set of elements.
Figure 1: The new row is replaced with the custom one

1. Create a descendant of the GridRowElement and override its CreateChildElements where you should add a single GridCellElement that contains the chart. The IsCompatible method determines for which GridViewRowInfo the custom row element is applicable:
public class CustomGridRowElement : GridRowElement
{
    private GridCellElement cellElement;
    private RadChartElement radChartElement;

    public CustomGridRowElement()
    {
    }

    protected override void CreateChildElements()
    {
        base.CreateChildElements();
        this.cellElement = new GridCellElement(null, this);
        this.cellElement.StretchHorizontally = true;
        this.cellElement.StretchVertically = true;
        this.Children.Add(cellElement);

        this.radChartElement = new RadChartElement();

        LineSeries series = new LineSeries();

        this.radChartElement.View.ShowSmartLabels = true;
        this.radChartElement.ShowLegend = true;
        this.radChartElement.View.Series.Add(series);
        this.cellElement.Children.Add(this.radChartElement);
        this.cellElement.ClipDrawing = true;

        series.CategoryMember = "CategoryID";
        series.ValueMember = "UnitPrice";
        series.DataSource = DataSource;
    }

    public override bool IsCompatible(GridViewRowInfo data, object context)
    {
        return data is CustomGridViewRowInfo;
    }
}
Public Class CustomGridRowElement
    Inherits GridRowElement
    Private cellElement As GridCellElement
    Private radChartElement As RadChartElement
    Public Sub New()
    End Sub
    Protected Overrides Sub CreateChildElements()
        MyBase.CreateChildElements()
        Me.cellElement = New GridCellElement(Nothing, Me)
        Me.cellElement.StretchHorizontally = True
        Me.cellElement.StretchVertically = True
        Me.Children.Add(cellElement)
        Me.radChartElement = New RadChartElement()
        Dim series As New LineSeries()
        Me.radChartElement.View.ShowSmartLabels = True
        Me.radChartElement.ShowLegend = True
        Me.radChartElement.View.Series.Add(series)
        Me.cellElement.Children.Add(Me.radChartElement)
        Me.cellElement.ClipDrawing = True
        series.CategoryMember = "CategoryID"
        series.ValueMember = "UnitPrice"
        series.DataSource = DataSource
    End Sub
    Public Overrides Function IsCompatible(data As GridViewRowInfo, context As Object) As Boolean
        Return TypeOf data Is CustomGridViewRowInfo
    End Function
End Class
2. Create a descendant of the GridViewNewRowInfo and specify that it uses the row element from the previous step by overriding its RowElementType property.
public class CustomGridViewRowInfo : GridViewNewRowInfo
{
    public CustomGridViewRowInfo(GridViewInfo viewInfo) : base(viewInfo)
    {
    }

    public override Type RowElementType
    {
        get
        {
            return typeof(CustomGridRowElement);
        }
    }
}
Public Class CustomGridViewRowInfo
    Inherits GridViewNewRowInfo
    Public Sub New(viewInfo As GridViewInfo)
        MyBase.New(viewInfo)
    End Sub
    Public Overrides ReadOnly Property RowElementType() As Type
        Get
            Return GetType(CustomGridRowElement)
        End Get
    End Property
End Class
3. The last step is to subscribe to the CreateRowInfo event and replace the default GridViewNewRowInfo with your custom one.
You should subscribe to the CreateRowInfo event at design time in order to ensure that the event will be fired when a data row have to be created.
private void radGridView1_CreateRowInfo(object sender, GridViewCreateRowInfoEventArgs e)
{
    if (e.RowInfo is GridViewNewRowInfo)
    {
        e.RowInfo = new CustomGridViewRowInfo(e.ViewInfo);
    }
}
Private Sub radGridView1_CreateRowInfo(sender As Object, e As GridViewCreateRowInfoEventArgs) Handles RadGridView1.CreateRowInfo
    If TypeOf e.RowInfo Is GridViewNewRowInfo Then
        e.RowInfo = New CustomGridViewRowInfo(e.ViewInfo)
    End If
End Sub