Getting Started with WinForms StatusStrip
This article shows how you can start using RadStatusStrip.
Adding Telerik Assemblies Using NuGet
To use RadStatusStrip when working with NuGet packages, install the Telerik.UI.for.WinForms.AllControls package. The package target framework version may vary.
Read more about NuGet installation in the Install using NuGet Packages article.
With the 2025 Q1 release, the Telerik UI for WinForms has a new licensing mechanism. You can learn more about it here.
Adding Assembly References Manually
When dragging and dropping a control from the Visual Studio (VS) Toolbox onto the Form Designer, VS automatically adds the necessary assemblies. However, if you're adding the control programmatically, you'll need to manually reference the following assemblies:
- Telerik.Licensing.Runtime
- Telerik.WinControls
- Telerik.WinControls.UI
- TelerikCommon
The Telerik UI for WinForms assemblies can be install by using one of the available installation approaches.
Defining the RadStatusStrip
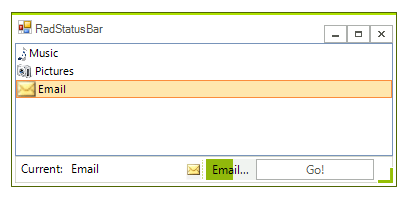
The following tutorial demonstrates configuring RadStatusStrip at design-time and programmatic access of individual status bar items at run-time. The status bar contains label, separator, buttons and progress bar elements. One of the button elements increments the RadListControl selected index. The label and one of the button elements reflect the current selection in the RadListControl while the progress bar mimics a process against the upcoming item.

1. Add a RadStatusStrip, and a RadListControl to a form.
2. Take three images of your choice and set them as project resources.
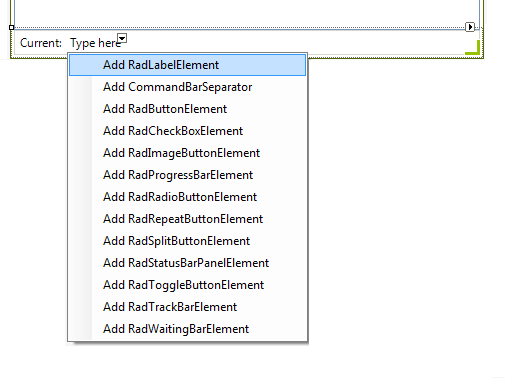
3. In the designer click the RadStatusStrip label Type here and enter Current:. This step is one way to create a RadLabelElement in RadStatusStrip and populate it.
4. Using the downward arrow of the RadStatusStrip add a RadLabelElement. In the Properties Window set the Name property to be lblStatus and the Spring property to true.
Setting the Spring property to true will stretch horizontally the respective element. Thus, this element will occupy the free space and the rest of the elements will be positioned on the right most side when resizing the RadStatusStrip. You can also use SetSpring method of RadStatusStrip and pass the element that needs to stretch horizontally.

5. In the Type here element click the downward arrow. Add the following elements:
RadImageButtonElement
CommandBarSeparator
RadProgressBarElement
RadButtonElement
6. Use the Properties window to set the following properties to the elements above:
RadImageButtonElement: Name = "imgStatus", DisplayStyle = Image.
CommandBarSeparator. There are no properties to set for the separator element.
RadProgressBarElement: Name = "pbStatus"
RadButtonElement: Name = "btnStatus", Text = "Go!", Spring = true.
7. Double-click "btnStatus" to create a Click event handler. Add the code below to replace the event handler. This code block bumps the list control selected index until the end of the list is reached, and then moves the index back to the first item in the list.
private void btnStatus_Click(object sender, EventArgs e)
{
    if (radListControl1.SelectedIndex >= radListControl1.Items.Count - 1)
        radListControl1.SelectedIndex = 0;
    else
        radListControl1.SelectedIndex += 1;
}
Private Sub btnStatus_Click(ByVal sender As System.Object, ByVal e As System.EventArgs) Handles btnStatus.Click
    If RadListControl1.SelectedIndex >= RadListControl1.Items.Count - 1 Then
        RadListControl1.SelectedIndex = 0
    Else
        RadListControl1.SelectedIndex += 1
    End If
End Sub
8. In the Properties Window for the RadListControl:
Set the Dock property to Fill.
Select the Items property ellipses. This will open the RadItem Collection Editor.
Click the Add button. Set the RadListDataItem.Text property to "Music", TextImageRelation to ImageBeforeText and Image to one of the images previously set as project resources.
Click the Add button. Set the RadListDataItem.Text property to "Pictures", TextImageRelation to ImageBeforeText and Image to one of the images previously set as project resources.
Click the Add button. Set the RadListDataItem.Text property to "Email", TextImageRelation to ImageBeforeText and Image to one of the images previously set as project resources.
Click OK to close the RadItem Collection Editor.
9. In the Properties Window for the RadListControl select the Events button.
10. Locate and double-click the RadListControl.SelectedIndexChanged event to create an event handler.
11. Paste the following code to the SelectedIndexChanged event handler. The code retrieves the selected item and assigns the text and image for the selected item to the status bar label and image elements. Then the progress bar element mimics an operation against the newly selected item.
void radListControl1_SelectedIndexChanged(object sender, Telerik.WinControls.UI.Data.PositionChangedEventArgs e)
{
    RadListElement listControl = (sender as RadListElement);
    RadListDataItem item = listControl.SelectedItem;
    lblStatus.Text = item.Text;
    imgStatus.Image = item.Image;
    pbStatus.Visibility = Telerik.WinControls.ElementVisibility.Visible;
    for (int i = 0; i < 100; i++)
    {
        pbStatus.Value1 = i;
        pbStatus.Text = item.Text + "...";
        radStatusStrip1.Refresh();
        Thread.Sleep(5);
    }
    pbStatus.Visibility = Telerik.WinControls.ElementVisibility.Collapsed;
}
Private Sub RadListControl1_SelectedIndexChanged(ByVal sender As System.Object, ByVal e As Telerik.WinControls.UI.Data.PositionChangedEventArgs) Handles RadListControl1.SelectedIndexChanged
    Dim listControl As RadListElement = TryCast(sender, RadListElement)
    Dim item As RadListDataItem = listControl.SelectedItem
    lblStatus.Text = item.Text
    imgStatus.Image = item.Image
    pbStatus.Visibility = Telerik.WinControls.ElementVisibility.Visible
    Dim i As Integer = 0
    While i < 100
        pbStatus.Value1 = i
        pbStatus.Text = item.Text + "..."
        Thread.Sleep(5)
        System.Math.Max(System.Threading.Interlocked.Increment(i), i - 1)
    End While
    pbStatus.Visibility = Telerik.WinControls.ElementVisibility.Hidden
End Sub
12. Add Telerik.WinControls.UI and System.Threading references to the "using" (C#) or Imports (VB) section of the code.
using Telerik.WinControls.UI;
using System.Threading;
Imports Telerik.WinControls.UI
Imports System.Threading
13. Press F5 to run the application. Press the "Go!" button to see the status bar react to list control changes.
See Also
Telerik UI for WinForms Learning Resources
- Telerik UI for WinForms StatusStrip Component
- Getting Started with Telerik UI for WinForms Components
- Telerik UI for WinForms Setup
- Telerik UI for WinForms Application Modernization
- Telerik UI for WinForms Visual Studio Templates
- Deploy Telerik UI for WinForms Applications
- Telerik UI for WinForms Virtual Classroom(Training Courses for Registered Users)
- Telerik UI for WinForms License Agreement)