Creating Dashed Line Series by Using the .NET MAUI Chart
Environment
| Product | Progress® Telerik® UI for .NET MAUI Chart |
| Product Version | 4.0.0 |
Description
How can I create a dashed line chart by using the Line Series of the Telerik UI for .NET MAUI Chart?
Solution
For the purposes of this guide, the example uses the following prerequisites:
- Native iOS, Android, and WinUI Chart controls.
- The stroke approach to draw the lines of the Chart series.
- The
DashedArraywhich is part of the Stroke tool.
To achieve the desired scenario:
1. Define the Business Model and the ViewModel.
public class NumericalData
{
    public double XData { get; set; }
    public double YData { get; set; }
}

internal class ViewModel : NotifyPropertyChangedBase
{
    public ObservableCollection<NumericalData> Data1 { get; set; }
    public ObservableCollection<NumericalData> Data2 { get; set; }

    public ViewModel()
    {
        this.Data1 = GetNumericData1();
        this.Data2 = GetNumericData2();
    }

    public static ObservableCollection<NumericalData> GetNumericData1()
    {
        var data = new ObservableCollection<NumericalData>
        {
            new NumericalData { XData = 2, YData = 13 },
            new NumericalData { XData = 19, YData = 31 },
            new NumericalData { XData = 22, YData = 33 },
            new NumericalData { XData = 28, YData = 35 },
            new NumericalData { XData = 33, YData = 46 },
            new NumericalData { XData = 38, YData = 34 },
            new NumericalData { XData = 49, YData = 66 },
            new NumericalData { XData = 55, YData = 24 },
            new NumericalData { XData = 62, YData = 41 },
        };
        return data;
    }
    public static ObservableCollection<NumericalData> GetNumericData2()
    {
        var data = new ObservableCollection<NumericalData>
        {
            new NumericalData { XData = 19, YData = 17 },
            new NumericalData { XData = 22, YData = 19 },
            new NumericalData { XData = 28, YData = 21 },
            new NumericalData { XData = 33, YData = 35 },
            new NumericalData { XData = 38, YData = 43 },
            new NumericalData { XData = 49, YData = 15 },
            new NumericalData { XData = 55, YData = 21 },
            new NumericalData { XData = 62, YData = 47 },
        };
        return data;
    }
}
2. Now, define the Chart in XAML:
<telerik:RadCartesianChart x:Name="chart" HeightRequest="300">
            <telerik:RadCartesianChart.BindingContext>
                <local:ViewModel />
            </telerik:RadCartesianChart.BindingContext>
            <telerik:RadCartesianChart.HorizontalAxis>
                <telerik:CategoricalAxis />
            </telerik:RadCartesianChart.HorizontalAxis>
            <telerik:RadCartesianChart.VerticalAxis>
                <telerik:NumericalAxis />
            </telerik:RadCartesianChart.VerticalAxis>
            <telerik:RadCartesianChart.Series>
                <telerik:LineSeries CategoryBinding="XData"
                                    ValueBinding="YData"
                                    DisplayName=" Data1"
                                    ItemsSource="{Binding Data1}" />
                <telerik:LineSeries CategoryBinding="XData"
                                    ValueBinding="YData"
                                    DisplayName=" Data2"
                                    ItemsSource="{Binding Data2}" />
            </telerik:RadCartesianChart.Series>
        </telerik:RadCartesianChart>
        <telerik:RadLegend LegendProvider="{x:Reference Name=chart}"
                           LegendItemFontColor="DarkGreen"
                           Orientation="Horizontal"
                           HeightRequest="200"/>
3. Add the following code to your project to achieve dashed series:
public partial class MainPage : ContentPage
{
    public MainPage()
    {
        InitializeComponent();

        this.chart.HandlerChanged += this.Chart_HandlerChanged;
    }

    private void Chart_HandlerChanged(object sender, EventArgs e)
    {
        this.UpdateChart();
    }

    private void UpdateChart()
    {
        var platformView = this.chart.Handler.PlatformView;
#if ANDROID
        var platformChart = (Com.Telerik.Widget.Chart.Visualization.CartesianChart.RadCartesianChartView)platformView;
        var platformSeries = (Com.Telerik.Widget.Chart.Visualization.CartesianChart.Series.Categorical.LineSeries)platformChart.Series.Get(1);
        platformSeries.SetDashArray(new float[2] { 10, 20 });
#elif IOS || MACCATALYST
        var platformChart = (Telerik.Maui.Controls.Compatibility.ChartRenderer.iOS.TKExtendedChart)platformView;
        var platformSeries = (TelerikUI.TKChartLineSeries)platformChart.Series[1];
        var stroke = new TelerikUI.TKStroke(UIKit.UIColor.Blue);
        stroke.DashPattern = new Foundation.NSNumber[] { new Foundation.NSNumber(10), new Foundation.NSNumber(20) };
        platformSeries.Style.Stroke = stroke;
#elif WINDOWS
        var platformChart = (Telerik.UI.Xaml.Controls.Chart.RadCartesianChart)platformView;
        var platformSeries = (Telerik.UI.Xaml.Controls.Chart.LineSeries)platformChart.Series[1];
        platformSeries.StrokeDashArray = new Microsoft.UI.Xaml.Media.DoubleCollection { 10, 20 };
#endif
    }
}
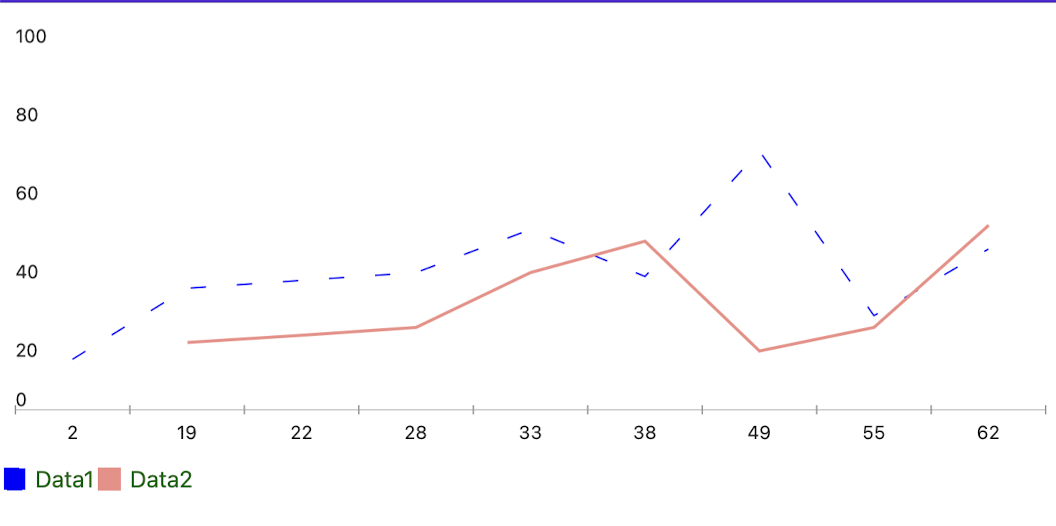
The following image demonstrates the end result on MacCatalyst: